Showing posts with label felting. Show all posts

Tuesday, 1 December 2015

Crocheted Felted Robin

A wee while ago I picked up some 100% Yorkshire wool, part of the W.I range at Hobbycraft.  The idea was to make one of my Robin Baubles that I designed last year, but instead of a Styrofoam ball in the middle, it would just be stuffing, then I would wash and felt the wool to make a super-cute robin.


So, Robin made, I asked Hubster to "chuck it in the wash" with his darks.  He did.   A few hours later he came sheepishly up the stairs with my felted Robin and said "I am so sorry, I think I ruined it".

I could have made him suffer I suppose, but it did exactly what I wanted it to do, it felted and shrunk perfectly.


With the addition of eyes and a beak, he was complete, and very cute, even if I do say so myself.

If you would like the pattern and instructions, you can find them HERE :

Sunday, 27 October 2013

Wet Felt Picture Making

We are lucky enough in Carlisle Hobbycraft to have some wonderful visiting artisans in who teach different craft classes.  On Friday, Julie Harrison came to do a wet felting class, of course I had to go along and have a play - I had not attempted wet felting before so was interested in how to do it.

She landed carrying an enormous amount of bits and bobs.


After a brief chat about the craft, it was playtime....


This is my attempt in progress...

First of all we got a piece of voile, folded in in half and layered some un-dyed roving wool onto it.


Next some colour - this is sky.


And some grass..... (and a brew)


Then some detail, can you tell what it is yet?  (It's a tree!!)


Leaves and apples  :)


Now it was time to pull the voile over the top and sandwich it all in.


Add some soapy water and push it through the voile to soak into the wool.


After a good vigorous rub, both front and back, I opened it up to find this  :)


Now to felt it down a bit.  We wrapped it round a foam roller, then into a towel and gave it a good few rolls back and forward on the bench  (250 rolls to be precise.)

Voila !  No idea what I am going to do with it, but it was fun to make.... and it helped trim a few millimetres off my bingo wings!


Here is my Mum, Vera, making hers.


Squeezing that water through the wool.


Pretty flowers.


Julie will be running another class soon, keep checking out the Hobbycraft, Carlisle website to find out when.

Friday, 28 June 2013

Needlefelted Flopsy Bunnies

On Thursday my friend, Lezley, and I took a course at Higham Hall with Joss Wrigg.

The course was to make Flopsy style bunnies from sheeps fleece using the Needlefelting method.

It was held in conjunction with Woolfest that happens once a year - more on that in a later post.

You may remember last year I took a Needlefelting course with Sue Allan from Sewsister, we made Fantasy Birds, which was loads of fun.

This time we were using fleece, straight from a sheep, a native Lake District Herdwick sheep no less, and although it had been cleaned and washed there was still the odd bit of 'natural history' hidden amongst the fluff  :)

Using a batting we formed a basic shape as a starting point.  

No rude comments about the shape now!

When we had a basic shape we added Herdwick Sheep fleece, trying to arrange the shades of the fleece to be where limbs and bulges might be.  Not being much of an artist I found it difficult to place limbs at first, but with the help of Joss's own big bunny (below) I worked it out.....kinda!
Isn't he a beauty?


I decided on a moon-gazing hare, so pointed his little head to the stars. (No, it's NOT a duck!)

Adding some darker fleece as detail for the muzzle and eyes made him (I decided it would be a him) come to life.

Looking up at ya!

And gazing at that big fat moon (or even the fluorescent strip light in the studio!)
He's called Colin  :)


Thursday, 17 January 2013

A little bit of this, a little bit of that.

A quick update on the crochet vest I am making for a display at work.  I have started shaping the armholes on the front now, and in the next couple of rows I will begin to shape the neckline.  Then it's just a case of making it up and crocheting the edges.


In other news, we got a new product in Hobbycraft, a felting mold.  There are a few different styles, but I picked this one - a rose.  You needle felt a few of each shape, then connect them all together to make a 3D flower.


Of course once I had gotten it home and unpacked, and dug out all of my felting wool, could I find my needles?  Of course not.  There are in a little plastic tube somewhere with a red cap, so if anyone should see them please let me know.

The next day in work I planned to pick up a pack of felting needles, now usually I just use a single needle and this is what I planned to buy, but instead I thought I would treat myself to a pen style one with 3 needles in it.


I pulled out some wool, padded it into the mold and started stabbing.  4 stabs later and I missed the hole, stabbed the mold and broke all the needles!  Dumbo.  I got a cute heart out of it though :)


Now I need to buy some more needles  :/


Another project currently under construction is my wavy blanket.  I have had to order some wool, the four colours I picked.......


.....needed something else alongside, lilac I thought.  I had to order it online though as we don't have that colour in our store.  Waiting for it to arrive now so I can do the next row as I think I need that colour in next.

In the meantime I added the fill in row at the top, this is a mixture of varying size stitched, normally done at the end once the blanket has been finished, but I was bored  :)


Right, back to it  ;)

Saturday, 1 September 2012

Needle Felted Bag

Another little project made for Carlisle's new Hobbycraft store.

The brief was very basic - decorate this bag.


What to do?  I took a look in my vast craft cupboards and found some felting wool,  Hobbycraft sells a similar wool, and the tools to do this project, so that was perfect.

Tools needed then are something to felt onto, a foam board underneath to stab into (I use a garden kneeling pad, I find they work well and only cost £1.00 from Morrisons)  A felting needle (you can also buy a tool to hold a few needles, which would have been easier for this project). and felting wool.


I started by drawing a heart - badly, but never mind, it would be soon covered with wool.


You take a piece of wool, stretch it out a little, then simple STAB, STAB, STAB into the bag (with the foam pad inside so it doesn't go right through).


I carried on until the heart was done, then I added another row (just coz I could)


Once done it looked a little bare in the centre, so I took some scraps of wool, rolled them into a ball and stabbed it into the middle of the heart.


Sunday, 24 June 2012

Needle Felted Birds

I thought I would treat my Mum, Vera, to a class at Higham Hall.

Leafing through the booklet I spotted a Needle Felted Bird class, in conjunction with Woolfest, just a day class which was perfect as Mum doesn't like to leave Dad on his own too long. (She worries)

So at 8.00am Thursday morning we set of for Higham.

The class was being run by Sue Allan from Sewsister.  

Neither of us have ever done felting of any form before, so we were total newbies.  We walked into the room to find a couple of examples, and got immediately excited.  Not sure what we were expecting, but it wasn't quite this!


We started with two pieces of hand-made felt which we cut into a "segment" shape, sewed it around, (leaving a gap) then stuffed.


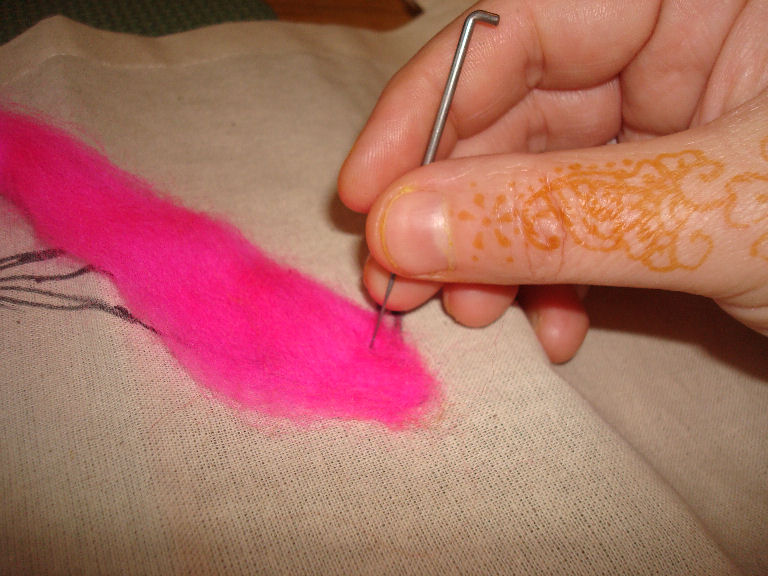
We then took lumps of "wool tops" and needle punched them into the felt in whatever pattern we chose.  I picked a load of wool tops in a pinky purple colour-way, and punched them in in stripes, adding squares of silver organza ribbon for patches of sparkle, and a twisted strip of blue for a curly wing effect.


Mum decided she was making a cockerel, so chose reds, oranges and browns for her colour-scheme.


Once the bodies were complete, we then went on to make felt beaks, and wired legs before the final assembly.


I have named mine "Burd", the Cockerel is called "Dennis".


We had a fantastic day, the tutor was wonderful and we were both chuffed to bits with our fantasy birds.
One classmate made this magnificent creature.


And a pic of everyones birds together.  What a colourful display.


I wasn't overly happy with the eyes on Burd though, I had taken a selection of beads and sequins with me but none of them seemed to fit.  So when I got home I took off the googly eyes he had and added a button with a bead on top, he seems to like them  :)


Burd now has pride of place on top of the TV.