Showing posts with label Embroidery. Show all posts

Wednesday, 14 April 2021

Mini embroidered cushions


Every craft space needs some cushions.  Cushions equal comfort. If people are comfortable and cosy then they will relax and craft easier. 

So, it was time to make some mini cushions for my mini shed.

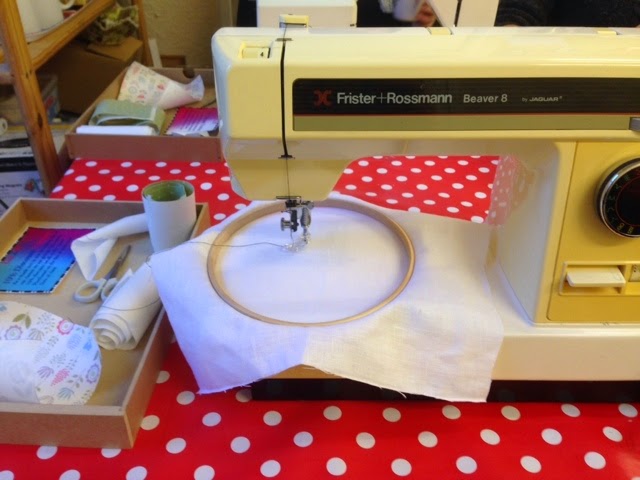
I started by taking some calico fabric and hand-drawing some shapes for flowers and leaves. When I say ‘shapes’, it is a lot easier than that, simply a couple of circles and a kind of leafy shape effort.  Luckily, for me, you don’t need to be an artist to do this bit  😊


Once the rough outlines were drawn, (using a heat sensitive pen that would disappear when ironed) I started to fill in the shapes with thread.


Then I ironed away all the ink marks to be left with a cute little flower image.

Then I had to cut out some backs for the cushions  - I measured these to the scale of 1:6 that I am using.


… and sewed them together using the sewing machine, before stuffing them and hand sewing them closed.


Two nice little plump embroidered cushions.   These took around an hour and a half each to make, so time spent on this project so far is now 48 hours.


Friday, 5 February 2021

Some tiny little Cross-Stitches.


I am starting to tick of some of the items I had on my list to pop into my mini shed.


  • ·       To design and build a mini shed – about 2’ cubed with a removable roof. To sit on a piece of wood for a garden. 
  • ·       Hinged Door with sign to let people know what is happening within The Shed.
  • ·       Crochet and knitted blankets (yarn crafts)
  • ·       Carpet for the floor (rag rug)
  • ·       Wall decorations (cross stitch and quilted panel)


The next one on the list was to make some wall decorations. 

I found some really small embroidery frames in my ‘oddments’ box which I thought would be perfect to make little wall hangings for the mini shed.

Online I found a free chart to do letters which would be the correct size to fit into the frames – I had some Aida (cross-stitch fabric) which was 14 count.  This means there are 14 holes to the inch, so I knew I had about 10 holes height wise to use as the stitching part.

I got to work, using the letters C A L and M – to spell out Calm.  I planned to put a single letter in each frame and hang them together so the word was readable.


I used a variegated cotton thread, but because it was a small design the colour didn’t actually change that much at all.

I had also found a very slightly larger frame, so I decided I would use that too and do a little flower.

Once they were finished stitching, I was ready to pop them into the frames.

I cut the fabric a little larger than the wooden back discs and glued them into place so they wouldn’t move as I manipulated them into the little frames.


Then it was time to stick the backs on.  With my trusty wood glue, which seems to be my new best glue ever, and a clamp to hold it while it stuck.  I stuck a bit of fabric inbetween the clamp and the work so not to risk marking it.


Once they were all set – which I had to do in stages as I only had two clamps – they were ready to display and hang.

These little cross-stitch samples took about 3 hours to make. So this project is now up to 35 hours!


Friday, 12 January 2018

Hand Embroidery for beginners.

Hand Embroidery seems to be making a huge resurgence at the moment.  Everyone seems to want to have a go at it.... and why not?


A little while ago I was given a large amount of embroidery threads - I made a donation to Charity for them, but I also wanted to give something back to the community, so I arranged a free-of-charge hand-embroidery class.  This happened on our first day back after the Festive season.

The idea was well received and the class was fully booked up quite quickly.

We used a piece of Calico along with a heat-sensitive pen to draw our own patterns on. The pen lines disappear when ironed so they work really well for planning designs.


There was only three stitches to learn in this class, I much rather people go away with good knowledge of a smaller amount, than lots of information that boggles their brain and they cannot continue at home.
We learnt Leaf Stitch, Flower Stitch and Chain Stitch.  Enough stitches to make a bunch of flowers and leaves.  (they also took some threads and a needle away so they could finish off their work in their own time).


Even though all the attendees were given exactly the same choice of colours, and the same tuition, the results were completely unique.  And the work looks so different once the pen marks are ironed off.


I think everyone enjoyed their class, some people even asked for a follow on class to learn more stitches, which is exactly what I want to hear  :)


Thanks for coming if you did, your support to The Shed is appreciated.
And if you fancy a class yourself, check out the website to see what is on.....

www.soozintheshed.co.uk/store/

Wednesday, 20 January 2016

A new face for a Rag Doll

I had a challenge set to me just before Christmas.   Could I put a new face on this Rag Doll.

The lady had bought it as a gift for her Granddaugher, but before she could put it away her Grandson was sick on it, and the result of cleaning it up was this......   Great for a kid's toy huh?


Oh my goodness, what could I do??

I really didn't want to put too much time in as completely rebuilding it would have been expensive labour wise, and it might have been cheaper to buy a new doll, so a cover up was needed.

The first cover I tried was a vintage cotton - trying to get the right shade was a nightmare, it was either too creamy in colour, or not cream enough.  However when I finally found a piece that was good enough, I pinned it into place to find the smudged ink bleeding through when I dampened it slightly.  I did dampen it on purpose as I needed to see what would happen if it was to get wet again - maybe with a child crying.


Scrap the cotton idea then, back to square one.  I took this photo so I could remember what the face was supposed to look like.


Then cut a circle of felt - I had over 100 sheets of felt in my stash, not one was the right shade, I had to go and source one.


With a heat sensitive pen I lightly drew the face in place.


Then embroidered it - to make it much more stable that using fabric dyes and pens.


Then it was time to pin it in place....


... and sew it, ever so neatly, with little enough stitches that they weren't visable, but would hold good enough.


I finished her off with a bit of fabric pen eye make up - if it does come off it won't matter really due to the embroidery underneath, but I wanted to make the eyes a wee bit bigger.  Then a little bit of blusher to give her a rosy glow.


And she was done!


Hopefully her little face will last a bit longer this time   ;)

Monday, 19 January 2015

Free Machine Embroidery - a cushion workshop

On Saturday I attended a "Free Machine Embroidery" workshop at Fun2Do in Carlisle, taken by Anni Hamer.

Not 'Free' as in free cost, but 'Free' as in no feed dogs on the machine so the material ran freely  :)

We started off with a practise piece of linen in a hoop and just went.  

It was really quite a tricky think to get the hang off, I wanted to keep lifting the foot to turn a corner, but you really just put your foot down and let it flow.


So I did, I just scribbled away with the needle and thread and ended up with this  :)


After the practise session it was time to make a cushion - scary stuff!!

We started with the grassy part, we could make it as jaggedy or smooth as we liked.  It was appliqued onto the linen and we started to embroider around it.


Bit wobbly, but it all adds to the hand-made charm, don't you think?


Then it was time for the rest of the componants.  A house, with windows, a door and a mini door knocker, trees, clouds and even washing on the line.


They were all appliqued in place before being sewn.


Too excited to stop for lunch, so we had scone and tea, provided by Fun2Do.


And one of my most favourite things, a mallow tea-cake, as Anni had read on my Twitter that I like them  :)  I certainly do!


After sewing all the pieces in place it was time for some writing.  I chose to make the cushion into a birth sampler for Hope, so I popped her name on with her date-of-birth and birth weight.   It was drawn on with a friction pen which disappeared when ironed.


Then it was time to add the patterned panels at the side, the back and the zip. 

Voilà!  a cushion cover.  And I have to say, I am thrilled with it.


Just to buy a cushion pad for it now  :)