Showing posts with label minis. Show all posts

Friday, 5 February 2021

Some tiny little Cross-Stitches.


I am starting to tick of some of the items I had on my list to pop into my mini shed.


  • ·       To design and build a mini shed – about 2’ cubed with a removable roof. To sit on a piece of wood for a garden. 
  • ·       Hinged Door with sign to let people know what is happening within The Shed.
  • ·       Crochet and knitted blankets (yarn crafts)
  • ·       Carpet for the floor (rag rug)
  • ·       Wall decorations (cross stitch and quilted panel)


The next one on the list was to make some wall decorations. 

I found some really small embroidery frames in my ‘oddments’ box which I thought would be perfect to make little wall hangings for the mini shed.

Online I found a free chart to do letters which would be the correct size to fit into the frames – I had some Aida (cross-stitch fabric) which was 14 count.  This means there are 14 holes to the inch, so I knew I had about 10 holes height wise to use as the stitching part.

I got to work, using the letters C A L and M – to spell out Calm.  I planned to put a single letter in each frame and hang them together so the word was readable.


I used a variegated cotton thread, but because it was a small design the colour didn’t actually change that much at all.

I had also found a very slightly larger frame, so I decided I would use that too and do a little flower.

Once they were finished stitching, I was ready to pop them into the frames.

I cut the fabric a little larger than the wooden back discs and glued them into place so they wouldn’t move as I manipulated them into the little frames.


Then it was time to stick the backs on.  With my trusty wood glue, which seems to be my new best glue ever, and a clamp to hold it while it stuck.  I stuck a bit of fabric inbetween the clamp and the work so not to risk marking it.


Once they were all set – which I had to do in stages as I only had two clamps – they were ready to display and hang.

These little cross-stitch samples took about 3 hours to make. So this project is now up to 35 hours!


Thursday, 4 February 2021

A mini mosaic table.


I am trying to incorporate as many crafts as I can into this project.  I would like it to be a ‘box full of goodies’ if you like, where people can reach in, grab and admire a craft piece and feel completely inspired to try it themselves.

So I had a good look in my ‘oddments’ box to see what random things I have collected over the years and what I could use in my mini shed – as long as the scale fits of course.

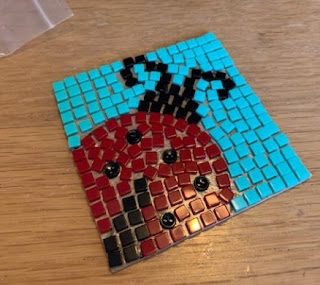
I found a Mosaic Coaster kit.  Now, I do have the proper equipment and other bits to have done a ‘proper’ mosaic, but this kit measured up to be the ideal scale to make a little table out of.  I had also found a large wooden bobbin which I could use to make the perfect pedestal stand for the table.

So I got to work.


Let me tell you right from the off that this ‘kit’ was awful!  I am ashamed to say I have bought these for people in the past too, having once working in the large craft store that sells them.  The contents are ok, the instructions are passable – but the mosaic picture on the front clearly shows that some of the tiles have been cut to make smaller pieces. There is no tool to do this and it doesn’t even tell you how to do it safely even if you have your own tools.  The kit would be fine if the design only used full tiles – easy to sort out I would think!

Anyway, I couldn’t be bothered to go and dig all my proper equipment out of the shed just to cut a few plastic tiles, and wasn’t really sure my ceramic tile nipper would cut tiny plastic tiles anyway, so I just fudged the design.


** Fudged is a word used by crafters to make something work when it obviously isn’t working.  I use it a lot.

Anyway, design fudged and ready to grout.  Again, rubbish instructions – simple 2:1 powder to water.  Which is all very well and good, but first you must find something to measure the powder with. I used a teaspoon.  Luckily, I know what kind of consistency of grout works so just added enough water to get me there. People that don’t might struggle a bit. 


And here comes the messy bit smudging that grout right in between the tiles. I like this bit.  It has a certain therapeutic feel about it.  Maybe gloves would be a good idea, but I don’t mind the feel of the grout.


You then wait for a few hours until it is dry and wipe off the excess grout with a slightly damp sponge.  This is when the picture comes to life and looks really good.

I had also wiped the grout around the edge of the coaster to give it a more finished look.

Then I stuck the wooden bobbin on the bottom and my table was complete  😊


Just need a little cup of tea to go on it now  😊


Tuesday, 2 February 2021

A teeny weeny crochet blanket.


My mini shed project would never been complete without a little bit of my speciality in there – Crochet!

Working on a 1:6 scale I ordered some funky 2ply crochet thread (sadly I didn’t have any of this laying about in my stash) and dug out my small 2.00mm crochet hook and got to work.


I decided to make a traditional Granny Square blanket.   It doesn’t matter how far your crochet journey goes in respect of difficulty, most people will always return to a Granny Square at some point.


I made sure I used all of the colours to make it as bright and colourful as I possibly could.  Then laid it out to plan the finished piece.


To join I used the ‘join as you go’ method, favouring this because you don’t have to thread a needle and sew all the edges together. It’s a quick but effective way of joining.


I finished it off with a couple of rows or a plain stitch to edge it.


The finished measurement is 17cm x 21cm which is a perfect size for my mini shed.

This took about 4 hours to make.


Friday, 29 January 2021

A little knitted throw.


Working out a scale:

My mini shed measures two foot square. I reckon an average room is about 12 foot square – and that makes it incredibly easy for me to work out a scale for all the mini things I need to go in my shed.

So if a room is 12 foot and my shed is two foot, that gives me a 1:6 scale.


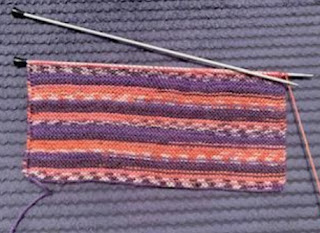
I shall test that theory and knit a small blanket for the mini shed. I grabbed this 4ply sock yarn as it knits up into some nice shades without changing the yarn, and some 2.5mm knitting needles.


So, a regular knee throw blanket is around 120cm square.

I had to knit a small square so I could measure how many stitches and rows I would need for my mini blanket.

This little piece was 3cm square. It has 10 stitches across and I had worked 18 rows in Garter Stitch.


I chose Garter Stitch because the finished piece had no front or back, it looks the same on both sides.

I calculated that using my 1:6 scale, to get the correct scale for a 120cm blanket I would need 20cm.


120 divided by 6 = 20.


20 divided by 3 (the size of my sample) = 6.66 = let’s round it up to 7.

7 x 10 stitches = 70 stitches for the width.

7 x 18 rows = 126 rows for the height.


I got to work…..


Knitting small is actually harden than knitting regular or chunky. The points of the needles hurt your fingers and you have to grip tighter.. plus it’s much harder to catch a fallen stitch if you need to.


It took about 6 hours to make would you believe!  SIX HOURS for a small mini blanket fit for a Barbie doll…if anyone wants to commission one do let me know.  😊


Would you like to learn how to knit?

I do some beginners Youtube videos if you fancy having a go, please find the links below.

How to Cast On with two needles.

How to Cast On Thumb method.

How to Knit and Purl.

How to Increase and Decrease.

How to Cast Off.

Have fun, and feel free to give me a shout with any questions.