Showing posts with label Patchwork. Show all posts

Monday, 8 May 2017

A randon Quilt Top from Charm Squares

Do you know one of those days when you have LOADS to do.  You go to your workroom to get started, not knowing which of the many "must get this finished today" projects to start first - you walk past a piece of fabric, or in this case a pack of charm squares, and think "I will play with these instead"?

Yeah, those days.

I bought this pack of charm squares ages ago, just to see what they were like.  I have never had the inclination to do anything with them, they didn't inspire me, they just sat on my desk, still wrapped, minding their own business.

Then, of course, when I an super busy, they want to be used!!


So, I got them out, tried not to sort them in anyway whatsoever, I really tried to use them randomly - failed a little bit by swapping some of them about.   But I simply sewed them into strips.


Then I sewed the strips together.  Then edged them in some fabric I found in my stash that matched quite well.


And that was that.  I haven't done anything else with it since. It has sat in the same place since then, on my cutting table - meaning I have had to cut on my ironing board  (as usual).  My inspiration has gone.... whittered away on the wind.  I have no use for a blue cartoon themed quilt top, but I guess I should finish it anyway........... at some point. In the future.


Monday, 13 March 2017

Quilting Exhibition at Rheged

I was lucky enough to receive an invitation to the opening of the Quilting Exhibition at Rheged, Penrith, Cumbria.

Now, I have done a little bit of random quilting in my time, just basic stuff, but enjoyable none-the-less, but this exhibition has given me so much inspiration and the urge to do more as soon as I can!

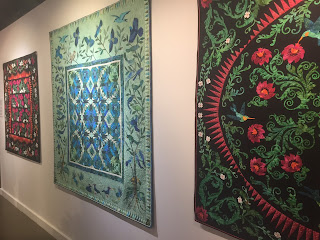
I must apologise for my rubbishy photos, the lighting in the exhibition played havoc with my phone camera - but it's a really good reason for you to go and view the marvellous quilts yourself.

In the meantime have a look at these beauties.


Just how much detail can you put in a quilt?  Amazing.


This one caught my eye, it is a giant shirt made up from collars, cuffs, pockets and yokes of old shirts, held together with threads.  Very cleverly done.


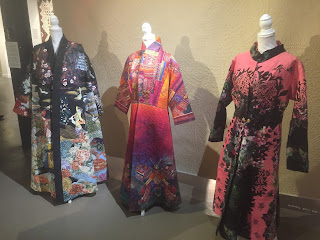
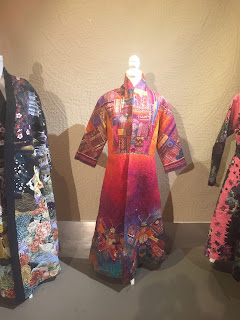
I particularly loved these quilted coats.  At £6,000 they were a little beyond my budget - but I would have had the rainbow one in the centre.  Alas, it was not for sale that one, so my decision was made for me  :)


I even got to "meet the maker", the lovely Marijke van Welzen, who was modelling her own work  :) 


Would you even believe these scenes were actually quilts?  No, me neither!  Such precision.


These pebble and beach scene pieces really caught my attention too, I just love the formation of the pebbles out of the fabric (then painted with fabric paint).  You were not allowed to touch the quilts, but if we were, this would be the one I would want to feel.  It looks so tactile.


How unusual is this clock piece?  It was very detailed and you need to get up close to see all the marvellous beauty and intricate work.


These pieces are a collaboration of two crafts, a woodwork frame with quilted pieces within.  Very clever.


This piece is fabulous, the ultimate in up-cycling.  It is a mattress cloth that the artist picked up from a car boot sale.  She then embroidered a poem all over the lines, it was really quite poignant and thought provoking.


Last but not least, a bit of quilting fun, with a nod to the Cumberland Wrestlers with padded, quilted pants and embroidered vests.


There was loads more than I managed to photograph, including a private collection of very, very old quilts in amazing condition.

If you are near by, do go and visit and see these beautiful pieces for yourself.  The exhibition runs until Sun 23rd April, and you can find more details here...  https://www.rheged.com/event/new-quilting/

Sunday, 13 November 2016

Crazy Quilted Christmas Stockings

A week or so ago I ran a workshop for Crazy Quilted Stockings.

I LOVE the Crazy Quilting technique, used with a sewing machine it is such a pleasing thing to do and surprisingly easy.

I originally made the stocking for the Hobbycraft Blog a little while ago, so thought it would be a good one to run out as a workshop too.


Three lovely ladies came along, they chose the Fat Quarter packs that they wanted to use and we got to work.  Cutting, snipping, sewing, ironing, cutting, snipping, sewing, ironing..... it's a very repetitive craft  :) 

I was so absorbed in stocking making that I forgot to get any action shots, but here are the finished stockings in all their glory.

Two ladies chose the same colour schemes, while another went for something a little different.


I, myself, made a sample one, but it is not yet finished so you will have to wait to see that one  :)  Let's just say, it is very bright colourful and funky, not traditional at all.


Thanks for coming ladies, if you are reading, it was a blast, and you did fabulously.

Don't forget if you fancy making one yourself you can find my tutorial over on the Hobbycraft Blog.  (click on the link :)  )

Friday, 22 April 2016

Patchwork Turtle - free tutorial

A little while ago I was asked by Hobbycraft to create a soft toy, aka Stuffie, tutorial.  It needed to be easy to make, but with a little skill, and using the Heather Jacks (winner of last years Sewing Bee) Fat Quarters.

I scribbled some ideas, including a dinosaur, a rabbit, a mushroom and a turtle.   The Turtle won, even though it was still just a pencil drawing I could imagine it's cute little buttony eyes and it's cuddle-able shape.

So I got to work, cutting, sewing, stuffing, tweaking.... and this little chap was born.

The shell is sewn by hand and the limbs either by hand or machine.


If you would like to make one for yourself, then the step-by-step photos are over on the Hobbycraft Blog.

Wednesday, 18 March 2015

Teeny Tiny Patchwork

A few weeks ago I started on some teeny, tiny patchwork.  This was for a very special project that I have not been able to share with you just yet - but soon, I promise  :)

First I asked Hubster to do me a tessellating hexagon, shown with a 10p piece so you can work out how tiny it really is.


Then I got to work, cutting out little bits of fabric and stitching them to card templates.


When I had enough I sewed them all together....


And added some edging so that I could put two panels together to make a 3D shape.


Finally I stuffed it


But what might it be?  What do you think?


Wednesday, 18 February 2015

Crazy Quilted Placemat

A couple of weeks ago I made a Crazy Quilted placemat, as a sample for a class I am doing in April.

They do look really effective and the best bit is you can use any scraps you have laying about, although I did use a fat-quarter pack that went together for this one.


So, what you do is this.....  Take a piece of cotton  (pillowcases are cheap and cheerful in supermarkets and you can get a few out of it), and a piece of wadding - not too thick.  I used a piece of A4 paper as my template.


Next, get your fabric ready - this is the fat-quarter pack I used, but you don't need a huge amount to make these.


Lay your white cotton on top of your wadding, then cut a little square of fabric - no need to be too fussy about the size, just chop a bit off.   If you wish you can use two pieces of white fabric and sandwich your wadding, this saves it catching on the sewing machine.

With a sewing machine sew your square onto the middle of the fabric - just randomly.


All four sides.


Now take another piece of fabric, in another colour, and match the length to one side of the square - any side.


Turn it face down and with the sewing machine sew down the length.


Time to get the iron out now - it is quite important to press each piece as you go, otherwise you will end up with wrinkled work.


Pretty!


Take another piece of fabric, and again, match the length to any edge.


Turn it face down, sew it in place and press it back.


Repeat, adding pieces of different colours onto different edges.  Remember to press with the iron each time you add a new piece.


Continue....


... until you have filled the whole space with pieces.   Trim your work to match the size of the cotton underneath.  (sorry about the blurry photo!!)


Now cute a piece of fabric the same size, this is going to be your backing.


Put the two pieces together, RIGHT SIDE to RIGHT SIDE  (very important this bit!) and sew all four sides, but leaving a small, 3", gap in one side to turn the work the right way in again.


Trim off the corners close to the stitching, but be very careful not to cut into your stitches.  This will make the corners less bulky when you turn it back the right way.


Give it a good ironing so it lays nice and flat.


Sew up the 3" gap by hand using nice neat little stitches.
Now take it to the sewing machine and sew a top stitch all the way round.  


Voilà!


A closer look...


Now you need to go and make another 3, (5,7,9 - whatever you need for your table  :)

You could also make coasters to match!

If you fancy coming to my workshop and learning how to do it by having a go, then you can find the details HERE on my website.  But hurry, there are only 6 places on this class :)