Showing posts with label free tutorial. Show all posts

Wednesday, 17 February 2021

How to make easy bunting.

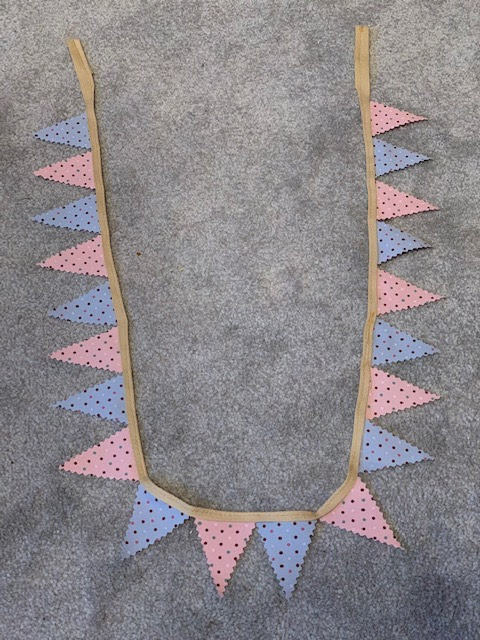
 I have just done a small length of bunting to go into my mini shed project... I get asked all the time how to make bunting, so I thought I would write it all down in case anyone fancies having a go.

How, you can obviously spend a lot of time making bunting, cutting and sewing and turning and ironing, and sewing some more.... or you can cut a few corners and make it easier for yourself.


Some buntings are made by sewing two triangles of fabric together, then turning it the right way out, before pressing then sewing it to the bunting tape.  If you need bunting that looks good both on the back and the front, then this is the method you should do, but if you want something a bit quicker that only needs to be seen on one side only, then follow this tutorial.

The photos I am sharing are step-by-step photos of my mini bunting (perfect for a Barbie Doll House), but I will give you a regular bunting size in brackets - of course you can make it any size you like.

Grab your favourite fabric.  You will also need some stabilizer (found in an craft/haberdashery store), a length of bias binding, webbing or cosgrain ribbon.  (length depends on how long you want your bunting to be)  You will also need some Pinking Shears.

First off cut your fabric into strips that measure approx 5cm (20cm) and do the same with the stabiliser.   Iron the stabiliser onto the back of the fabric - use a piece of greaseproof paper between the iron and the fabric to save any excess glue getting stuck onto your iron plate.

Mark across the top in increments of 5cm (20cm)

Then on the bottom put the first mark at 2.5cm (10cm) then every 5cm (20cm) after that.  The marks should now be inbetween the top ones.

Mark diagonally from a bottom mark to a top mark, then again back across, this will give you perfect triangles.


Using Pinking Shears, cut up the triangles.  By using the Pinking Shears you stop any fraying that would occur by using regular scissors.  The fabric is also less likely to fray with the stabiliser behind it as it makes it sturdier,


Take your tape, and if you need to make a loop at the end for hanging, do this now by turning the end over and sewing across.

Then folding your tape over the top of each triangle, simply sew down the tape making sure you catch the triangle fabric in-between.

You can add the triangles immediately after each other, or space them out a bit if you want the final length to stretch further.


And it is as simple as that!

How much will you make?


Wednesday, 26 April 2017

Crochet waistband Tutu

I made the cutest Tutu for Grandbaby no: 1


What is is about Tutu's that make them incredibly cute.  I wish I could wear one, but I would look a wee bit odd, at my time of life!  Think, Mavis.


Anyhoo, this one is pink, frilly and perfect for a little girl who is just starting dancing lessons.


So, I crochet the waistband in a pink DMC Natura Cotton with a 3mm hook, I crocheted it over a band of thick elastic for sturdyness.


Then added a picot fan edging to make it look pretty.


The Tulle is added to the loops created, I only added two layers of Tulle, but I did enough loops for a third layer, so if she ever wants the Tutu "puffier" I can add the third layer easily.


It fit beautifully, and will look super cute on the dancefloor, don't you think?


I lent it to Hobbycraft, Carlisle for their display, looks quite good like this!

If you would like a copy of the tutorial, please email me and I will send you one through FREE of charge  :)


Thursday, 1 December 2016

Cute Christmas Purses - free tutorial

Sometimes you just don't know what to buy someone for Christmas so you end up giving them money.

But money just seems a bit impersonal, don't you think?  Obviously very useful, but it can look like there has been very little effort or thought when you give money - in fact, the opposite is probably true, you have probably spent so much time thinking and rejecting ideas that by the time you decide to give some money it is the best idea ever!!

Anyway, to make your gift of money look a little more exciting, why not make a cute purse from Christmas Fabric to pop it in?  They will get a lovely hand-made gift then too.


Fully lined, with a zip, you can whip these cuties up in no time - about 30 minutes all in.


I have popped some instructions for you below.  Let me know if you make some wont you?


How to make:  (use a 10mm seam allowance throughout)
  1. ·         Take your zip and measure the outer fabric to match it.  Cut two pieces of fabric the length of the zip and whatever depth you wish to make.
  2. ·         Cut two more pieces the same size for the lining.
  3. ·         Place the outer fabric on the desk facing UP, place the zip on the top edge facing DOWN, place the lining on top to match facing DOWN.  The zip will now be sandwiched in-between the two fabrics.
  4. ·         Using a zipper foot, sew carefully down the zip line. You will have to stop half way, put your needle down, lift your presser foot and close or open the zip to enable a neat line across.
  5. ·         Open up the pieces and place them back to back with the zip facing up at the top.
  6. ·         Place the 2nd piece of outer fabric on the desk facing UP, place the zip on the top edge facing DOWN, place the lining on top to match facing DOWN.  The zip will now, again, be sandwiched in-between the two new pieces of fabric.  Sew it as before.
  7. ·         Open the layers, open the zip half way, and place the outer together RIGHT SIDE TO RIGHT SIDE, and the inner together RIGHT SIDE TO RIGHT SIDE. Pin or clip the sides of the zips making sure the zip edges face DOWN into the lining fabric side.
  8. ·         Pin or clip around to hold it all in place, change to a regular presser foot then sew all the way around, but leave a small gap in the bottom edge of the lining for turning.
  9. ·         Clip the corners and trim away any access, then turn the right way in.  Sew a neat line across the bottom of the lining to close the gap before tucking the lining into the pouch.


Sunday, 13 November 2016

Crazy Quilted Christmas Stockings

A week or so ago I ran a workshop for Crazy Quilted Stockings.

I LOVE the Crazy Quilting technique, used with a sewing machine it is such a pleasing thing to do and surprisingly easy.

I originally made the stocking for the Hobbycraft Blog a little while ago, so thought it would be a good one to run out as a workshop too.


Three lovely ladies came along, they chose the Fat Quarter packs that they wanted to use and we got to work.  Cutting, snipping, sewing, ironing, cutting, snipping, sewing, ironing..... it's a very repetitive craft  :) 

I was so absorbed in stocking making that I forgot to get any action shots, but here are the finished stockings in all their glory.

Two ladies chose the same colour schemes, while another went for something a little different.


I, myself, made a sample one, but it is not yet finished so you will have to wait to see that one  :)  Let's just say, it is very bright colourful and funky, not traditional at all.


Thanks for coming ladies, if you are reading, it was a blast, and you did fabulously.

Don't forget if you fancy making one yourself you can find my tutorial over on the Hobbycraft Blog.  (click on the link :)  )

Friday, 4 November 2016

How to make a Doily Angel Christmas Card

A good one for the youngsters.  Get them to make this years Christmas Cards - you get half an hours peace & quiet, they get a crafting session, all the relatives will love the cards - it's an all round win-win situation!


Ok, so first of all take a doily. (sneak one to one side so you can colour it in later if you wish)


Section it off as shown in the photo.  I used the waves on the bottom as a guide to where to cut.


Trim off the tops of the thinner pieces so they look a little like this.


Now, grab the metallic pen, mine was gold, and colour in some bits.  You can colour it all in if you like.
(I do realise I sound like I am totally obsessed with colouring in doilies right now!!)


Do some artful colouring on all three pieces.


Next, take your card and Pritt Stick one wing to the card as shown.


Add the second wing.


Then the body part on top.  (now, I have noticed that I have gone completely skew-wiff on this - blame the wine ((it was late in the evening when I made this, not early morning, so don't worry!))


Now for the head.  Take the gold card and the 2cm circle punch and cut out a circle.


Now grab the 1cm circle punch and cut a circle out of your circle - voila!  A halo!  See, how clever are you?  (pop the small circle in your craft box, I am sure it will come in for something.)


Glue the halo to the card as shown.


Now, cut another 2cm circle - if you are lucky the gold card will be white on one side, if not you might have to go and find some white card too.
Glue that circle in place as a head, gold side down.


Draw some sleeping eyes on - or a whole face if you feel the need.  But for the artistically challenged, eyes are good enough.


And there you go.  Fun, easy, effective.  And who wouldn't love a hand-made card this year?


And below is the You Tube tutorial, set to some funky music  :)


Enjoy!


ps:  this content contains affiliated links, which basically means, if you click and buy, I might earn a couple of pennies.

Sunday, 9 October 2016

My YouTube Channel

I have had my YouTube channel for ages now and all I have had on it is a tutorial of how to make a paper snowflake, and a few videos of Ruby when she was a puppy.


So, time to start using it properly I think.

I have uploaded a few tutorials, just so I could get the hang of editing the photos to make a video etc.... I found a great little app called Splice by GoPro, it's really easy to use and upload - which is useful for me!

The tutorials I have just put up are step-by-step photograph ones, with some instructions along the way. I fully plan to do moving videos too, but one step at a time   :)

There are a couple of Christmas themed crafts on there, and some Kid's crafts too, would love your feedback on what you think if you have time.

Click HERE to view my channel, if you like  :)


Wednesday, 22 June 2016

Giant Floor Cushion - Free Tutorial

I made a giant floor cushion for display in Carlisle Hobbycraft recently.

I love this fabric the colours just work so well.   I teamed it with a purple and a dusky pink for the back of the cushion and just used the print for the front.


If you would like to make one they are VERY easy, just straight sewing required - no zips or buttonholes  :)  The instructions are below.


How to make:
The Liner: 
·         First of all we will make the liner, from the lining fabric cut two squares each measuring  62cm x 62cm. 
·         Place the fabric squares together and leaving a 15cm gap for stuffing on one side, sew all the way around the square using a 10mm seam allowance.
·         Clip the corners neatly, turn the right way, stuff as required and hand-sew the gap closed.
The Cover: 
·         Using Fabric A, cut a square measuring 62cm.
·         Using Fabric B, cut a rectangle measuring 62cm x 42cm.
·         Using Fabric C, cut a rectangle measuring 62cm x 42cm.
·         Take Fabric B and fold over one of the 62cm sides by 10mm and press flat, fold it over again and press flat again. Sew down this seam neatly.
·         Repeat the last step with Fabric C.
·         Place Fabric A right side facing up on your table, and place B on top, right side facing down, with the raw 62cm edge matching the sides and the sewn seam towards the centre.
·         Place Fabric C on top of this with the raw edge matching the opposite side and the sewn seam towards the centre, overlapping Fabric B.
·         Pin into place.
·         Sew all the way around using a 10mm seam allowance - no gaps for turning.
Clip the corners and turn the right way in through the envelope gap created.

Wednesday, 25 May 2016

Colourful Baby Blanket

I made this a long while ago for a blog post, but it was never featured so I guess it is ok to share it   :) 

It is made from W.I.  (Women's Institute) yarn called "Soft & Silky".  It really is the most gorgeous feeling yarn, really satiny - and it is 100% acrylic so it washes really well.


I chose these candy, springtime colours, as I get bit sick of seeing babies in either blue or pink.


Zingy lime, refeshing orange, with a soft lilac and lemon, all joined together with a warm vanilla cream.  Sounds a bit like a posh pudding, doesn't it?


I did a series of rows, alternating the colours.


I shall write the pattern up very soon, just in case you fancy making one for yourself  :)