Showing posts with label beanbag. Show all posts

Sunday, 12 March 2017

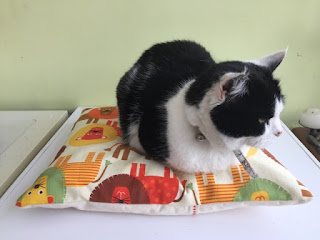
A sitting cushion for Milly the Cat

I used to spend a small fortune on beds for my cats, but will they sleep in them?  No, they will not!  We leave the beds in the places that the cat lies to sleep - but instead of using the bed, they just find somewhere else to sleep.

But, after making a huge bean-bag - which you can find HERE - I had a few 'beans' left over. I didn't want to waste them, or bin them, but equally I didn't want to store them.  So, I thought, I would make a mini bean bag, for a cat.

And do you know?  She likes it!!  I was quite surprised.


So, first of all I decided on a size 40cm x 40cm, I took some calico and cut a simple rectangle measuring 42cm x 64cm.


I cut it in half so each piece measured 42cm x 32cm and hemmed and stitched one long side only - I used a red thread and a fancy stitch on my sewing machine, just because.


I then took some thick curtain fabric with cartoon lions on - well cats for cats and all that - and cut it at 42cm x 42cm.

With the right side of the Lion fabric facing up, I laid one piece of calico (facing down) on top with the raw edges matching and the sewn edge facing the centre.


Then I laid the second piece on top of that - also facing down.


A quick sew all the way around, trim the corners, turn the right way in and Voila!  You have a bean bag cushion cover.

Just make a basic bean bag pouch, measuring 40cm square, out of some sheeting, fill it with beans  and pop it inside.


I still can't get over the fact that Milly actually uses this cushion - maybe because she thinks it isn't really hers?

Wednesday, 22 June 2016

Giant Floor Cushion - Free Tutorial

I made a giant floor cushion for display in Carlisle Hobbycraft recently.

I love this fabric the colours just work so well.   I teamed it with a purple and a dusky pink for the back of the cushion and just used the print for the front.


If you would like to make one they are VERY easy, just straight sewing required - no zips or buttonholes  :)  The instructions are below.


How to make:
The Liner: 
·         First of all we will make the liner, from the lining fabric cut two squares each measuring  62cm x 62cm. 
·         Place the fabric squares together and leaving a 15cm gap for stuffing on one side, sew all the way around the square using a 10mm seam allowance.
·         Clip the corners neatly, turn the right way, stuff as required and hand-sew the gap closed.
The Cover: 
·         Using Fabric A, cut a square measuring 62cm.
·         Using Fabric B, cut a rectangle measuring 62cm x 42cm.
·         Using Fabric C, cut a rectangle measuring 62cm x 42cm.
·         Take Fabric B and fold over one of the 62cm sides by 10mm and press flat, fold it over again and press flat again. Sew down this seam neatly.
·         Repeat the last step with Fabric C.
·         Place Fabric A right side facing up on your table, and place B on top, right side facing down, with the raw 62cm edge matching the sides and the sewn seam towards the centre.
·         Place Fabric C on top of this with the raw edge matching the opposite side and the sewn seam towards the centre, overlapping Fabric B.
·         Pin into place.
·         Sew all the way around using a 10mm seam allowance - no gaps for turning.
Clip the corners and turn the right way in through the envelope gap created.

Saturday, 18 June 2016

Battenberg Beanbag - free tutorial

I recently had a request from Hobbycraft to create an easy to make beanbag.

Sometimes when I get these requests it takes me a while to think up something to fit the brief, but other times the ideas just "POP" into my head.  This was a popping idea.

Why on earth I had Battenberg in my head I do not know, although I do like a slice now and again.

So, I made a beanbag to look like a slice of Batternberg, completed with 'apricot jam' piping.

Are you hungry now?


If you want to make one for yourself, then pop over to the Hobbycraft blog where you will find all the step-by-step instructions.