Showing posts with label fusing. Show all posts

Thursday, 10 March 2022

Experimenting with marbles

  have melted marbles in the kiln quite a few times over the years, to make pin badges, tie-pins and other stuff.

But this time I wanted to see if I could fuse some to window glass.

The hardest job is getting all the little buggers to stay in the right place, as once you knock one it is like a domino effect and they roll about all over the place.


After a bit of swearing, and much more time than this deserved, I seemed to have them all laid out nicely in the kiln.


I placed a few on top of a small square of window glass – these too had the tendency to roll about, but we got there in the end.

The following morning I opened the kiln with anticipation, wondering if I would find a heap of melted marbles all in one corner of the kiln, but luckily they had stayed put and fused down nicely.


And the best bit was…. My experiment had worked too!


With no incompatibility cracks either would you believe?


Result!

Friday, 26 February 2021

My sustainability project.

  I have finished my uni piece for my 'Sustainability' assignment.

Due to the fact the working with glass isn't one of the most sustainable art forms, I decided to create a piece that might draw attention to the plight of the planet instead.  

I also decided that I would not purchase anything to create this piece, but concentrated on working with things I already had.

In my head I wanted to make a clock, to draw attention to the fact that we have limited time left to help the planet.

I had a box of mini wine bottles that I scrubbed and dried, then popped in the kiln to melt down flat.

My kiln is quite an energy efficient one, as it's not soo big, but I did need to do a couple of firings to complete my piece.

Once they were flat I messed about for a bit trying to decide on a formation. Ideally I would have liked to use all twelve bottles, but this was going to make the clock too heavy to hang.  In the end I decided on a formation of eight bottles, leaving some to use in another project at a later date.

I cut the numbers out of old copper sheet that I had rescued from a fire pit.


Once that was all nicely fused I was just going to fit a clock part, when I came across a clock kit in my stash that had an interesting wooden ring. Immediately I thought this would be excellent as a 'warning' ring if painted red.  Warning road signs are usually red rings.  

Because there was also another piece of round wood in the kit, I could sandwich the glass in-between the pieces with glass glue and bolts - therefore making it a much sturdier piece to hang on the wall.


As I now had a red warning ring I felt like I needed a warning statement to go on it.  My daughter helped me out with that - I wanted both the words 'Time' and 'Waste' within it.  She she wrote... "Don't call time on the Earth, reuse, don't waste". That worked really well so I wrote it on.

I was VERY unhappy with this as my handwriting is appallingly bad.  So it was back to the drawing board for that.

After a quick repaint, I dug out my vinyl cutting machine and I had some scraps of black vinyl left that had come from my old shop many years ago.  I cut out the words by machine this time and it looked so much better.  Using the vinyl was something I wanted to avoid if possible, due to it being plastic.  If it wasn't lockdown and I could have found someone with nice handwriting I would have definitely done it that way instead.


Now it was time to put it all together and add the clock mechanism.


And my piece was finished.  And it holds it's own weight well on the wall... and you can tell the time so it's functional too, as well as being a conversation starter,

I have enjoyed this project. I particularly like working with materials that might have otherwise gone in the bin.  Giving something a repurpose is something I try to do in other aspects of my life, like adapting clothing and sprucing up furniture.  So this assignment was right up my street.

Sunday, 21 February 2021

Experimenting with what I have....

  Because I cannot really totally sustainably make a piece of glass art, I am going to head down the route of making a piece that will raise awareness.   I am also only going to use things that I already have. I am determined not to purchase anything extra but work around design issues to find a solution.


I have decided to make a clock - to show that time is ticking away for the planet and that we, as consumers, need to act now to help keep it safe.


The clock will be made out of the mini wine bottles, I have a clock part in my box of oddments that I can use.... the design will come to me as I put it together.  I have a rough idea of a design, but sometimes when working with glass - especially recycled glass, you have to roll with the punches and change the design at the drop of a hat.


I thought I might like to put some numbers on the clock, so while the kiln was on and melting the wine bottles flat, I added some little pieces of broken bottle to the corner with different things added to try and see if I could make marks.

The results weren't as pleasing as I had hoped, The Reichenbach green wasn't too bad but I would have  need a good thick layer before it looked decent, and the thicker I had it the more chance there would be of it cracking as the two glass types weren't compatible.

The mica powder just brushed right off, off the top fired piece and the piece with it underneath, which I found surprising.

The silver luster was very disappointing, I expected it to turn a nice dark metallic silver and it did ... nothing!


So that left the copper sheet piece. Now I know that copper sheet works well when sandwiched between two layers of glass, but didn't actually think it would adhere when just placed underneath - so this was a pleasant surprise.

Hopefully, I have found the way now to add numbers to my clock.  Happy days!

Friday, 19 February 2021

Messing about with wine bottles.

 I seem to manage to collect all sorts of glass  - glass fascinates me and if I see a nice coloured bottle or an interesting shape I can never bring myself to put it in the recycling.   Because of this habit I have amassed quite a collection.

Some I make into pretty lamps, others I melt and make abstract shapes from.

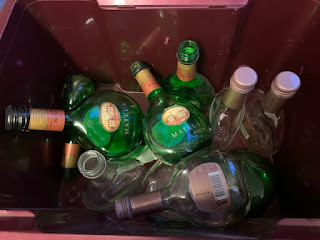
For my sustainability assignment I have decided to try and make a clock out of mini wine bottles. 

I had a box of these mini Mateus Rose bottles, just because they are such a pleasing shape, so thought it was a good time to make them into something new.

So, time for a good scrub.  It took a pan scourer and a teaspoon to scrape all the lables off, and I had to cut off the little wire ring around the neck. Neither of these would have been good in the kiln.


When they were all nice and clean I put the bottles in the kitchen oven to make sure they well and truly dried out.   My kiln is a glass kiln which wouldn't take too kindly to the presence of moisture within it.

I laid them all out, making sure none of them were touching, then programmed the kiln to do an overnight fusing fire.

In the morning I opened the kiln lid to find a set of lovely flat little bottles.  Result!


As my kiln isn't a large one I needed to do two firings to get enough bottles for my piece.  So now another patient wait until tomorrow when the next lot will be ready   :)


Monday, 15 February 2021

Slumped Glass for my Metamorphosis project.

  I opened the kiln this morning to find some rather pleasing pieces of slumped glass.

They had all worked as I expected..... as one off pieces.


However, on putting them together (as I had originally planned) I found that one piece didn't work at all.... however, three pieces fit together so it was a great starting point.


I think it fits the brief - using two opposite words and showing the metamorphosis between,

I actually chose two sets of words to work opposite to each other. One was 'Clear to Opaque' and the other was 'Bud to Bloom'  So far it seems to work.


This piece (below) I shall put back into the kiln to re-fire. Although I have never had much success with re-firing work as it doesn't slump in the desired way.... glass has a habit of doing it's own thing sometimes.


So, I now have three pieces of my five needed for my metamorphosis assignment.  Just need to work on two more   :)

Sunday, 14 February 2021

Trusting in the Kiln Gods

Waiting all night for a kiln firing... then bracing yourself to open the lid, has to be one of the hardest things to do when working with glass.   You just never know if your project has worked or not.  It is very much a 'fingers crossed' kind of moment.


So this is what I left in trust the night before, and happily it all fused down nicely.   It looks pretty much the same except for nice rounded edges and the coloured parts are all melted in.


So I can now breath a sigh of relief that the first firing is over, and I now have to trust my kiln gods again for the second firing.

I am totally self taught when it comes to fused glass kiln work, everything I know has come from making a mistake beforehand, or remembering how to do it when it has been a lucky accident.

Getting the glass nice and flat with rounded edges like this is called 'Fusing'. I now want to put some shape into the pieces by laying them on top of kiln safe vessels so they can melt and drape over them.  this is called 'Slumping' and the temperature of the kiln doesn't get quite as hot as a fuse.

I chose my shapes from a good collection that I have amassed over the years. You can get proper kiln furniture for this (like the square piece in the photo), but I have found that stainless steel pots and cups work really well.  


I gave my fused pieces a dust and positioned them all back in the kiln, balancing precariously on their vessels.  

 I also use kiln paper - I know most kiln artist use kiln or batt-wash, but I have found the paper easier  (albeit a more expensive method)


Now it is time for the lid to close and another night of waiting!   (and a quick prayer to the Kiln Gods)

Saturday, 13 February 2021

Starting my Metamorphosis uni project.


I have started to prepare my glass to put into the kiln to become my offering for the Metamorphosis assignment.

I planned to do five piece of glass in total, all of which would nestle together as one piece forming a blooming flower, but would also work as individual pieces too.  


Piece number one is going to be really quite simple, I wanted it completely clear and flat, so all I had to do with that was cut the glass and lay it in the kiln.  I am holding back on firing that piece as there isn't enough room in my kiln but also I may have to re-fire some of the other pieces if they don't work out as planned.

Piece number two was the same kind of glass as piece number one, but this time with a little bit of frit to change the colour.

Frit is basically broken up glass in various grades, from chunky to really quite fine, like salt.

The frit I used in this piece was called Red Apple and was like the constancy of granulated sugar.   I piled it all into the centre of the glass and simply pushed it about with my fingers.  I really liked the effect and was interested to see how that would turn out, so I left it like that.

Piece number three was the same clear glass but this time with pieces of stringer laid upon it. I used black, red and a brownish shade.  Some are a transparent glass and some are opaque.

Piece number four is a risk!  This is Striker glass, which means it changes colour in the kiln once fired, so I am not too sure what colour it will turn out as.  Let's hope its a good colour to tie my work together, otherwise I will be back to the drawing board for that piece.


And piece number five is a small piece of opaque red, this will form the centre of my blooming flower dish.


And now all I can do is close the lid, set the kiln schedule and keep my fingers crossed that the Kiln Gods do their thing!


Thursday, 10 November 2011

Eye Eye

Oooooo it's been a long time since I blogged - naughty me!


Anyway, I thought I would tell you about my latest experiment.

A friend of mine made me the most wonderful beaded necklace with a glass eye cabochon as the centre piece.  This then got me thinking, eye cabochons.

I did a bit of research and found some glass dolls eyes on eBay, but they were something like £7.00 a pair.  Gulp.  I was looking for something a wee bit cheaper so I could resell to my customers.

After a lot of emails and a bit of haggling, I found a factory in China that made dolls eyes.  It took a good few emails for me to get across what I wanted  - oval, flat back, glass, no wires.

Well, I obviously didn't do very well as I received round with stems on the back  - at least they were glass!!


So, how to get them flat.  Luckily I have a kiln, so I set to work.

First of all I had to use my rod cutters and snip all the back off as close as I could get them.


Unfortunately I couldn't get some of them quite as close to the back as I would have liked, so they didn't all sit too straight in the kiln.  Never mind, I thought, the odd wonky one will be fine  :)


All night they were in the kiln, and I didn't peep once.


In the morning, I threw open the lid and ...... whey hey....... eyes!!!


They weren't too wonky at all, a success of sorts  :)