Showing posts with label upcycling. Show all posts

Friday, 26 February 2021

My sustainability project.

  I have finished my uni piece for my 'Sustainability' assignment.

Due to the fact the working with glass isn't one of the most sustainable art forms, I decided to create a piece that might draw attention to the plight of the planet instead.  

I also decided that I would not purchase anything to create this piece, but concentrated on working with things I already had.

In my head I wanted to make a clock, to draw attention to the fact that we have limited time left to help the planet.

I had a box of mini wine bottles that I scrubbed and dried, then popped in the kiln to melt down flat.

My kiln is quite an energy efficient one, as it's not soo big, but I did need to do a couple of firings to complete my piece.

Once they were flat I messed about for a bit trying to decide on a formation. Ideally I would have liked to use all twelve bottles, but this was going to make the clock too heavy to hang.  In the end I decided on a formation of eight bottles, leaving some to use in another project at a later date.

I cut the numbers out of old copper sheet that I had rescued from a fire pit.


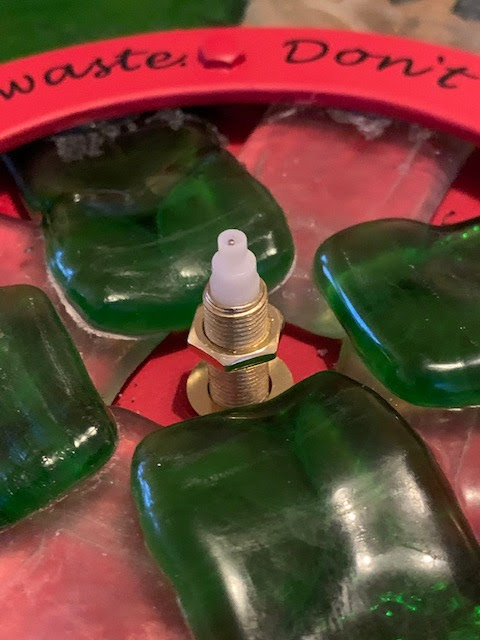
Once that was all nicely fused I was just going to fit a clock part, when I came across a clock kit in my stash that had an interesting wooden ring. Immediately I thought this would be excellent as a 'warning' ring if painted red.  Warning road signs are usually red rings.  

Because there was also another piece of round wood in the kit, I could sandwich the glass in-between the pieces with glass glue and bolts - therefore making it a much sturdier piece to hang on the wall.


As I now had a red warning ring I felt like I needed a warning statement to go on it.  My daughter helped me out with that - I wanted both the words 'Time' and 'Waste' within it.  She she wrote... "Don't call time on the Earth, reuse, don't waste". That worked really well so I wrote it on.

I was VERY unhappy with this as my handwriting is appallingly bad.  So it was back to the drawing board for that.

After a quick repaint, I dug out my vinyl cutting machine and I had some scraps of black vinyl left that had come from my old shop many years ago.  I cut out the words by machine this time and it looked so much better.  Using the vinyl was something I wanted to avoid if possible, due to it being plastic.  If it wasn't lockdown and I could have found someone with nice handwriting I would have definitely done it that way instead.


Now it was time to put it all together and add the clock mechanism.


And my piece was finished.  And it holds it's own weight well on the wall... and you can tell the time so it's functional too, as well as being a conversation starter,

I have enjoyed this project. I particularly like working with materials that might have otherwise gone in the bin.  Giving something a repurpose is something I try to do in other aspects of my life, like adapting clothing and sprucing up furniture.  So this assignment was right up my street.

Wednesday, 30 November 2016

Memory Cuddle Cushions, from a Loved One's shirt.

I was recently commissioned to make some cushion covers from men's shirts.  The gentleman who owned, and obviously wore the shirts, had passed, so these cushions were to be a precious memory of him.

First of all I was told they were to be for a 16"  (40cm) cushion pad.  And there lies the first issue. You would think that you could just cut a square and sew it up, wouldn't you?  But at no point could I get a 16" measurement that incorporated the logo too  (Ralph Lauren).    The measurement across the shoulders was less than 16", but if I dropped down I lost the logo as the measurement down from that didn't measure 16" either.

So, a bit of artistic cutting and rebuilding was needed.

First I took off the sleeves (both of them), and sewed a little fabric under the shoulder seams to make up to 16" (plus seam allowance of course) across.  I cut off the back and used it to panel in a piece at the front, therefore utilising the buttons from the front to be the opening for the cushion at the back.

To make it less cushiony and more "shirty" I sewed a sleeve back on the front, laying across the chest.  I also left the neckline in place, sewing up all the gaps by hand.


So, as you can see, I managed to get the logo in  :)


And the back.... perfect button opening for the cushion to pop in and out for laundering.


So, that was one done, onto the next.  

The blue one was a bit trickier again as it was short sleeve, so a huge lack of fabric to work with. 


 So what I did was I simply cut a square out of the main part of the shirt to include the neckline and logo, hemmed it all the way around and appliqued it to a plain square taken from the back of the shirt.


Again, I used the buttons from the front to make the opening for the cushion to pop in and out.
  The blue method was definitely easier, and both look good I think!


I hear the recipient was pleased anyway, and that's the main thing   :)

Saturday, 11 June 2016

Decopatching an old school chair

I managed to lay my hands on a few of these fabulous old school chairs.  Do you remember them from your days at school?  I certainly do!  I recently wrote about running a decoupage workshop with them, so I thought I should show you the sample chair that I made before the workshop went ahead.


These are the paper I chose, one for the frame and legs, one for the seat and one for the back.


With the TV remote and a glass or two of wine, I got to work.  Blue on the legs...


Butterflies on the back...


But, oh no!  I had run out of blue paper, and would you believe it?  I was a discontinued pattern - I couldn't get any more!!

So, a change of plan was needed.   And something dark enough to cover over the blue.  Red.  Roses.  Yep, that will do nicely.


I finished the seat pad off with a gorgeous multi-floral, and it was done.


Rather pleased with it, even if I do say so myself.


Now, where can I find to put it?

Monday, 6 June 2016

Decoupaging old School Chairs

I had managed to  get my hands on a few very old wooden school chairs. In not bad condition too.  

But what could I do with them?   I buy these things without a plan, and have to think of the plan later.

Aha!  I could run a decoupage workshop with them.

And that is exactly what I did.


Some lovely ladies joined me and got to work with some sandpaper at first, scrubbing the varnish off the chairs to give it a rough edge for the paper to stick.  

Just look at that wee baby enjoying the movement at Mummy scrubbed the chair!  (she was picked up by Dad soon after, before the messy play started).


Each lady picked a completely different colour scheme, some went for pastels, some for vintage, some for brights and bolds.   I wished I had picked all of them as they all worked up really nicely.


The workshop was just two hours, and of course you can't decoupage a whole chair in two hours, but they made a good start on the seats, then took home the skills and materials to complete the chair in their own time.


Just how fabulous are these?  I think the pink is my fav... no wait, the blue.... no wait, maybe the....... agghh, I just cannot choose!


And a close up so you can see just how nicely the papers worked.


I cannot wait to see these chairs finished, and if you are reading ladies, please do not forget to send me photos.


Saturday, 16 April 2016

Toy Cars and a mirror.

I finally got round to doing something I had in my head for ages last weekend.  I made my grown-up son a gift.  He is car mad, and loves the colour red - which made the decision of what to make a little easier.

First of all I sourced some toy cars - the matchbox size ones.  I paid £5.00 for a shoe box full on a Facebook selling site and got to work with a can of Plastikote enamel spray in metallic red.


This bit was quite enjoyable, seeing all the different shaped vehicles all turn a vibrant shade of red.  (I also managed to spray my wheely bin, which I was using as a table!)


Don't they look great?


I then scoured the charity shops for a suitable mirror and found this lovely oval one with a wooden frame for just £2.00 - the dust was free and there was plenty of it, but after a good squirt of Mr Muscle it was nice and sparkly.


I decided that hot glue would probably be the best way of sticking the cars to the wood.


Bostik glue gun, Hobbycraft's own glue sticks  :)


They did the trick perfectly.  So much so that I can pick the mirror up by a single car and it still holds.
Not that I will do that very often of course, but these things need to be tested.

I wasn't going to include this little crane vehicle, but when I saw how the arm draped across the mirror I knew I had to  :)


Not sure which is my favourite vehicle - the cement mixer is up there I think.


And then we were done!  Now to find somewhere nice to photograph it so you don't see all the moss on my conservatory roof!


Dining room.... that'll do.  :)


He seems to like it anyway, and I am pretty pleased with the result too.   Now, what can I spray and stick next?

Monday, 30 November 2015

Extending Baby James' blanket

Way back in May I made a baby blanket for my great-nephew James, you can find that post HERE.

This was the result.

But, as babies do, James grew, and consequently outgrew his blanket, so it needed to be made bigger.
 I unpicked the fluted fan edging and luckily found some of the same W.I Soft & Cuddly Yarn and just added more rounds in clusters of three Treble Crochets.

Round and round and round I went, six extra balls in total, until it was small bed size.


Hopefully this will last the little chap a good while longer now   :)

Tuesday, 8 September 2015

Rug making at The Devil's Porridge Museum

Last week I was invited to The Devil's Porridge Museum to do a demo on Rag Rug Making. 

This was part of the "Pack Up Your Troubles" event to celebrate the 100 year birthday of the townships of Eastriggs and Gretna.

My brief was a tradtional style rag rug which might have adorned the floors of houses in years gone by.

I hemmed some hessian and got to work on a traditional(ish) design.


I was situated in the 1940's "house", a little section of the museum made up to look like those days of old.  I remember loads from this little corner, from my Grandparent's house.  The old Singer sewing machine, the carpet sweeper, the vintage typewriter... and much more.


Now, the donated fabrics that I had to work with were obviously modern and not like the traditional wool coats and bits that they used to use to make the rugs, so there was a mixture of modern materials with a traditional element, which I think works very well.


People got stuck in and had a go, the rug is large and will need to be a big community effort to get it all finished.


Although those fabrics were bright and colourful, at the end of the session I could see that they were really going to work well.


I just hope someone remembers to send me a photo when it is finally done, as I would love to see it completed.


If you have never been to the museum, do go. It's only a few miles from J44 of the M6 and a very interesting little place.

You can find out more about it here...

http://www.devilsporridge.org.uk/about/