Showing posts with label hand building. Show all posts

Monday, 14 March 2022

Glazing Ugly Pots

 I had a couple of pieces of hand built pottery that I wasn’t particularly over happy with, so I thought I would use them as glaze test pieces.

This has taught me that I really need to make all of my own glazes and test them properly, as this piece stuck to the kiln shelf as the glaze ran so much!

At Uni we have a system that nothing goes in the bin and we are encouraged to use any left over glazes from other peoples projects, should we wish to do so – the issue with that is you never know what you’re going to end up with.

With this one I dipped one half in one colour and the rest in another colour, then splashed it for added effect.


It’s still ugly  😊

But, it’s all a learning curve.


Saturday, 12 March 2022

Sgrafitto – kidney dishes

 I thought I would practise my new found Sgrafitto skills on my kidney dishes.

They had been dried to a leather hard state (not fired) and then coated with three coats of coloured slip – orange on one and bright blue on another.

They had been dried to a leather hard state (not fired) and then coated with three coats of coloured slip – orange on one and bright blue on another. 


(The colour comes out when the firing process is finished.)

I decided on a kind of visual illusion pattern – which looks better on a flat piece of paper to be honest, but I think it did work quite well on this.

I started by marking the dishes out in sections…….

……then carved smaller lines into each of those sections.


I am quite pleased with the result of these.. off to the kiln to be biscuit fired before being glazed and fired again.


Learning Sgraffito

 This morning we had a ‘slip decorating’ demo planned, and our tutor had prepared a large dish to demonstrate on.

As I was hanging about the room as it was being prepared I asked some questions about how to apply my Sacred Geometry designs to clay – I was told to go home and prepare I pattern and he would show me during the demo.


So I went home and found a relatively easy pattern to draw on YouTube - https://youtu.be/m10l55vMTOw

And got to work.


Back at Uni, I placed the design onto the clay and pinned around the lines to give me a grid.

The clay had been painted with 2-3 coats of coloured slip.


Then it was time to carve out the marks with a carving tool.  Through the coloured slip and into the base clay underneath.

There were lots of other techniques going onto this plate too, but it was really cool to be able to add some of mine.


Rob (Tutor) then started adding coloured slip and other marks, some stencils and other bits to the dish.


This is the finished dish, with loads of decoration going on.

I have now been given the task of trimming it and getting it ready to fire – then I can keep it!  😊


Wednesday, 2 March 2022

Sling Mould – flower print dish

 Today we had a demo in making Sling or Slump Moulds.

You create a sling over a frame, using a towel (or other fabric) – but first you need to find a form.

I had an idea that a lampshade frame would make a good form, so I trotted off to the charity shop to see what I could find.  I found a vintage lampshade that was plastic with a veneer inside.


I draped a towel across the top of the lampshade and tied it tightly with string. 

Then I rolled out my clay and laid it over the top.


Very carefully, with a slightly damp sponge, I eased the clay down onto the towel sling.

Once I was happy with the depth, it was time to trim off the excess.

Then it was time to smooth the whole thing out and make it all neat and tidy.


I decided I would like to experiment and see how rubber stamps might work. I only had a set of two different sized flowers, so went with those.  Have now decided to get some more in different designs ðŸ˜Š


Really pleased with how this turned out – now it was time to cover it lightly and wait for it to become leather hard so I could trim it a little.


Once leather hard, I could trim the lip off a little and tidy it up, then it was ready to dry properly and be fired.


Watch this space for the next update on this dish  :)

Monday, 7 February 2022

Learning to make a slab box


Another first in ceramics today for me – learning how to slab build.

With slab building you have to roll out the clay to your desired thickness  (using a clay roller, rather the by hand) and leave it to dry to the correct dryness.

If it is too soft the slabs will not be sturdy enough to build with, and it it’s too dry then with just crack and break. – this may take some time to get right!


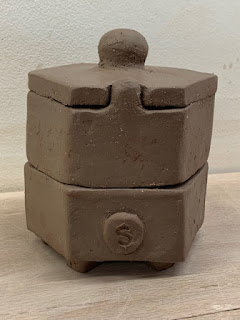
Our task was to build a box with a fitted lid, a knob on the lid and feet on the base.

I thought I would do a hexagon shaped box,  I had to mitre the sides so they all fit together nicely – this was a good bit of guesswork to be fair, rather than mathematical preciseness.

My feet were a bit rubbish to be fair, a bit clunky – but it had feet so I had ticked that box.


The lid needed to fit without falling in – but because my hexagon wasn't a true shape, my lid would only fit if placed in one direction.   To solve this I added a knob to the front of the box and cut a gap in the lid, which means the lid can only be put on in the way it will fit.   (Hope no one notices !)

As I had cut loads of pieces of clay, I had enough to be adventurous and make a second layer, this one had slightly better feet (in my opinion) but again needed to be placed in the correct position to fit the lower box, so I added a signature button to show which way it should go.


I will be really interested to see how this turns out, I hope it survives the kiln firings.

These boxes are going to go into a Raku firing later on in the module.  Before then it will be fired in a biscuit fire at 800 degrees, then glazed with a Raku Glaze.