Showing posts with label handbuilding. Show all posts

Sunday, 24 April 2022

A really useless jug!

For some random reason I decided to make a useless jug.  

I wanted it to be a challenge to pick up due to a strangely shaped handle, and just in case someone fancied using it as a jug or a vase, I put holes all the way down the back to make it totally leak if water was added.

Why?  No idea.  Just a strange idea.

Anyway… I hand build it using rolled out slabs of clay.


I then painted it in a few coats of different coloured slips.

Can’t even remember what colours I used as I was just grabbing anything from the cupboard, so it will be a nice (or not) surprise when it comes out of the kiln.


I decided to do some random designs on it too with my Sgraffito carving tool.  I marked off some sections to begin…


… then lightly marked a pattern so I could go back and carve it properly once done.


Quite pleased with the outcome so far, it will look a little different once glazed and fired.


Thursday, 21 April 2022

Carving little dishes

 I was working towards making a tea set in a Moroccan style with little lemon dishes and a dish for a sugar cone.

The design I wanted to use was the one from the Ben Yusuf Madrasa  (A place of study) in Marrakesh.

I followed the instructions from Eric Broug’s book on Islamic Geometric Patterns and drew the design using a pair of compasses and a ruler.

I had previously made the little bowls and they had been dried to a leather hard state (not fired) and then coated with three coats of yellow coloured slip. 

(The colour comes out when the firing process is finished.)


I printed out the pattern in various different sizes and placed it into the prepared dish.  I then pin pricked the lines.


I then went in with my new Xiem carving tools and followed the lines to carve out the pattern.


It took a while, but it is quite a mindful and therapeutic process… so you get lost in it a little.

Using different parts of the design I made each one a little different.

Can’t wait to see these once they’ve been fired and glazed and refired.


Wednesday, 20 April 2022

Mini Kiln Building

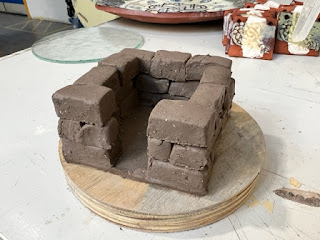
We were given a little challenge by our ceramic tutor to research and build a mini kiln – no bigger than 6” high.

I decided I would build something that resembled a hand-built wood fire kiln.

Using this photos taken from Google images, as inspiration.


I grabbed a lump of clay and some tools and got to work.

It was easy enough to build the bottom part, brick by brick, with a gap in the front to allow the air to fuel the fire.


I added some little clay ‘sticks’ as detail.


Next job was to make a little grate, that would sit on top of the brick kiln for the potter to sit on to be fired.


Then I made the top part of the kiln, where the posts would be housed for firing.  This was a round shape, which I made with little bricks again, sealing the inner walls with smooshed up clay.

I also made a lid and some little pots.

Unfortunately the grid snapped when drying, but it wasn’t going to be fired so all was ok  😊

I assembled and presented my little kiln and got awarded 8 out of 10.

Two marks off, as I didn’t put a hole in the lid, and I didn’t label it saying what type of kiln it was .

It’s an updraught one by the way!  😊


Tuesday, 15 March 2022

Geometric Sgraffito

 Having really enjoyed the process of Sgraffito, I thought I would try and make a largish bowl with an interesting geometric design.

 I created a slump bowl into a towel tied across a lampshade,  smoothed it out and left it to dry to leather-hard.

Next I painted it with 2-3 coats of pale blue coloured slip.


Then I decided to add some random splashes of dark blue coloured slip.


Now it was time to draw out a design.


I followed the Mustansiriya Madrasa pattern from the book  ‘Islamic Geometric Patterns’ by Eric Broug.


I placed the pattern onto the middle of the dish and pin-pricked around the outlines.


I then peeled the paper off, replaced it so it would tessellate, and did the process again.  I added the pattern 5 times in total.


Then it was time to carve out all of the mark lines. 


This is such a satisfying process.  Very zen like – until it goes wrong of course!

Once done, it was time to leave the bowl to dry out some more (fingers crossed it survives) then off to the kiln to be biscuit fired.


Monday, 21 February 2022

Porcelain Hedgehogs


We were encouraged to try the three different types of clay available in the workshop – Stoneware, Earthenware and Porcelain.

I decided I would try and make a hand-built pot out of porcelain!   I failed, miserably.

Nothing I did worked, not like the other clays that were much easier to handle.  Everything I tried in porcelain just kept collapsing…… so for the sake of not wasting any more product than I already was, I made some little hedghogs out of the lump I still had out.


I think I will practise with the other clays before attempting porcelain again   😊


Sunday, 6 February 2022

Learning to make a ceramic pinch pot.

It was the first of my ceramic lessons today – not a module I was particularly looking forward to, I must admit.

Having done ceramics at school (I was bad!) and then at Adult evening classes (I was just as bad!!) I didn’t hold out much hope at all for being even half decent at it.

Our teacher was the marvellous Rob Winter – a superb ceramicist.

Our first lesson was handbuilding and to make a pinch pot.

We took a lump of stoneware clay and formed it into a nice smooth ball by banging it slightly with the palm of our hands whilst turning in the other hand.

Once smooth I would continue to turn whilst pressing my thumb into the centre.

This wasn’t so bad after all – I managed to turn and press my thumb into the hole making it bigger and thinner each time.

Then I added a ‘signature’ button so I could tell it was mine when it came out of the kiln.

Considering the very first effort that I had made way back in school over 40 years ago… I don’t think I did too badly.

This piece is going to go into a Raku firing later on in the module.  Before then it will be fired in a bicuit fire at 800 degrees, then glazed with a Raku Glaze.


Saturday, 5 February 2022

Learning to make handbuilt Coil Pots

My first attempts at making coil pots.

With this technique you make a base then build the sides of the pots up using coils, which you then squish together.

First I went for a straight sided pot, which I then textured to look almost like wood.


The second one I wanted to be more sculptural – this was harder – and yet, it looks like it’s a mistake!   😊


I don’t think I like it at all – but maybe it will be a little more exciting once it is glazed.

I thought I would have another go – this time I build the shape of the pot then added loads of curly features to the outside.


The weight of the extra clay on the outside caused the pot to sag a little, so I held it up inside with a wooden tool while drying it with a hair dryer.  It helped a little but is still a little misshapen.


They went into the kiln for a biscuit firing at 800 degrees