Showing posts with label kiln glass. Show all posts

Monday, 25 April 2022

A puddle of circles

One of our lessons in Uni was on how to cut circles from glass.

The easy bit is actually cutting the circle, the harder bit is breaking it out from the rest of the glass…. So it’s good to get a bit or practise in.


I cut nine circles out in total, using three different colours and various different sizes.

Then I thought I might pop them in the kiln to fuse together and make an interesting wall hanging.

After being left overnight to fuse in the kiln, I was quite excited to open the lid and see what I had.

It’s maybe a little more ‘puddly’ than I would have chosen, I should have not fused it as high as I did in retrospect, but I still quite like it.


Sunday, 10 April 2022

More Pate De Verre

 Last week I tried a little Pate De Verre – and I did admit it wasn’t my most favourite technique…. but today I found myself wanting to have another go.

First I made a couple of moulds.

The first dish was made using a wax cast from a silicon mould.

The second piece I wanted to be a cone shape to represent a Moroccan sugar cone, so I hand built a cone shape out of clay.


Once I had the wax and the clay I made a plaster mould around them. Using the recipe 1lb each of plaster and molochite to 1.5 pints of water.

Once the moulds were dry, I melted the wax out of one, and dug the clay out of the other.


Then I mixed frit glass with a mix of 50/50 glasstac and water into a thick paste.

I pressed this into the moulds, then packed them with a pre-fired plaster powder so the glass didn’t collapse back into the middle.

Then off to the kiln to be fired at 765 degrees for an hour.


Quite happy with the results of these…

A very untactile little dish and a white cone that actually does look like sugar!


Wednesday, 6 April 2022

The Kaleidoscope Project - Tartan disc.

 As part of a uni assignment, I am creating a type of kaleidoscope – the viewer will be made from mirrors and the discs will all be different using various forms of architectural glass techniques.

This disc is a fused ‘tartan design.

I started off by cutting a circle out of glass, then I cut some glass ‘ribbons’ and stringer to fit the circle and laid them onto the class.

I actually worked directly into the kiln for this disc as I knew that trying to move it after placing the ribbons and stringers would be very stressful – and probably unsuccessful 😊


I then fired it at 760 degrees to fuse the decorations to the disc.


I was really pleased with this one when it came out of the kiln, I really do like the Tartan effect.

And it looked great through the kaleidoscope viewer.  😊


Tuesday, 5 April 2022

The Kaleidoscope Project - candy stripes disc

 As part of a uni assignment, I am creating a type of kaleidoscope – the viewer will be made from mirrors and the discs will all be different using various forms of architectural glass techniques.

This disc is a fused ‘candy stripes’ design.

I started off by cutting a circle out of glass, then I cut some glass ‘ribbons’ to fit the circle and laid them onto the class, not in any particular order.


Then it went into the kiln and I fired it at 760 degrees to fuse the ribbons to the disc.


The finished disc was lovely and smooth, and the ribbon lines were nice and crisp.

It made a really interesting pattern when looked at through my kaleidoscope viewer.  😊


Monday, 4 April 2022

The Kaleidoscope Project - Mandala Disc

 As part of a uni assignment, I am creating a type of kaleidoscope – the viewer will be made from mirrors and the discs will all be different using various forms of architectural glass techniques.

This disc is a sandblasted mandala design.

I started off my drawing a mandala in a iPad app called Amaziograph.


I found a lovely piece of flashed glass, which is clear glass with a coating of colour on one side.

You can sandblast through the coating to make sections clear glass again.


I used a masking tape and placed the mandala image on the top, and cut through them both with a very sharp craft knife.


Then it was off to the sandblaster to blast away the parts I had cut out.


I wasn’t really prepared for how long it would take to blast through a 1mm layer of coloured glass – this was about 2 hours work!


After a few more hours I was finally getting somewhere…


I removed all of the tape, and popped the piece into a kiln to fire at 650 degrees so that it would soften the sand blasted areas to make it all nice and shiny again.


I’ve still got to grind the edges and maybe put some tape around it to make it a little neater, but so far I am quite pleased with that.


And it looks really cool through my kaleidoscope viewer.  😊


Sunday, 20 March 2022

Kaleidoscope Project – marble disc


As part of a uni assignment I am creating a type of kaleidoscope – the viewer will be made from mirrors and the discs will all be different using various forms of architectural glass techniques.


The first one I wanted to make was to include shop-bought marbles.


First I put the marbles in the kiln to melt down so they had a flat bottom.

This meant I could arrange them neatly onto a disc of glass without them rolling all over the place.

I cut a 15cm glass circle out of window glass and placed the marbles onto it.

Then into the kiln it went up to 820 degrees.

The next morning I was way too impatient and had a sneaky look while the kiln was still at about 100 degrees  (not really recommended in case the piece thermal shocks and cracks.)


Happy with the result.. I think it should make a good disc to view through a kaleidoscope.


Friday, 18 March 2022

First attempt at Pate De Verre


Todays demo was on Pate De Verre (Paste of glass)  and I thought I would have a little go myself!

What you need for this is a plaster mould, a teaspoon, some frit (fine or powder is better) and a mix of 50/50 Glasstac and water.

You mix up the frit and glasstac mix to a thick gritty paste, almost like sugar topping.


Then you take the teaspoon and press the paste into the mould, compacting it as much as possible.


I also added a little blue glass mix at this stage too to make it a little more interesting.

Once you are happy with the thickness of the glass paste, you pack the remainder of the mould with a pre-fired plaster to stop the glass collapsing during firing.

Then off to the kiln to be fired at 765 degrees for an hour.


When it is cold you shake the powdered plaster out – wearing a mask so you don’t breath in any nasty particles.


Then you can carefully chip away and break the mould off to reveal your glass work underneath.


Not bad for my first go.  Not sure it will be a favourite technique as it’s not hugely tactile to tough and hold, but I enjoyed trying the process.


Monday, 28 February 2022

Fused Glass experiments.

 Today we got to play with pieces of glass – layering them up to create some interesting patterns and designs.

I have done this for quite a few years now in my own studio, but it was nice to just ‘play’ and see what happened rather than creating something purposeful to perhaps sell or gift.


I just layered up some pieces that I had found left over from someone else’s waterjet cutting project, I thought they formed interesting shapes and was interested to see what would happen when they were layered on top of each other.

It was fired at around 780 degrees – normally at home, I would have gone a little higher to create a smoother surface.  But the texture was quite nice.


Monday, 31 January 2022

Lost Wax Casting - my own hand!


We were learning how to use silicon casting material today to take a nice detailed cast of items – which can then be made into wax and finally glass.

 So, I thought I would do my hand, complete with jewellery to see how much detail I could get.

 So I plunged my hand into the bucket and waited a little while for it to set – then after a slight wriggle or two, I was free!

The next step was to pour melted wax into the mould, and wait for that to harden.

Once the wax was set I could break away the silicon mould – I then set the waxy hand on a lump of clay to form a base.


Plaster Recipe for refractory mould:  (to be measured up as required)

·       1lb plaster powder

·       1lb molochite powder

·       1 pint water

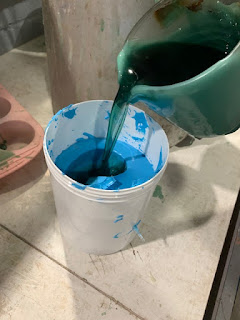
Now it was time to cover the hand in the plaster mix.  Adding layers at a time to ensure all the parts were covered.


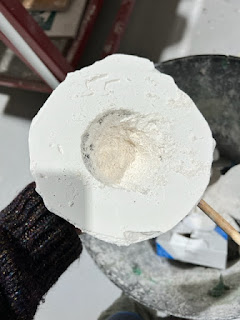
When the mould was dry, it was time to scrape out the clay and melt out the wax. 

This was done over a steamer, allowing the wax to drip into a tray which meant it could be reused.

Once the wax was out I have to fill the mould with water to measure how much glass I would need  (2.5 x the amount of water)

The mould was then put into the drying cupboard.

Once dry, I filled a terracotta plant pot with the correct amount of glass and they went into the kiln.

The mould was positioned with a table above made from kiln props, on this sat a plant pot with my measured amount of glass in it.  Once the glass melted it dripped through the hole in the plant pot down into the mould.

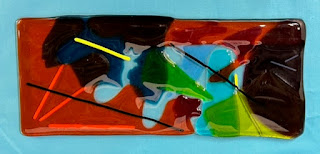
I used some scrap glass from the HotShop to make this as I fancied a little colour.


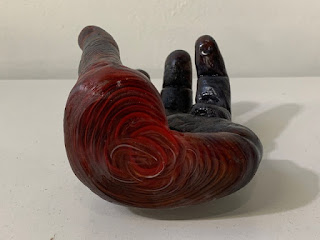
Now it was time to very carefully chip away the mould, making sure not to damage the glass inside.


Dah da!    A lovely glass hand …. minus a little pinkie  😊

 It was at this point that I realised I had not added any cocktail sticks to help air and glass flow – lesson learnt.

The silicon mould doesn’t last long and is not really reusable over time, but I managed to get another wax cast from it.

This piece didn’t need any coldworking at all, I purposely underestimated the glass amount needed so I didn’t have much (or any) overspill, and it all came out quite smooth.