Showing posts with label mould making. Show all posts

Thursday, 7 April 2022

Casting my hand in alginate

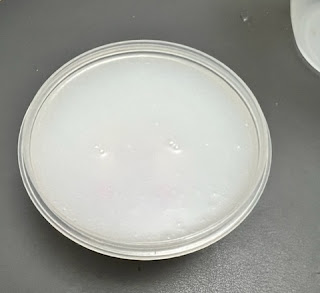
Today I had a play some alginate, in the hope of making a plaster hand to hold a light bulb!

 The brand I used was Babyrice – strange name, but it smelt good – all minty and fresh!  😊

I mixed it up according to the instructions, poured it into a suitably sized container and stuck my hand in it.


It set in about 5 minutes, but it’s quite hard to keep your hand still for that long… I am not the most patient person.


It took a little wiggling to get my hand free, but eventually it popped out leaving a nice hole to cast into.

The colour had also changed from pink to white during the process, this is something to do with the setting process.

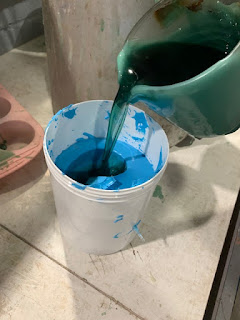
I filled the hole with a plaster mix of 1lb of plaster to 1 pint of water.


Then I left it alone for a little while for it to set.  The alginate had turned back to pink again at the point.

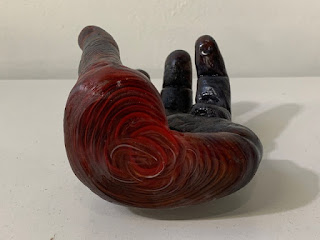
The next job was to remove the alginate from the plaster.


I was really pleased with the amount of detail on the plaster, you could see all the wrinkles on my hand quite clearly  😊

But, ALAS, I had managed to miss out some finger parts!

I guess I must have caught some air as I pushed my hand in.

I did get my hand into the position I wanted before pushing it into the alginate – on reflection I should have pushed my hand in open, then formed the shape I think.

I shall have another go and test that theory.

But it was good to have a go, and discover what errors can be made..... and changed in the future.


Saturday, 19 March 2022

Silicon Mould – tiny trainers

Todays demo was on making Silicon Moulds.

The benefit of silicon moulds is that they are reusable over and over again – for various uses too – wax, resin, polymer clay etc…

The silicon I used for this project was a 1-1 mix which you can find on Amazon.


As the silicon is quite expensive I wanted to try it on a smaller item first… so I had a look about my local B&M shop and found these little trainers  (they seem to be collectable and come in a blind bag).  I thought they would work really well.


The little shoes are hollow which I thought might cause an issue with the silicon going right inside, so I partially stuffed them with a dog-poop bag.

Then I stuck them into a little plastic pot using a glue dot.

If I didn’t stick them down I thought they might float up when the silicon was added.


Time to mix and add the silicon.

I had just enough to cover the shoes luckily.

The price of this was £10.00


Then it was a long, overnight wait, for the silicon to set.


Then next day I could turn it out of the plastic pot and flip it over. The silicon had covered the bottom of the shoes every so slightly with a thin layer, but I could easily cut this away with a craft knife.


They came out nice and clean and left a good impression in the silicon.


Now it was time to see if the mould had worked.  I poured warm melted wax into it… and waited until it had set.


They turned out better than I expected.  I would need to give them a little tidy up, and go around the inside of the trainer with a hot tool to melt the wax a little and make it a little neater.  But quite pleased with those.


Thursday, 17 March 2022

Gelflex Mould

I wanted to have a go at Pate De Verre (paste of glass) but first I needed a mould…

I had this broken wine glass which I thought was quite a nice shape for a little bowl.

So I took some chunks of Gelflex, popped it in a bowl and put it in the microwave for 3-4 minutes.

Once melted it looks like the most disgusting pea-green soup!


I stood my glass up in a bucket with a little sand in the bottom to keep it steady – and also to take some of the heat out of the Gelflex when I poured it into the glass.


Then it was a couple of hours wait for it to set.


The best thing about Gelflex is that once I am finished with this, it can be remelted and made into a different shape.

Getting it out of the glass was trickier than anticipated, it had a real good grip on the side of the glass.  But I got there in the end.


Quite pleased with that!


Now to make it into a plaster mould for my Pate De Verre.

I placed my shape upside down on the table (wiped with a little vaseline before hand to prevent sticking) and made a plaster mix.

  • ·       2lb plaster
  • ·       2lb molocite
  • ·       2 pints water


Then I patted it into shape over the mould.


Once it was dry it was time to ease the gelflex out of the plaster – which was easier than getting it out of the glass.


Now the mould is ready for my Pate De Verre.


And the Gelflex can stay to make another mould or be reheated to make something new.


Tuesday, 1 March 2022

Making a hump mould - nibbles dish

Today we had a demo in making Hump Moulds.

You create a form either from handbuilding or throwing, make a plaster cast of it, and from the plaster mould you can reproduce many dishes the same by using slabs of clay that are coaxed into the mould with a damp sponge.

But first the mould………

I decided I would like a kind of pear shaped nibbles dish, that would sit in an almost flower shape when in multiples.  So I formed a solid lump of clay into the shape I wanted.

 Next I put my shape on an acrylic board and built a little wall of clay around it so I could judge where the plaster would go.


Time to mix up the plaster mix….


Plaster Recipe for hump mould:  (to be measured up as required)

  • ·       1.5lb plaster powder
  • ·       1 pint water

I built up the plaster in layers by hand – I didn’t want the mould to be super heavy, so I added an even layer around the clay but not too much.


Once the plaster was set it was time to flip it over and scoop out the clay.


A quick wash and brush up later and the mould is now ready to go……


Monday, 31 January 2022

Lost Wax Casting - my own hand!


We were learning how to use silicon casting material today to take a nice detailed cast of items – which can then be made into wax and finally glass.

 So, I thought I would do my hand, complete with jewellery to see how much detail I could get.

 So I plunged my hand into the bucket and waited a little while for it to set – then after a slight wriggle or two, I was free!

The next step was to pour melted wax into the mould, and wait for that to harden.

Once the wax was set I could break away the silicon mould – I then set the waxy hand on a lump of clay to form a base.


Plaster Recipe for refractory mould:  (to be measured up as required)

·       1lb plaster powder

·       1lb molochite powder

·       1 pint water

Now it was time to cover the hand in the plaster mix.  Adding layers at a time to ensure all the parts were covered.


When the mould was dry, it was time to scrape out the clay and melt out the wax. 

This was done over a steamer, allowing the wax to drip into a tray which meant it could be reused.

Once the wax was out I have to fill the mould with water to measure how much glass I would need  (2.5 x the amount of water)

The mould was then put into the drying cupboard.

Once dry, I filled a terracotta plant pot with the correct amount of glass and they went into the kiln.

The mould was positioned with a table above made from kiln props, on this sat a plant pot with my measured amount of glass in it.  Once the glass melted it dripped through the hole in the plant pot down into the mould.

I used some scrap glass from the HotShop to make this as I fancied a little colour.


Now it was time to very carefully chip away the mould, making sure not to damage the glass inside.


Dah da!    A lovely glass hand …. minus a little pinkie  😊

 It was at this point that I realised I had not added any cocktail sticks to help air and glass flow – lesson learnt.

The silicon mould doesn’t last long and is not really reusable over time, but I managed to get another wax cast from it.

This piece didn’t need any coldworking at all, I purposely underestimated the glass amount needed so I didn’t have much (or any) overspill, and it all came out quite smooth.


Sunday, 30 January 2022

Poor Man's Silicone Moulding

 This was an interesting technique – called ‘Poor Man’s Silicone’ and you actually use a tube of cheap silicone from a DIY shop and plenty of washing up liquid.

It’s a very messy job – and smells unpleasant too.


You squeeze a tube of silicone into some warm very soapy water, then get your hands in and mix.  Add more washing up liquid if it is too sticky.  (You will need a lot more than you think!!)

Once it is a pliable putty type consistency, wrap it around the item you want to make a mould from – in this case I used a vintage old Nokia phone.


I added a layer of mod rock around this (bandage soaked in plaster) – it was to stabilize it, but there was no need really – I did use the mould a second time and just Duct taped it – and it worked ok.


Once the mould was set I sliced across the side and slipped the phone out.


It came out nice and cleanly, leaving a good copy of the phone within.


Time for the wax…….


And voila!   A wax version of a vintage Nokia phone.


I can now use the lost wax casting technique's to turn this wax into a glass piece  😊