Showing posts with label mistake. Show all posts

Friday, 1 April 2022

Teapot disaster!

My ugly little teapot didn’t survive the biscuit firing.


It turns out that the base was too thick, and it obviously still held a little moisture so it exploded in the kiln!


A little disappointing, but a learning curve no less.

Next time I will concentrate more on the thickness of the clay throughout.

I am just pleased the explosion didn’t wreck anyone else's work.


Thursday, 11 April 2013

First attempt at shrink plastic

I recall, many years ago, at Guide Camp, shoving crisp bags on the end of a stick into the camp fire, and turning them until they melted and shrunk right down.  We then used to glue a pin on them and use them as a brooch.  Sadly, the crisp packets these days are made from a different material - foil lined to keep the crisps fresh - and therefore do not melt.  But it was such fun, do you remember?

Well the modern day product seems to be Shrink Plastic (available in different brand names)  I wonder if the inventor of this also used to shrink down crisp packets.

I have been eyeing up the "Shrinkles" in Hobbycraft for a while now, but when I also spotted a Marabou stencil for a Stacking Doll type figure and idea formed....


I made a small purchase  :)  (the pens were already mine, I just had to search around the house and re-discover them, strangely under Shona's bed!!)

I made a start and very quickly worked out that normal felt tipped pens bleed, they looked ultra messy and frankly as if a 3yr old had coloured them in.  In fact a 3yr old might have made a better job!


I tried again.  Same result.


So then I dug some pencils out and had another go, I scribbled and scribbled to try and strengthen the colour as it was very pale, but to no avail (remember this bit, I will refer back to it later).


Ok, so I'm watching this project slide uncontrollably down hill, but instead of throwing them in the bin in utter disgust I thought I would see it out to the end and bake them.


But before they do I hole punched their heads so I can hang them from something.


The instructions say, Gas mark 3 for a "few minutes".  I take that to mean, 3 or 4 minutes, perhaps 5.  So I sit on the cold tiled kitchen floor and watch them through the oven door.  25 minutes later I decide to go and watch something on TV in the living room and allow my bum to warm back up.  At this stage I had watched them curl right up almost into little balls, then just wobble about with a big bubble in the centre.  I had to wait until they were totally flat before removing them from the oven.  My oven isn't a great oven anyway, I never use timings or heat instructions I just shove stuff in and take it out when it looks/feels cooked.  A throwback from using an old Aga when I was 17 and working in a hotel kitchen.

Eventually they make an appearance back into the real world, nice and flat.

Before and after cooking.


Before and after.


The colours are still horribly smudged on the felt tipped pen attempts.


But the pencil one surprised me, the colours had intensified a lot, were nice and crisp with neat edges.  Alas though, all that scribbling to make the colours brighter had resulted in lots of pencil dust which also intensified when cooked.


Lessons learnt I think..... off to try some Sharpies, see it they work any better.

ps: The Amazon links I've scattered throughout the page are affiliated  if you click and buy I might get a few pennies.   I'll never be rich, but every little helps ;)


Friday, 8 March 2013

Yarn eggs

On my Facebook feed I saw a photo that someone had 'liked' featuring yarn eggs - so I Googled it, as you do.

Must have a go at that, I thought to myself.

That afternoon, it was a Saturday, I spent 1 hour 55 minutes exactly (I know this as time was running out for the car park!)  searching for water balloons.

Being an adult (allegedly) I didn't realise that water balloons would be seasonal and hard to get hold of.

Hobbycraft didn't have any, the local News Agent didn't have any, neither did Hawkin's Bazaar or Poundland.  Wilkinsons was lacking in them too, as was The Works.  B&M Bargains had none and neither did WHSmiths.  The little newsagent in the market and the newstand in The Lanes, they didn't have any either.  My very last stop was to be Toymaster  - ta-dah!  They had them!!   Although they had just come into stock that morning.  (would you believe it - the very next day they came into Hobbycraft!!)

So, armed with a pack of water balloons I went home to start my craft session.

Now, have you ever tried to blow up a water balloon?   Well, let me tell you, they are the strongest balloon ever and my lungs didn't hold enough puff to even get the balloon stretched.  My cheeks ached for days after overstretching them. The balloons came with a little funnel to put water in, so I thought I would stretch them that way, then let them dry out and puff them up once stretched.  That didn't work, the water just fountained out of the funnel.

I set Shona and Marie a challenge - blow up these balloons.  But I also wanted two chocolate eggs popped in them at the same time.


In a whole evening they managed to blow up just 5 moderately usable balloons.  I say usable as some of them had little holes in and after all the huffing and puffing, and the tricky act of tying a knot in the top, the balloons shrunk slowly and hugged the choccy eggs.


Now really, you should be doing the wool wrapping as soon as the balloons were blown up, but as they took so long it was another 4 days before I could find some spare time to carry on.  This meant that the balloons were getting a little soft.


Still, not to worry.  I grabbed some wool....


and some PVA glue....


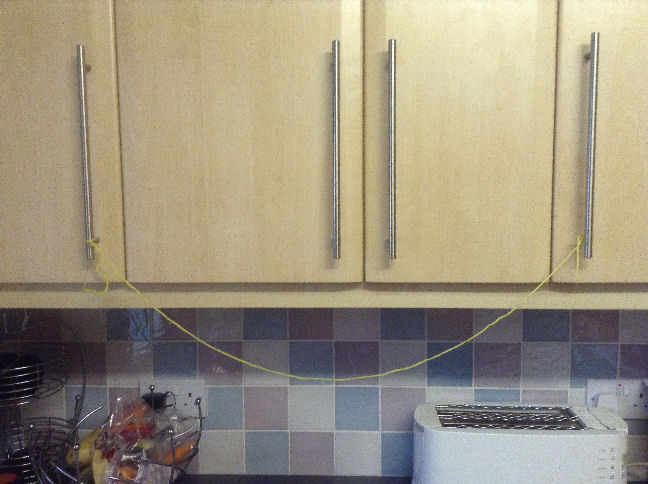
I hung up a 'drying line' between my kitchen cupboard doors...


and got messy with it....


When I say messy.... I mean MESSY !

There was glue everywhere, imagine trying to wrap sticky spaghetti around a balloon that it really doesn't want to stick to, imagine then thinking you have it sorted and noticing a huge gap, so you have to then fiddle with the sticky spaghetti to try and fill in the gaps.  Imagine having more glue on your fingers than a 6 year old would have.


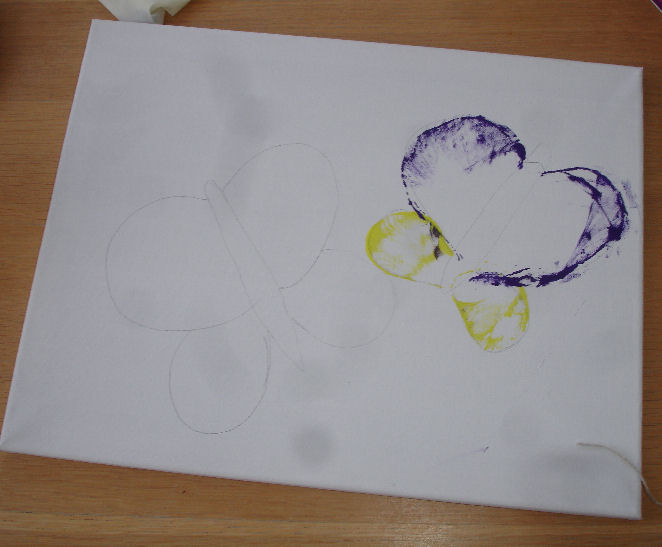
I managed to do three.


That was enough!

They took a good 24 hours to dry, that was 24 hours of not being able to get into the cupboards to get out food ingredients. (lesson to be learnt there)

Once dry, the instructions I found was to carefully puncture the balloon, holding onto the knot so it didn't disappear inside the egg.  Well, I did this, but the balloon didn't go down, it just stayed stuck to the wool.  So I let go of the knot and eventually managed to poke and prise it away from the wool.


So there we go, some crappy yarn eggs.  Don't think I will be doing this again.


Have you made any?  Would love to see, feel free to post links if you have.

Thursday, 5 April 2012

Not every experiment is successful.

You know when you get something in your head, and in your head it looks fantastic?  You can also work out in your head exactly how to make it work and what to use.  It happens to me, a lot.  Sometimes it works, sometimes it fails miserably :)

Yesterday, it failed miserably.

I decided for some really weird reason, that a string picture would look great.  You know those pictures you used to make in school with paint and string? Seeing it written down makes me think it wasn't such a great idea in the first place.

So, I got a pack of acrylic paints, and a ball of string, and a decent sized canvas.  Then I looked at it for about a week not quite knowing where to start.


So, yesterday, with my A Level art daughter Shona on board, we made a start.

I sketched a rough guide onto the canvas, cut up some string, then covered it in paint, layed it on the outlines, and pulled it off.


What a blooming disaster, we laughed so much at the mess, there was paint everywhere, all over our hands like we were 4 year olds.


The whole time my father, Lawrence, sat opposite shaking his head, tutting and laughing at the same time.


I decided not to proceed, as it was just a scribbly mess, so threw out the half mile of toilet roll, loads of paint covered paper plates and dribbled of painted string.

At this point Shona decided she could use the canvas and gave it a back wash in purple. If it is anything like her last one I bet it will be fabulous!  Watch this space.


Shona's last painted canvas. A blue strawberry with red lips for 'pips'.


Wednesday, 11 January 2012

A silly mistake....

I fancied a bit of knitting, but something I would actually wear and not get bored half way through when knitting it.

I found this gorgeous free pattern.....


http://berroco.com/exclusives/kia/kia.html

Right up my street is this style. Problem is it was for a certain wool type, which is now obsolete, and I wasn't sure what thickness of wool it was either. So off I trotted to the local wool shop, chose a nice double knit in a random shade of blues and greys, with a silver metallic thread running through it.  Perfect.  Bought my two sets of Sz 9 circular needles and rushed home to make a start.


I dug out my Sz 9 needles and set to work.  You start by making the edge piece, which you sew into a ring, then you pick up the stitches along once edge and just work in a big round.

At this point I should mention that I NEVER do a test piece to check my gauge (Tut-Tut)  does anyone?

So, I got the rim done, that looked fine, in fact the whole thing looked fine until I did the armholes, they looked a little neat, but just a little.  I carried on, it actually wasn't until the last few rounds that I realised this wasn't going to be the big baggy waistcoat, one to fit my generous frame, that I thought it would be. In fact, it was more like a bolero jacket for my Sz 8 daughter!


I do like the pinwheel design on the back though...


The mistake?  I used Sz 9 needles, which are 3.75mm instead of 9mm needles!!!

(the top ones are the ones I SHOULD have used, the bottom ones are the ones I did)


Oh well, lesson learnt.

Right, try again..... this is my new wool, and this time I have been out and bought 9mm needles.

Tuesday, 11 January 2011

Disaster in the kiln !

I am officially a muppet, yep, a bone-fida , slap my own head, stamp my feet in temper, muppet !!

What did I do?

Well, I spent a whole afternoon cutting glass, designing a couple of large wall-hangings, loads and loads of fused glass pieces for cabochons and pendants.  Filled my kiln up edge to edge, and went to bed quite excited about what I would find the next day.


What did I find? A whole load of cracked pieces, all because stupidly, I have picked up the wrong Millefiori and used it with incompatible glass. This means the glass seperates and cracks - in time the Millefiori will just fall away. It all has to go in the bin. 

You should be able to see what I mean from the piccies below.


What a shame, I really liked these ones too.


I am so annoyed with myself, for the lots and lots of wasted glass, for the wasted night in the kiln, for the wasted afternoon in the shed, and for being so dim for not checking.
Lesson learnt !

Saturday, 15 May 2010

UFBO - Gone wrong !!!


One of my many UFBO - now finished.


UFBO stands for Un-Finished Beady Object. I am notorious for starting things, and never finishing them.


My bead box is full of half-finished Beaded projects, but the real issue is, when I pick them up again months and months later, I can never find the beads I was working with at the time. This means I have to totally adapt the pattern and find something different to do with it.


This can be quite fun though, it's like having a platform to start from.


Anyway, the middle section of this necklace is a Peyote Spiral stitch, which is in green, cream, gold and brown, was the bit residing in my bead box, waiting to be finished. Of course I couldn't find the original beads - except the brown and cream, so a compromise was rapidly needed.


I attached a brown beaded spiral peyote to each end, but then found I was running out of beads, so had to swap to cream. I finished it off with a real copal amber bead to fasten.


Then I thought I was quite happy with it, until I spotted something........ on one side the brown section was thicker than the other. I had added one to many beads. Now you might not spot it, but now I have noticed it, it is irritating the life out of me !!!


Argghhhhhhhhhh. Oh well, sod it, it will have to stay like that, I aint pulling all that out !

Tuesday, 4 August 2009

A distaster in the Kiln !

I was in such a good mood this morning, expecting to come into work and find some gorgeous glass handkerchief bowl. I have made a few in the past so I should know what I am doing - you would think !!
Instead I lifted the lid and my heart sunk. It looked like a glass explosion, I had forgotten to change the kiln setting and left them to get so hot that they totally collapsed into a motlen lump.


Even my beautifully planned dish came out wonky.


Big intake of breath, puff out the chest, grab the hoover, clean the kiln and start again !


Now what could I make out of this? :)