Monday 28 February 2022

Fused Glass experiments.

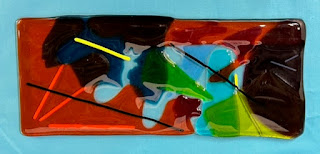
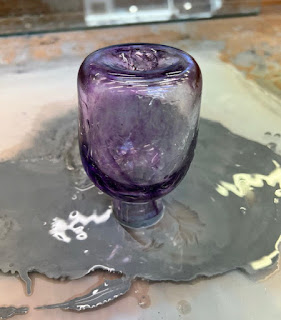
 Today we got to play with pieces of glass – layering them up to create some interesting patterns and designs.

I have done this for quite a few years now in my own studio, but it was nice to just ‘play’ and see what happened rather than creating something purposeful to perhaps sell or gift.


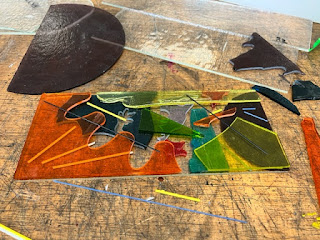
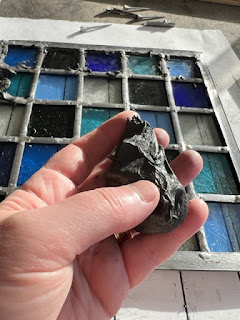
I just layered up some pieces that I had found left over from someone else’s waterjet cutting project, I thought they formed interesting shapes and was interested to see what would happen when they were layered on top of each other.

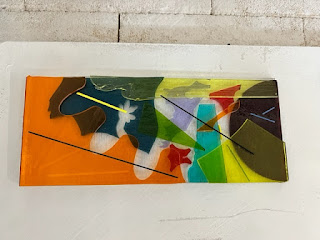
It was fired at around 780 degrees – normally at home, I would have gone a little higher to create a smoother surface.  But the texture was quite nice.


Sunday 27 February 2022

Raku Firing Glaze Results

We made our own Raku glaze for firing….

Description: Satin, smooth, light blue iridescent surface.


  • 80 parts Borax Frit
  • 15 parts Ball Clay
  • 4 parts Tin Oxide
  • 1 part Bentonite
  • 1 part Cobalt Oxide
Results:

Shown as raw clay, glazed ready for firing, Raku fired.


The next glaze I used was one I found on the shelf in the glaze room – we are encouraged to leave our spare glazes for others to use, and to use any leftovers.   There was no recipe printed on this glaze so it was a case of pot luck with how it might turn out.  Not sure I like the bright green, but it is certainly very vibrant!


Saturday 26 February 2022

Raku Firing

Today we did our first Raku firing.


Raku firing is done quite differently to a regular firing, as id is generally done outside, using a gas kiln rather than electric.

The pre-glazed pieces  (using a special Raku Glaze) are placed into the kiln and brought up to around 1000 degrees – but, ours was really done by watching the glazes change through the viewing hole on the kiln, as different glazes take different times to react to the heat.


Once the pieces are up to the correct temperature, they are placed gently into a metal bin full of sawdust and combustibles.  These combustibles then stick to the glaze, burn away and form interesting patterns.


Extra sawdust is added to cover, then the lid is placed on and the burning allowed to take place.


Once removed from the metal bin, the pieces were dunked into cold water and set on the grass to cool down.


Then it was time to clean off the carbon to reveal the true colour underneath.


Raku firing is quite a faff and I haven't yet decided if I like the uncertainty of the results yet or not!


Friday 25 February 2022

Flower in a bottle

Having cold worked a bottle for one of my assignments, I thought it looked a little too plain…so I decided to make a paper and wire flower to go inside it.

The flower stalk runs up through the bottle and flower heads poke out through both sides and the top.


There are also leaves which can just be made out through the frosted bottle.

This was a fun make, combining two skills that I have learnt in the start of my uni journey. 

Thursday 24 February 2022

Alcohol Inks on glass


I wondered how alcohol inks would react when dripped onto glass  - having had some success with using them on Gourds in the past, I thought I would have a play.


So, I took my inks and a bottle of 99% alcohol along with a pipette and got to work.


I found the results really pleasing – and then I found a piece of scrap glass that looked like a Sail…. Remembering I had some little handmade wooden boats that needed sails, I had another go at dripping ink followed by alcohol to make it run.


Really happy with the results. 


And it looks so nice with the light coming through it.


To finish the sail off I added an edge of Copper Foil – with the plan to soldering it, but then decided to leave it just copper as it looked nice.

Then I popped it into my little boat that a friend had made.


I love this, so easy to do too.


Tuesday 22 February 2022

Trying out some Glazing


After a lesson on Glazing today, we were encouraged to try out our own recipe glazes.  This was quite exciting, like a cross between a chemistry and a baking lesson!

We chose this recipe to try – it was supposed to be an ‘opaque speckle glaze’.

  • 30 parts of Feldspar
  • 10 parts of Feldspar (soda)
  • 10 parts of Calcium Borate Frit
  • 8 parts of Dolomite
  • 14 parts of Talc
  • 8 parts of Ball Clay
  • 20 parts of Flint

The pots that came out of the kiln were totally different, might be the position in the kiln, or the thickness of the clay – every little difference makes a difference.


Monday 21 February 2022

Porcelain Hedgehogs


We were encouraged to try the three different types of clay available in the workshop – Stoneware, Earthenware and Porcelain.

I decided I would try and make a hand-built pot out of porcelain!   I failed, miserably.

Nothing I did worked, not like the other clays that were much easier to handle.  Everything I tried in porcelain just kept collapsing…… so for the sake of not wasting any more product than I already was, I made some little hedghogs out of the lump I still had out.


I think I will practise with the other clays before attempting porcelain again   😊


Sunday 20 February 2022

Glass Glueing - a quirky sweetie box

A new skill learnt today – how to glue glass using UV glass glue that sets permanently under a UV light.

First of all I cut little squares of glass to glue together to create a cube….. but I kinda wanted to put something inside the cube so it would be encased forever…..

I found a handful of miniature chocolates and popped one into the cube before sealing it.

But I was having so much fun that I decided to add a second layer and a larger cube with more chocolates in underneath.

The result was a quirky glass box ornament.


It’s not the best put together cube to be fair, but practise makes perfect, as they say. 

Saturday 19 February 2022

Glass Painting a tree design

 I thought I might practise some glass painting and decided on a tree – nice and simple.


The paint powder was mixed with gum Arabic to make it a good consistency for painting with.

I then covered a piece of scrap window glass with it completely.


After that I started scraping away the paint to create a tree design.

This then went into the kiln to bake at around 650 degrees to make it permanent.


Lots of scope for this technique, with nice results too.


Friday 18 February 2022

A glass flower vessel

 I was just playing about in the Hot Shop today, with no particular end product in mind, I was just allowing the glass to become what it wanted to be.


I took a couple of gathers and rolled it in some frit, then blew it out to create a bottle or a glass…. Wasn’t sure which.  

Then I decided I would cut the top with some glass shears and push the glass back on itself to create a petal like effect.


Although not very even, it was my first time using glass shears on this sale (I have used them with Lampworking before) so it was all very experimental.


And I quite liked the result. 

Thursday 17 February 2022

A decanter and glass.


 Finally made a glass and a bottle that I was pretty pleased with for my assessment.

The bottle is maybe a little on the small side, but believe it or not, it does hold two of the glasses of water!


I originally made this bottle with a small lip for pouring, but when both the bottle and the glass were cold and out of the kiln, I realised that the glass wouldn’t fit on top of the bottle!

So, I cut the top off the bottle and then polished the rim so it would be nice and smooth again.   

And this time….. it fit!   Result  😊


Wednesday 16 February 2022

Coldworking a Port Bottle

 For this practise session I needed a bottle – I thought this Port bottle was a particularly nice shape, so I emptied it  (the night before I must add), washed it, removed the labels then it was ready to go.


First I drew a basic pattern on with a Sharpie marker…. I added to this later on as it was a bit simple.

Then I took it to the diamond wheel and experimented with the different shaped discs to create some cuts.

I was surprised to find that the thicker wheels gave the best lines, I expected the thinner ones to do that, so it was really work experimenting with the different ones to find out.


As it happens, I wasn’t very steady when holding the bottle so my lines are a little on the wavy side – but it was just a practise piece, we all have to start somewhere!


As the lines were a bit wonky at the top, I thought I might add a couple of strips of sandblasting to hide them a bit.   I did this by adding strips of masking tape to the parts I didn’t want changed, and giving the rest of the bottle a good blast.


Quite happy with the result, it was a fun task and has given me some ideas for some other projects.

Monday 14 February 2022

Stained Glass Panel

My first attempt as proper leaded stained glass – I have done numerous amounts of copper foiled stained glass, and I have edged some of those pieces in lead to make them sturdier, but I have never made a fully leaded piece – until now.


First I drew a ‘cartoon’ (a design on paper) and cut 25 squares of glass exactly the right size as the cartoon.


It’s really important to get the squares exactly right so that the lead runs straight along the lines.

The next step was to cut the lead to match.  The vertical strips ran in one piece, while the horizontal strips were cut to be slightly smaller than the glass squares.


Once all the pieces of lead were cut, I then ‘blocked’ it by hammering some nails in behind piece of wood to keep everything in place.


The next step was to cement it.  I made a putty out of lead cement and whiting and pushed it inbetween the glass and the lead with my thumb.

I then coated the whole lot in a layer of whiting and brushed it all off.


The final job was to give it a polish with black polish, and it was done!