Thursday 26 May 2016

A Quilling workshop

A couple of weekends ago we decided to travel down to Oxfordshire, we have friends there and Hubsters family live there also.  It was high time we visited them.

On one of the days we were there, my Mother-In-Law was going to a Quilling workshop - she is a very keen and very wonderful Quiller herself - so I cheekily asked if I could tag along.

The group meets at this Botley W.I. Hall.


So, in I trotted, behind the MIL, no idea what I had signed myself up for, except I knew it was papercraft, and I generally DON'T DO papercraft.

The tutor (Diane Boden Crane) showed everyone how to make the cutest little plant pots with bunnies sticking out of them.  This scared me half to death, I would never manage one of those, I was sure...after all, these ladies were all accomplished Quillers already.  So I just went off and did my own thing, with some guidance and help from the lovely folk on my table.


I picked some papers that I liked the colours of....


And, as mentioned, after a wee bit of help to be shown how to curl and shape, I got to work making name cards for my Granddaughters.


I then got a little more adventurous and started work on a random flower design that just popped into my head as I went along.


I thoroughly enjoyed this workshop, so much so that I bought all the stuff to continue at home (although I have still to remove them from the carrier bag) so watch this space...


Oh, these pretty boxes are the work of my MIL, so you can see I have a long long way to go yet   :)


Wednesday 25 May 2016

Colourful Baby Blanket

I made this a long while ago for a blog post, but it was never featured so I guess it is ok to share it   :) 

It is made from W.I.  (Women's Institute) yarn called "Soft & Silky".  It really is the most gorgeous feeling yarn, really satiny - and it is 100% acrylic so it washes really well.


I chose these candy, springtime colours, as I get bit sick of seeing babies in either blue or pink.


Zingy lime, refeshing orange, with a soft lilac and lemon, all joined together with a warm vanilla cream.  Sounds a bit like a posh pudding, doesn't it?


I did a series of rows, alternating the colours.


I shall write the pattern up very soon, just in case you fancy making one for yourself  :)


Tuesday 24 May 2016

A super chunky, ribbed crochet blanket.

I was asked to do a commission piece a little while back.

The yarn had to be super chunky and the design just a basic rib.

Sure, I could do that.  And I did.


I used the Soft & Chunky W.I. Yarn, which is a 70% acrylic / 30% merino mix.  The colour was a gorgeous shade of grey.

I actually loved this so much that I have a plan to make one for myself... eventually, once I have finished everything else that is.  (like that will happen!!)


I quickly found that I couldn't knot the yarn in as I went as it showed up quite badly, and I couldn't wait until the end of a row to restart a new piece of yarn as I would be wasting far too much, so I had to "splice"

I split apart the fibres of both the old yarn and the new one, then plaited them together before smoothing it out to be the same thickness as the yarn.
It worked really well and you honestly cannot see the joins.


This was a work in project, if you are wondering what the little tail is mid way up  - I have since trimmed it off   :)


The customer seemed delighted with this, as I would hope, because if not I wanted it back!   :)


Now, what colour should I make mine?

Monday 23 May 2016

A Potter I am not....

There is this thing on Facebook where it pops up memories of previous years.  I love it actually, I ponder over who or what that status was about, or smile at old photos I have shared.

But last week it helpfully reminded me that I was crap at pottery!

A good few years ago I booked a pottery course for my Mum, for her birthday, or Mother's Day... or something, and I decided to go along with her.

Straight away I realised the error of my ways as the clay made my hands dirty, and I don't care much for dirty hands.  I can just about cope with glue, but chalky, grey clay... ummm, no thank you.

But I had paid, so I gave myself a stern talking to and got to work, being creative.

Now, as I worked with beads back then, and as I mess about melting glass, I decided to experiment to see what would happen mixing the two mediums.  

I made a clay frame butterfly shape thing, with segments to fill with glass seed beads.


Ok, so far so good, nice and colourful, should make an interesting wall hanging when fired...


..... or not!

Not quite the effect I had in mind, but hey, that's what experimenting is all about.  It might have been a masterpiece, you just never know. 


Scrap that then, lets make something that looks like fabric instead.  How about a denim vase, complete with stitching and pockets.  (bear in mind that everyone else was making "normal" stuff, like plates and bowls).

Ok, so was happy with the form.


Still looking passable with the glaze on.


Hmmmmm, crap again.  Into the scrap pile.


It was then suggested that I make a pot, like other people were making pots.  A coil technique pot, where it is built up from coils of clay, smoothed into place.   I'm quite chuffed at this point, it's talking to me.  It's saying.....


...GIVE ME BOOBS!

Yeah, ok, I know. I am slightly odd.


I also made her  (as she is now obviously a 'her') and bung for her head. I decided she was going to be a money pot and needed a head.

I added some splodges of glaze.  Still unsure where I was going with this.


Voila!   Please, don't bother to comment, I have heard them all, trust me!


But the bung would come in handy if I ever needed a weapon, it was solid!


My son, Iain, trying not to smirk as I made him hold my "goddess" for a photo to show her size.

(She's now gone back to the ground)


My final ditch attempt, after the 10 weeks or so were up, was to knuckle down and make something that actually looked like something.

The conversation with the Tutor went something like this...

TUTOR:  What are you making now Sue?
ME:  A lidded pot, but it's crap, as usual.
TUTOR: I think it's really good, it really does look like a crap.
ME:  It's supposed to be a cupcake.


And to prove a point I put a cherry on the top.


See?  Cupcake!

Sigh.
The only things I could actually say that I was even the tiniest bit please with was my pendants and charms that I made on the first day.  Maybe I just need to work smaller, or maybe I should just leave the clay in a dark room out of my reach   ;)


Sunday 22 May 2016

The planning of a Peacock Feather blanket

I was asked a little while ago if I could make a Peacock Feather Blanket.  I am sure I can, I thought, as the requester then sent me a photo of someone elses.  I shut it down quickly as I don't like to be over inspired by other people's work, I would rather work things out myself and come to my own design.

Ok, so sometimes it is similar to other people's work. I guess with something like they eye of a peacock feather, it's going to have similarities somewhere, or they are not going to look like what they are supposed to look like, but hopefully different enough not to be a copy.

The first thing to do was find inspiration. Not a difficult task when you have Google, and a quick search gave me these...


When I started this design I was at my Parent's house, without any kind of yarn that would go anywhere near to being the correct colours, so I just grabbed what I could from my Mother's stash and got to work.


I worked out the eye, then the shape, all ok so far..


Now how to join them?  I added an edging to make it easier and worked out which parts of the edging needed to be joined together to make all the pieces fit.

But, I am not sure about this bit.  It makes it look a bit odd, I might pull it out again.


So I decide the best thing to do would be to get the correct colour yarns, make up a load of the motifs, and go from there....

Stylecraft Special DK in Bright Green, Cloud Blue, Bottle Green, Plum, Gold and Royal Blue.  (and a cat tail)


So, watch this space, as they say....

Saturday 21 May 2016

Crochet Lace Doilies

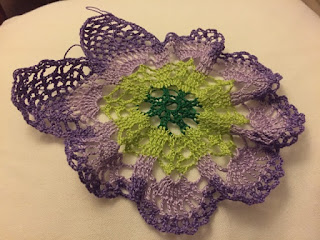
Way back in January I went on holiday to Portugal, and I wanted a project to do at the airport, on the plane, at the beach.... you know how it is?

I decided on Doilies, or is it Doilys?  Either way, those.

I bought some reels of Crochet Cotton and dug out my very fine hook, and popped them in a sandwich size lunch box to keep everything together.

I did get some questions about the tiny hook at the airport though, only on the way back as it happens, but they were very interested in it.  Try explaining crochet in Portuguese, even with their vast knowledge of English, this wasn't a word they knew.  As I stood there almost playing Charades as I acted out how to crochet (yeah, why do we do that?) while waving the hook in mid air, they must have decided I wasn't a huge risk and let me through.

So, I have downloaded some vintage patterns, to be used with my very bright colour choices of greens and purple, and started to play.


Now these patterns used a TR crochet, but I wasn't sure if that was an American TR or an English one.  There were no other clues to what terminology the pattern was written in, so I made up both.

Hmmm, both so far so good, don't you think?


I continued with the smaller one, but after a few rows my petal edges were starting to curl in, so I am guessing I went with the wrong option.


So I switched to the bigger one and after a few rows my petal edges are rippling.

I'm getting bored and frustrated with this now.  Working this small makes my fingers ache as I try to tension the cotton, and I am rather wishing I had brought a big sod off blanket to do instead!


First doily abandoned, let's try another pattern.


Let's just say from this point I had given up, and I did have a 3 x 100g balls of DK in my suitcase for a 'just in case' emergency crochet project issue.  

I am not ashamed to admit that I do use some of my precious luggage allowance for yarn  ;)  More on that project later, but for now the doilies have been abandoned to the "works-in-progress" pile.

Friday 20 May 2016

Filet Crochet - monthly workshop at Hobbycraft, Carlisle

I have been designing Filet Crochet patterns of late for a new monthly workshop I am running in Hobbycraft, Carlisle.

Each workshop is a different pattern, you learn the format of Filet Crochet, then learn how to follow the chart to produce a panel of around 12" or so.


Colours are chosen by the students, but I find Filet works better with lighter colours.  Although that Hazelnut Brown seems to work very well.


Claire, one of the ladies that comes, sent me this photo this week.  She has been to 3 classes now and has finished the heart, butterfly and owl, and she is now in the process of reversing the heart pattern to make it a little different.  (Yep, that's easy to do too!)


If you fancy it, I hold these classes on the 2nd Tuesday evening of each month in Hobbycraft, Carlisle.  If you only come to one you can learn enough to make a cushion, a few more and you can make a throw or bedspread.  It's an addictive way of crocheting.

Alternatively, I have started putting my patterns up on Etsy, it includes the chart and an instruction sheet on how to follow it. You can find them here .... www.etsy.com/uk/shop/SoozinTheShed