Showing posts with label mini shed project. Show all posts

Wednesday, 14 April 2021

Mini embroidered cushions


Every craft space needs some cushions.  Cushions equal comfort. If people are comfortable and cosy then they will relax and craft easier. 

So, it was time to make some mini cushions for my mini shed.

I started by taking some calico fabric and hand-drawing some shapes for flowers and leaves. When I say ‘shapes’, it is a lot easier than that, simply a couple of circles and a kind of leafy shape effort.  Luckily, for me, you don’t need to be an artist to do this bit  😊


Once the rough outlines were drawn, (using a heat sensitive pen that would disappear when ironed) I started to fill in the shapes with thread.


Then I ironed away all the ink marks to be left with a cute little flower image.

Then I had to cut out some backs for the cushions  - I measured these to the scale of 1:6 that I am using.


… and sewed them together using the sewing machine, before stuffing them and hand sewing them closed.


Two nice little plump embroidered cushions.   These took around an hour and a half each to make, so time spent on this project so far is now 48 hours.


Thursday, 4 March 2021

Felting my shed roof.

I have been pondering over what to do about the roof on my mini shed.  I really wanted it to look like a shed roof, but roofing felt was a bit thick and expensive as you can’t seem to purchase it in small amounts.

It was then my son, who is a skateboarder, suggested I used the grip tape that skateboarders use on their boards. I didn’t even know there was such a thing, so he pointed me to a website where I bought four strips.

The lovely thing about this stuff was that is was also self-adhesive, so really easy to put on…  just removed the backing and smooth down. 

‘Smooth down’ might sound easier than it was – the tape it by no means smooth, it’s like a rough sandpaper, so smoothing it down was a bit hard on the hands, but I found if I used the backing tape inbetween my hands and the grip tape I could do it without much trauma to my hands.


But all in all it was relatively easy to do, I tucked the edges underneath the roof and stuck them down.

All done… but the seams seemed to be lifting a little.  I guess that this tape is not designed to overlap.  I decided I would pop a bit of hot glue on in the morning, but by the time the morning had been and gone and the sun had come through the conservatory window and heated up the tape, it seemed to stick itself down  😊 

So, all in all I was quite pleased with that result.  It actually looks like a proper shed roof now.


It took me about an hour to do this part, so in total that makes 45 hours work so far.


Wednesday, 17 February 2021

How to make easy bunting.

 I have just done a small length of bunting to go into my mini shed project... I get asked all the time how to make bunting, so I thought I would write it all down in case anyone fancies having a go.

How, you can obviously spend a lot of time making bunting, cutting and sewing and turning and ironing, and sewing some more.... or you can cut a few corners and make it easier for yourself.


Some buntings are made by sewing two triangles of fabric together, then turning it the right way out, before pressing then sewing it to the bunting tape.  If you need bunting that looks good both on the back and the front, then this is the method you should do, but if you want something a bit quicker that only needs to be seen on one side only, then follow this tutorial.

The photos I am sharing are step-by-step photos of my mini bunting (perfect for a Barbie Doll House), but I will give you a regular bunting size in brackets - of course you can make it any size you like.

Grab your favourite fabric.  You will also need some stabilizer (found in an craft/haberdashery store), a length of bias binding, webbing or cosgrain ribbon.  (length depends on how long you want your bunting to be)  You will also need some Pinking Shears.

First off cut your fabric into strips that measure approx 5cm (20cm) and do the same with the stabiliser.   Iron the stabiliser onto the back of the fabric - use a piece of greaseproof paper between the iron and the fabric to save any excess glue getting stuck onto your iron plate.

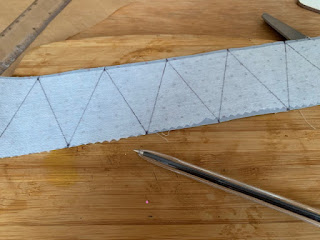
Mark across the top in increments of 5cm (20cm)

Then on the bottom put the first mark at 2.5cm (10cm) then every 5cm (20cm) after that.  The marks should now be inbetween the top ones.

Mark diagonally from a bottom mark to a top mark, then again back across, this will give you perfect triangles.


Using Pinking Shears, cut up the triangles.  By using the Pinking Shears you stop any fraying that would occur by using regular scissors.  The fabric is also less likely to fray with the stabiliser behind it as it makes it sturdier,


Take your tape, and if you need to make a loop at the end for hanging, do this now by turning the end over and sewing across.

Then folding your tape over the top of each triangle, simply sew down the tape making sure you catch the triangle fabric in-between.

You can add the triangles immediately after each other, or space them out a bit if you want the final length to stretch further.


And it is as simple as that!

How much will you make?


Tuesday, 9 February 2021

A 'Napkin Decoupaged' mini table.


The last largish thing I planned to build for the mini shed was a table.  Having already made a smaller mosaic table, I needed a larger table to go with the bench.  Somewhere where mini people could work 😊

I am a bit more confident with my woodworking skills now so I thought this would be a piece of cake.

I cut up some dowel for legs and found a square bit of wood in the scrap box – perfect!  The scale worked well with my mini bench.


Having learnt from working on previous parts of the mini shed, it is beneficial to drill a small hole first for your screw to grip onto. So I drilled into the top of the leg and through the table top.

But, then I thought about how the screw would be sticking out of the top of the table. How could I sink it?   It’s called ‘countersinking’ I have since found out with the aid of Google.  So with a larger drill bit I drilled a slightly larger hole, just a couple of millimetres down, so that the screw head would be below the top of the table.

Then I screwed the legs onto the table.  Not hugely straight mind you, but at least there was no wobble.

Now I had to deal with the holes on the top of the table so I could have a nice smooth surface.  I didn’t have any wood filler so I used a blob of wood glue. It worked quite well luckily.

The next step was to smarten it up a bit. I decided to do some Napkin Decoupage on the top, but first I would need a coat of paint.  I used a basic white acrylic to give it an undercoat.


Then I painted the underside of the table and the legs in a couple of coats of metallic brown acrylic, to match the mini bench I had just finished.

Once that was all dry I could add the napkin to the table top.

Napkin Decoupage is a lovely craft, and you can put your napkin onto all sorts of things like glass bottles and slate coasters.  First of all you have to separate the napkin plys – these are the layers of paper within the napkin. There are usually three, occasionally four.  You need only to use one single ply with the pattern on.


Having separated the plys, I then coated the table top with Mod Podge – this is a glue brand with a good formula that works really well with napkin decoupage, but PVA glue can work just as well.

Once coated I then laid the singly ply napkin down on the top and with a piece of cling film wrapped around my finger I smoothed out all of the wrinkles.   Stupidly I pressed too hard at this stage (you do have to be quite gentle) and took some of the napkin back off, so I had to strip it back off.  I was very annoyed with myself for being so careless.  The now took me back a couple of steps as I then had to repaint the table top!


The second attempt went much better as I was extra careful with my smoothing out.  Once the napkin was in place I gave it another coat of Mod Podge and left it to try before trimming the excess napkin away.


And that is my little table finished.  The top is very scuff proof thanks to the Mod Podge top coat and I think it looks rather good(even if it does have a wonky leg!!)


This mini table took me around two hours to make in total, not including drying time.  so my whole mini shed project is now up to 44 hours in total.

If you would like to have a go at Napkin Decoupage, then have a look at my YouTube Tutorial on how to do a flat slate HERE or a bottle HERE.


Monday, 8 February 2021

A mini wood and 'leather' bench.


Having made an armchair for my mini shed, I thought it needed a bench and table to go with it. So back to practising my wood skills.

I found some scraps of wood, in my growing scrap box and thought they would do the trick.

I had no real plan, no sketch, no idea what to do really. I cut the long bits of wood the size that I thought the bench should be, then I had another piece that I cut in half for the back legs and found two chunky bits that might work for the front legs.  I would adapt as I went.


I started with the bench seat and the back piece. I found some faux leather in one of my fabric stash boxes and I had some wadding left over from the mini armchair. All I needed was a staple gun – luckily I have one  😊

So I basically wrapped the faux leather around the wood with the wadding and stapled it in place.


Then it came to tidying up the ends.  I tried to fold the fabric over like I was wrapping a gift, but it was too thick, so I trimmed a bit off to make it less bulky.  Grabbed my trusted wood glue and glued it into place clamping it until it was set.

About an hour later I found out that wood glue will not stick faux leather!

So, a staple it would need to be.  This is where I was wishing I had cut a bit more fabric so I had more at the ends to play with. It was a tricky manoeuvre, included a few swear words and a lot of removed and reinserted staples.  But I got there in the end.   The staples are ugly though, I think I have a metallic marker somewhere that I could colour them in with to help disguise them a bit.

The next part was to stick my wooden legs and the back bits together to give the seat part something to rest on.  I did this and painted all the bare wood a lovely metallic brown.


So now it looks like I have a set of stilts and some seats.  Time to put it all together.

Having found out the hard way that wood glue does not work on this fabric, I dug out my hot glue gun and used that to glue the bench seat to the legs.  It was only to hold it all in place until I could get some screws in.

The next thing I had to do -  and this again was something I had learnt from things going wrong earlier in the project – was to drill a small pilot hole to guide the screws in, otherwise my wood would split  (expert now talking here folks!!)

So, drill I did, then screws, and it all worked out rather nicely.


And there we have a bench.  On reflection I wish I had used a nicer wood for the back struts as this is a bit rough…but then it’s a bench, I suppose its ok being a bit rough.


Time spent on this was around two hours.