
I have finished.....or have I?.. my experiments on working with gourds.
When I question if I have really finished or not, I think the answer would be a resounding 'no', as there are so many more things I can try, that I have discovered as I have worked up to now, but I needed a stopping point for my assignment, and this seemed to be a good point (especially as time is running out!)
I chose this project as I like working with natural materials as much as I can. These gourds gave me that opportunity. I think they would be great to offer to people who think the same, who like having more natural materials around them as opposed to a lot of plastics or many made products.
The soft way that the lamp gourds light up would look great in a yoga studios perhaps, or a therapy room. They might be really attractive to people that practise a plant based life style (like myself) as, originally, they were actually a vegetable :)

In detail then....
This was gourd number 1. As the initial plan was to make a lamp, of sorts, I was going to drill lots of holes in a gourd to create a lovely pattern for the light to seep through.
This was a learning curve. The first thing I learned was that I needed some small holes to position my drill in, a pen mark wasn't enough as the drill would bounce all over the place and drill a hole in the wrong spot. So I had to pin prick the pattern out with a sharp awl first.
Following on from that I quickly learned that the sawdust from the drill holes would fill the pin prick holes making them hard to see, so I had to only pin prick a small part of the pattern at a time.
I also learned that you have to go on with the drill in a really confident manner with a bit of pressure. Any hesitation and the drill bounces, making your holes all uneven and messy.
But all in all, I was pretty pleased with the outcome of this one, and it looks great with a light source in it. (The light source is a battery powered cupboard light).


Gourd number 2 was experimenting with pyrography. I wasn't so keen on this technique, I felt it didn't allow me to be as free as I wanted to be... and also it was a drawn out procedure, having to wait for the iron to cool down between changing tips. It wasn't a technique I necessarily wanted to repeat - although I now have the knowledge that I can use that if a design requires it.

Gourd number 3 might be my favourite... and was created purely by accident.
I wanted to colour my gourds, but I am not good at art and painting, so I needed it to be very fluid and freeform. I researched some paint techniques that are good for this kind of art and Alcohol inks - along with pure alcohol - came up, so I ordered some of those.
As I had never worked with this medium before, I took two rather scruffy and discoloured gourds from my box as I thought they would probably be going in the bin afterwards.
First I did a little gourd, and just splashed little bits of ink at it - it was a little underwhelming and I was a bit disappointed with the effect, so I knew I needed to go a bit bolder. As for this little gourd... I hadn't bothered cutting into it and cleaning it out, so I have now discovered that it makes a fabulous rattle with all the seeds inside.

Grabbing a dishwashing sponge, I sponged the ink on the next one, in rows of colour. Then I dripped the pure alcohol from the top using a pipette. This effect pleased me no end, this was the kind of colour I wanted. Unfortunately the gourd was a broken one with a large crack and hole in one side.

As I liked the colour so much I really didn't want to discard this piece, so I jigsawed down the middle to cut out the damage, then drilled holes along the cuts so I could lace it up, almost like a corset.
It's often the mistakes that come out the best :)

Gourd number 4 was basically a repeat of gourd number 3, except there was no damage so I just cut off the top to make it into a rather nicely shaped vessel, and added a threaded ribbon trim for a bit of detail.

Gourd number 5 came about after I sat thinking how I could add some texture to my gourds.
So I grabbed a bottle of Mod Podge glue (strong PVA) and a load of different fabrics - calico, faux suede, ribbon, trimmings, wooden pieces, scrunched up toilet roll and garden string - and just stuck it all randomly to the gourd.

On reflection, it actually looks ok like this, with the different fabrics being different shades and textures in themselves. But I decided to spray paint it.

So, now it was time to stop playing and put some techniques together for my main piece - Gourd number 6. I decided to make a fusion of both alcohol inks and drilling to create a lamp.
I wanted this piece to look pretty as a stand alone piece when not lit up, but also give a different look once the lights were down, so the owner could choose whether to have it as a lamp, or just as an ornament.
I drilled the holes I wanted first as I thought the inks would then dribble into the holes and make them look less 'fresh'. I was correct.
I was a bit more precise with where I placed my colour on this one, and I added extra bits of colour where I thought they were needed as I went along.

I love the way the light works with this, as the ink that dribbled into the holes give the light a different hue.

And a photo of it shown in daylight with no inside lights, daylight with lights and dark with lights.

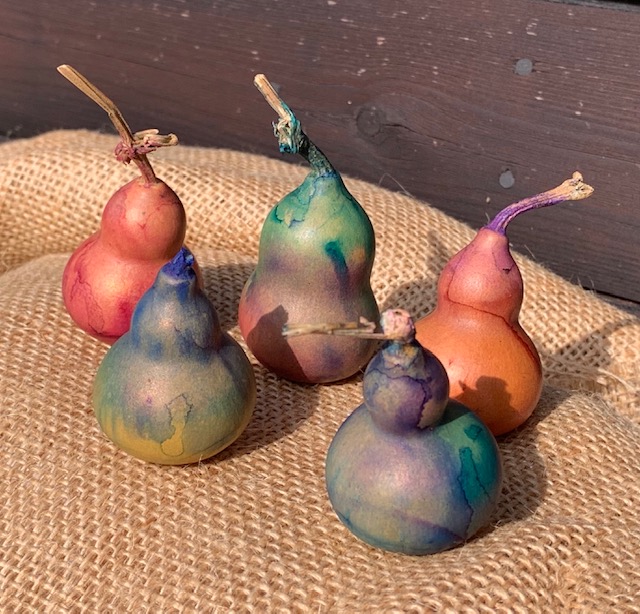
And finally.... I had 5 mini gourds that I ordered in error without checking the size. While I have the inks out I coloured all of these with the view to making a necklace perhaps..... that might be my next project!
No comments:
Post a Comment
I would love to hear from you, questions, comments and salutations all welcome.