Showing posts with label uni project. Show all posts

Saturday, 22 January 2022

Tropical Storm through a marble - machine embroidery

 Life through a marble series

Freehand Machine Embroidery & Quilting Technique.


This photograph (below) was taking in Vilamoura in Portugal in 2016.


We were sitting in a deserted beach bar, just two of us as the weather was starting to turn from a lovely bright sunny day, into a chilly, windy evening. 

There was a storm brewing, so we decided to wrap up as warm as we could with our limited holiday clothing, and watch the clouds do their thing.

It was a perfect opportunity to take a photo of the changing light through a marble, resting on the edge of the beach bars fence.

Whilst sitting there I decided to mess about with filters on my iphone, seeing what I could do with the colours and after trying a few I ended up with this colourwash of hues. 


A complete contrast to the dark grey and black that was starting to roll in.

This adapted photo was to be my inspiration for my freehand embroidery piece called “Tropical Storm through a marble”.

I started off with some wadding  (leftover insulation packaging from a food delivery box – made from recycled plastic bottles) and some cream cotton to cover it in.


All of the materials used for this piece have been saved and reclaimed from other projects.

To decide what colours to use, I squinted at the photo, trying just to see the blocks of colours, then pulled the matching fabric out of my stash box and laid it on top of the wadding.


I used a tin bucket to draw around for the ‘marble’ and reversed the fabric selection within that space to show inversion.

I chose a ‘wine’ themed fabric for the actual bar, as I felt it gave a nod to the fact that I was in a bar, having a drink, even though that cannot be seen from the images.

Next job was to use the sewing machine and ‘scribble’ all over the fabrics.

I did this by changing the foot on my machine to an embroidery foot and dropped the ‘feed-dogs’ which meant I could move the needle about freely and not have to work in straight lines.

I looked more closely at the initial image and picked out more subtle colours to do my ‘painting with thread’ with.  I simple drew patterns with my sewing machine until I has added colour to the areas that I thought needed it.
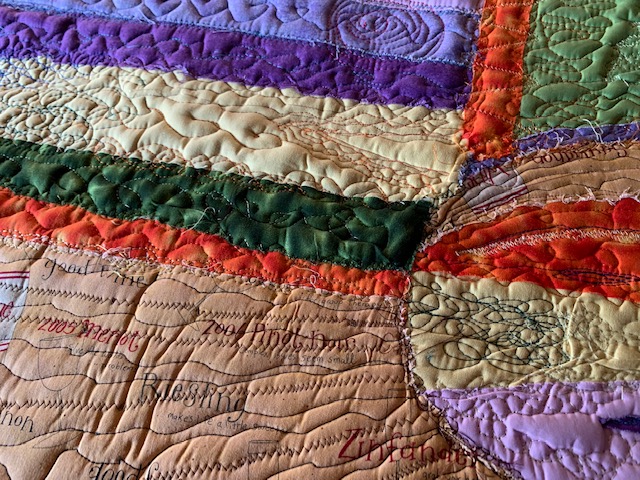

Once it was done  (many, many hours of scribbling) I trimmed off the edges to make it nice and neat.


I then measured a piece of PVC table covering to create a disc the same size as the marble section, and I sewed it in place. 

I though this might give it an extra layer of texture and shine to replicate that the original photo was a marble.

Finally I added a black border to finish it off neatly, hide any stray threads and create a framework around it.


Looking at the finished piece I feel it is quite ‘blocky’.

On reflection, maybe I should have tried to blend the fabric colours together better, creating softer lines between them.  Smaller pieces of fabric would have been trickier to sew in this manner, but might have created a better colour flow.


Monday, 10 January 2022

‘The Bigger Picture’

 Life through a marble series

Acrylic & Watercolour paint, with permanent marker.


Although my theme is ‘Life Through A Marble’ I went off a little on a tangent with this one…

I found some old mountboard in my Dad’s attic, from the days that he used to be a picture framer… and one of those mountboards had a perfectly cut round (marble shape) in it.   I took it and decided that one way or another I would use it.

Then it got me thinking…. What if that was the only view you could see, yet there was so much more going on?

I decided that this would be my inspiration.


Using the hole as a template, I drew a cartoon style earth… and around that earth I drew destruction, despair, damage, and death.

Ice melts, trees dying, pollution, plastic in oceans, overuse of fossil fuel.

I showed the earth heating up and therefore melting.

Animals crying, flowers dying…. What have we done?


I painted the earth in bright metallic acrylic paint, with a shimmer so it looks vibrant and exciting.  Then I painted the background in water colours, quite washed out, so it looks drab and dull and lifeless.

I edged it all in a marker pen for a cartoon like quality.

I drew features on the earth so it either looked happy or sad, depending which way you viewed it.

 Once the drawing and painting was complete, I could lay the black mountboard on top with the hole cut out so you could only see the ‘happy face’ earth.  

Then I added the question…

“Can YOU see the bigger picture?”

Once the mountboard was flipped over then you saw a ‘sad face’ earth.


Then once you remove the black mountboard from the top, you see the whole picture….


Monday, 29 November 2021

Marble Run

Life through a marble series

Acrylic metallic paint & vintage glass marbles


 For this piece I decided to let marbles do the work.

 My Dad used to be a picture framer, so I raided his attic for some pieces of mount board.  I found some pieces with circular holes cut out which I though would work very well.

I laid one board with a circle cut out on top of a full sheet.


I found some old vintage school type marbles in my shed, and took out my metallic acrylic paints.

I chose colours that would compliment each other and not blend into each other to create a muddy colour.

Green

Purple

Red

Gold

Silver

I covered a marble in paint then I rolled it along the mount board  - or rather I attempted to.  The paint clogged up the rolling effect so the marble needed a good flick to help it on it’s way.  If it stopped before I wanted it to I gave it another flick.


It was a bit of a messy project  😊


I actually liked the end result way more than I thought I would, I might even put this on my wall!


This image is both the boards as planned laid on top of each other.


This one is the underneath board turn around to show an image inversion – like viewing through a marble might look.


This one is just the top board on it’s own.


And this is the bottom board on its own.


Friday, 19 November 2021

Cowpat Moulds


Make the plaster recipe as shown, stir with hand until it starts to thicken…like a thick double cream. 

Pour onto the bench (rubbed with a little Vaseline beforehand) and form into a ‘cowpat’. 

Carve, roll  a texture into it.


Plaster Recipe for Cowpat:

·       1lb plaster powder

·       1lb molochite powder

1 pint water


This was my first piece, I scrumpled up a piece of Blue-Roll and laid some Bubble wrap over the top, I then poured the plaster mix on top of that to create the texture underneath.

Once dry, I turned it over and laid some sheet glass on top and put it in the kiln


I think the glass would have benefitted from being fired first to prevent any sharp edges, as the finished piece has taken on the textures, but the edges are still quite sharp.


For this piece I found a lovely piece of glass which had been screen printed already, which looked a little oriental to me.   So I used some bamboo skewers, laid them out on the bench and poured the plaster mix over the top.

Apart from the edges being a little sharp as before, the texture of the bamboo skewers worked well.


The screen printing faded a little in the kiln, but left enough to give an effect.


I am looking forward to experimenting more with this technique.

Thursday, 18 November 2021

Paper & Wire Sculpture

This project was to learn how to form a wire shape then cover it in paper to create a Wire & Paper sculpture.

I used a variety of different thicknesses of wire to create a flower with a leaf, and a vase to stand  it in.

I had to try and work out how to weigh down the base of the flower so that it stood up on its own when out of the vase.  I did this by using a thick coil of stainless steel memory wire and by balancing the flower head and leaf out.

Once I was satisfied with the general shape, I went on to cover it with tissue paper.

I used Decoupage paper for a bit of colour interest – each piece of paper was cut slightly larger than the section I wanted to cover, then I dabbed UHU glue around the wire section and stuck the paper to it, trimming it back to the wire when it was dry


I used different colours of paper for the different areas.

One fully covered I mixed PVA glue with water (approx 50/50) and painted it all over the paper, causing a slight shrinkage when drying – this made it firm and strong.

I gave it two or three more coats after that to make it even stronger.


I am quite happy with the finished result, although my shapes could definitely do with more practise.

I like the effect that the PVA glue gave to the paper, making it almost ‘drum skin’ like.


Tuesday, 27 April 2021

Pampas Glass - an improvisation.


 When I heard about this assignment I smiled to myself - improvisation, it's what I do all of the time.  I have an idea, I don't have the bits needed to carry it out, so I improvise and change this for that, and that for this, until I have managed to come up with something.


So, I wanted to force myself to work a little differently.  

Based on this quote, especially the last bit.....

"Something that is improvised, in particular a piece of music, drama, etc. created spontaneously or without preparation."

I decided I would 'just do it', go for it, roll with the flow.  

I wanted to create a piece of Pampas Grass just out of stuff I had laying about.

First I started with a piece of found driftwood. I thought it was a nice shape to represent the Pampas stalk, once I had chopped the end off to make it straight.


Next I drilled holes in it.  First I started drilling holes the size of the glass rods I was planning to use, but very quickly realised that if I had holes that large (8-10mm) I wouldn't be able to fit many rods in and I wanted it to be quite full.  So I swapped to a 3mm drill pieces and drilled about 80 holes with that.... at a downward slant.


Have you ever drilled found driftwood?  It really is quite nasty.  The smell of dead fish, salt and rotting seaweed is not the nicest aroma in the world!

Once the holes were drilled I needed to sort out some glass.

I found a pile of glass rods in a nice creamy ivory colour which I thought would work well.


And the next step was to go and melt them on the torch.  I had two things to do, one was to round of the end so it looked a bit more natural  (and also wouldn't be sharp to work with) and the other was to melt the other end and pull it into a point so it would fit into my smaller drill holes.


So, off to the torch I went, melted my ends and then melted the centre so I could pull the two ends apart to make a thin section.  I then snipped this section to create two pieces which would stick into my wood.


Then all I had left to do was to assemble it.

I found a couple of old plant pots, stuck my driftwood in them and packed them out with little pebbles from my garden so the wood wouldn't move.


Then I started to stick in my glass rods.


But it some became apparent that I had totally underestimated how much glass I would need, I had way more holes than glass - and none of that particular glass left, so I had to improvise and use a different colour to make some more.

I wasn't too happy about this at first, until I had put a couple of the new colour in place, which was like a transparent straw colour, and realised it worked rather well.


And that is my improvised, finished piece of Pampas Grass..... although it looks more like a cactus.

If I had of had more glass I might have worked further down the stem with it, sadly I have nothing left in that kind of shade.  I think it works quite well in a way though.

I am calling it my Pampas Glass!