Showing posts with label glasswork. Show all posts

Friday, 22 April 2022

A hot glass Graal collaboration

I arranged to do a collaboration with a fellow student, Brynn. 

This piece is created in three parts.


1: making a glass ‘embryo’

2: Carving a design

3: Blowing the embryo into a sculpture or vase


The Embryo is made from glass.  First a coloured piece which is then coated in clear before being rolled in a thick coating of frit.  Brynn did this part of the process/

This is then left to cool down in the annealer.


Next it was my job to create a design on the glass.

I covered it completely with a good strong masking tape, then draw an illusion pattern design on it, before cutting it out with a super sharp craft knife.  

This took ages!  Much longer than I anticipated  😊

It was then off to the sandblaster to take off the top layer of glass – the frit rolled part.  This would then show through the clear layer to the colour underneath.

If I thought the cutting took a long time then the sandblasting took forever!  I was soon clocking up the hours on this piece.


Then I handed the piece back to Brynn, who removed all the tape and put it in kiln to bring up to 550 degrees so he would be able to blow it.

Once at the correct temperature it was lifted out of the kiln and warmed up some more in the Glory Hole.

Then it was time to blow…….

Brynn decided this piece would be a sculpture.  He has a little cold working to do to make the bottom nice and smooth and so it stands up properly.


All in all, a good result.


Friday, 18 March 2022

First attempt at Pate De Verre


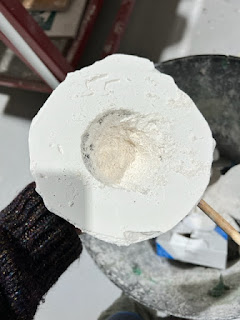
Todays demo was on Pate De Verre (Paste of glass)  and I thought I would have a little go myself!

What you need for this is a plaster mould, a teaspoon, some frit (fine or powder is better) and a mix of 50/50 Glasstac and water.

You mix up the frit and glasstac mix to a thick gritty paste, almost like sugar topping.


Then you take the teaspoon and press the paste into the mould, compacting it as much as possible.


I also added a little blue glass mix at this stage too to make it a little more interesting.

Once you are happy with the thickness of the glass paste, you pack the remainder of the mould with a pre-fired plaster to stop the glass collapsing during firing.

Then off to the kiln to be fired at 765 degrees for an hour.


When it is cold you shake the powdered plaster out – wearing a mask so you don’t breath in any nasty particles.


Then you can carefully chip away and break the mould off to reveal your glass work underneath.


Not bad for my first go.  Not sure it will be a favourite technique as it’s not hugely tactile to tough and hold, but I enjoyed trying the process.


Sunday, 30 January 2022

Poor Man's Silicone Moulding

 This was an interesting technique – called ‘Poor Man’s Silicone’ and you actually use a tube of cheap silicone from a DIY shop and plenty of washing up liquid.

It’s a very messy job – and smells unpleasant too.


You squeeze a tube of silicone into some warm very soapy water, then get your hands in and mix.  Add more washing up liquid if it is too sticky.  (You will need a lot more than you think!!)

Once it is a pliable putty type consistency, wrap it around the item you want to make a mould from – in this case I used a vintage old Nokia phone.


I added a layer of mod rock around this (bandage soaked in plaster) – it was to stabilize it, but there was no need really – I did use the mould a second time and just Duct taped it – and it worked ok.


Once the mould was set I sliced across the side and slipped the phone out.


It came out nice and cleanly, leaving a good copy of the phone within.


Time for the wax…….


And voila!   A wax version of a vintage Nokia phone.


I can now use the lost wax casting technique's to turn this wax into a glass piece  😊


Wednesday, 1 December 2021

Making paperweights

 Take a gather of glass from the furnace.


Gently marver, then sit at the bench and wait until the glass is slightly hard – turning all the time to keep the shape.

Take a second gather.

Next sit at the bench and use  gravity to help you centre the glass.

Next use the wet cherrywood block to help shape the paperweight.


Reheat in the glory hole.

Use the Jacks to form a cut.

Add water to the cut with tweezers.

Knock the paperweight off the iron over the vermiculite.     Place in the kiln.

My first attempt… could be rounder, but not too bad.


Adding Frit….


Roll the hot glass in frit (broken glass or various sizes) before the second gather.


These were rolled in a fine powder frit of three different colours.


These were rolled in a fine powder frit in colbalt blue, then twisted before the second gather was added.

These were rolled in a fine powder frit in white, then a chunky frit in turquoise… I quite like the ribbon effect it has created, but I think I prefer the finer frit effects.


This one was rolled in Cremation ash  (a friends three dogs) before the second gather.   The ash has not melted and stayed a lovely silvery colour, magnified by the second coating of glass.


Friday, 19 November 2021

Cowpat Moulds


Make the plaster recipe as shown, stir with hand until it starts to thicken…like a thick double cream. 

Pour onto the bench (rubbed with a little Vaseline beforehand) and form into a ‘cowpat’. 

Carve, roll  a texture into it.


Plaster Recipe for Cowpat:

·       1lb plaster powder

·       1lb molochite powder

1 pint water


This was my first piece, I scrumpled up a piece of Blue-Roll and laid some Bubble wrap over the top, I then poured the plaster mix on top of that to create the texture underneath.

Once dry, I turned it over and laid some sheet glass on top and put it in the kiln


I think the glass would have benefitted from being fired first to prevent any sharp edges, as the finished piece has taken on the textures, but the edges are still quite sharp.


For this piece I found a lovely piece of glass which had been screen printed already, which looked a little oriental to me.   So I used some bamboo skewers, laid them out on the bench and poured the plaster mix over the top.

Apart from the edges being a little sharp as before, the texture of the bamboo skewers worked well.


The screen printing faded a little in the kiln, but left enough to give an effect.


I am looking forward to experimenting more with this technique.