Showing posts with label tie-dye. Show all posts

Wednesday, 19 August 2015

Festival clothing

Summer is the time of festivals, and having just been to one myself I realise just how much effort people put into their clothes for such events.

As these ladies did.

When I first claimed my patch of grass I spotted these jumpers across the back of 6 chairs, I thought to myself that someone had made a lot of effort, or did they have a knitting club and they all made their own.

As the evening drew in on the jumpers started to go on and I grabbed this shot, but then I decided that really I should go and talk to these colourful ladies and find out more about their jumpers.


It turned out that one of their Mum's made them all - a 75 yr old lady no less, I bet she enjoyed seeing them come together with all those wonderful neon colours.  Matching leg warmers too!


Thank you ladies, if you are reading this, for letting me take and use your photo.  Your bright and cheery jumpers made my day.  Always like to see a bit of craft work  :)

So... talking of festival clothing, do you remember the spray paint neon t-shirt I made a wee while ago?

Here is is again....


You can easily make yourself one of these, my tutorial is on the Hobbycraft blog which you can find by clicking below.


What festival clothes have you made?  Pop me a photo on  my Facebook page.

Tuesday, 23 June 2015

"Love" spray-dyed T-shirt

When I was down in Bournemouth doing some video tutorials for Hobbycraft, I made one of these t-shirts using a stencil and spray dye paints.


The one I made was with a spiral shape rather than the letters, here is the video...


If you would like to make one, I have prepared a step-by-step photo tutorial.

So.... grab a t-shirt and pop some cardboard in-between the front and the back to save the dye soaking through and marking the back.


Get some vinyl - this one is leftover Fablon from another project, but you could use masking tape, Duck Tape, anything sticky.


Cut out your chosen letters and stick them to the t-shirt.


For the dye I used this fabulous spray paints from Tulip.  They work really well.


Give them a shake..


... and start to spray in small patches - you can always add more but you can't take it off, so start small and build up to the colour you want.


Add other colours.


Until you are happy with your design.


Now leave to dry for 4 hours before removing the letters.


Wash as instructed on the packet and VoilĂ !
You have a funky, unique t-shirt.  Just for you.


Tuesday, 12 November 2013

Another tie-dye shirt for Daddy L

I am afraid I am a bit tardy, as most people already know.  Commissions just aint my thing, even if something only takes a few minutes/hours to make, it can take me WEEKS  (months) to get round to it.

As in this shirt for Daddy L.

He liked the previous one I did for him so much he instantly asked for another, so I have had this nice crisp shirt since the end of August.   Ahh, tis only 3 months.  It's not that bad!

The brief was 'red'.   So I got some Tulip Red Dylon dye, which incidentally is more of a dark cerise pink - but he won't mind.


Holding the shirt at one side of the collar, I tied elastic band diagonally down it.


And dunked it in the dye for a few hours.  Swishing and stirring now and then.


Then I gave it a rinse in cold water, and chucked it in the washing machine on a 40 degree wash.

Voila!


I think he will look rather smart in this.

Friday, 23 August 2013

Daddy L's New Shirt.

Those of you who have the pleasure of knowing Daddy L will understand that his dress sense is amazing, quite flamboyant at times, and sometimes just crazy.  He likes bright shirts, lots of shirts, and the brightest socks you can find.


In Marrakesh they even matched the plant pots!

Jazzy jackets too.  (with Shona on her 18th)


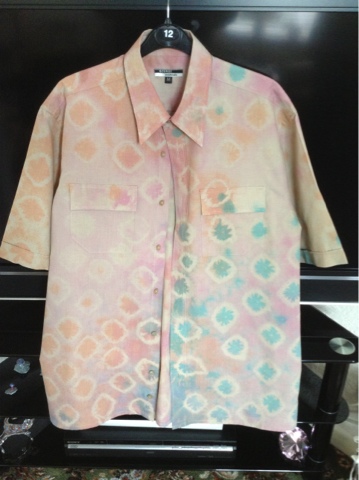
So when he asked me to tie-dye a shirt of his I knew it would have to be slightly mad and colourful.

It started off a boring dull mushroom colour.  (forgot to take a photo, but it was so dull it would have bored you to sleep anyway)

I bought some marbles - actually, I sent Shona to the pound shop with a £5 note to buy marbles.  Thinking they would be small bags I told her to get 5, she did, but they were huge bags and I still have 4 bags left.  (quickly Googling "what to do with marbles").

I tied up the shirt with lots of marbles and elastic bands.  It took HOURS, honestly, those little blighters take ages to tie in.


Then we put it on our heads for a laugh!

Shona

It was so heavy once all the marbles were in, she couldn't keep it on her head for long, although I do think it suited her.

I then dyed half in one colour and half in another, before that though I dipped the back side of it in a third colour to make the marble  gaps stand out more.


Delivered Unashamedly un-ironed, which he grumbled about. 


I don't DO ironing.

Here it is after my mother got her hands on it :) looks better huh?


I don't think I have seen him without it on yet, he must just wash it and wear it again.  Mad I tell ya, and you wonder where I get it from!

Friday, 5 July 2013

Goodness me, it's July already - GIVEAWAY!!

I know the months and years are supposed to fly by quicker when you are older, but seriously....this quick?

I am sure I just washed up after Christmas Dinner a few days ago.  Didn't I just finish the chocolate covered brazil nuts?  Isn't the Malibu still in the cupboard?   Well, actually, yeah the Malibu is still in the cupboard, I think it's been there for about 3 years now, I should drink it.

So, there you go, it's the seventh month and time to do my monthly giveaway.

How about a tie-dyed bag with my cute little Opus Moon label attached.

You can have the colour/pattern of your choice (as long as I still have it) and I will post it to you anywhere in the world.

All you have to do is let me know you would like to be included in the draw.  Blog comments, Facebook comments, email me, text me, nudge me, poke me - whichever.  (If you decide on the poke option please make sure your implement is blunt)

I will draw the names on Tuesday 9th using a random name generator.

Good luck!


Sunday, 23 June 2013

Tie-Dyed Tote Bags

I've been messing about with Dylon dyes of late, tying knots and marbles into tote bags and making pretty patterns on them.

I even ordered some fabric labels to sew on as I have decided to resurrect my idle website and put some prettyful things on it.  (Don't bother looking yet though, it's still idle  ;) - you will be the first to know when it goes live.)

Back to the bags then.

I got some plain tote bags from good old Hobbycraft.

And some Dylon hand dyes in nice funky colours.  (I do like bright colours, they make your heart sing!)

I tied the bags up in all different manners with a big pile of elastic bands.

Then dipped them in the dyes.

Then I sewed my brand new funky label on them  (at a wonky angle, just coz I can!)

Ta-dah!


I thought I might sell these at £4.00 each + postage.

Sunday, 9 June 2013

Tie-Dye Hobbycraft Shirt

Yep, I tie-dyed a workshirt.

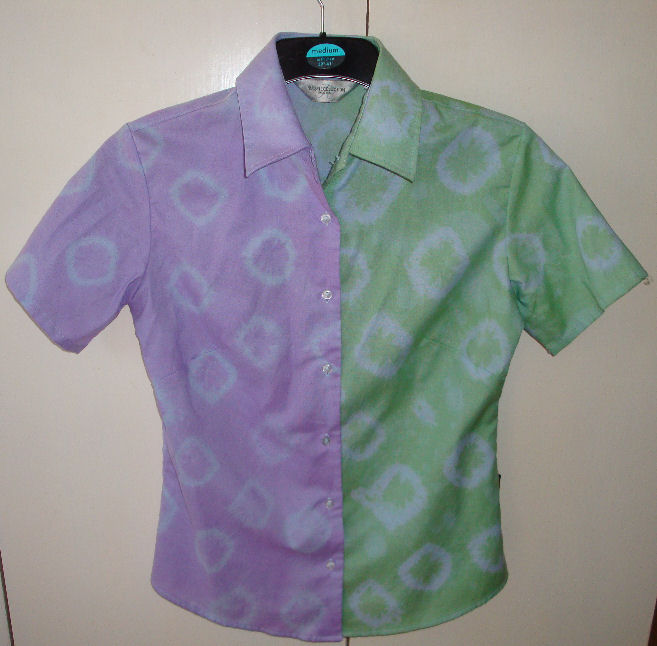
Following on from my tie-dye skirt I was asked to produce a shirt for display in Carlisle, Hobbycraft, so I took home a lovely crisp, never worn, work shirt and gave it the colour treatment.  (it is a pale blue colour to start with)

Using some marbles I tied them all into the shirt (took ages! - well actually I skipped off for a sly wee and a read of a magazine while Hubby did it - why have a monkey and climb a tree for coconuts yourself?)

Then I dyed half purple and the other half green.

Groovy baby!

Want to make one yourself?

What you need:
  • a shirt you want to dye.
  • Dylon hand dye in two colours
  • an old bucket / sink basin
  • measuring jug
  • marbles
  • elastic bands

What you do:
  • Wash the shirt by hand and wring it out well.
  • Take the marbles and tie them into the shirt, as many as you can fit in gives a nice pattern.
  • Make up the dye according to the instructions
  • Position the shirt so only half of it is in the dye, poke it, swish it, leave it for the allotted time.
  • Rinse in cold water and wring out at much as you can do with a shirt full of marbles!
  • Prepare your second colour and repeat the process with the other side of the shirt.  Don't worry about being too exact as ome cross over is good as you get a third colour, as is leaving a little of the original colour to help blend.
  • Rinse well in cold water and remove all those marbles.
  • Wash according to the instructions on the dye.
  • Done!