Thursday, 7 April 2022

Casting my hand in alginate

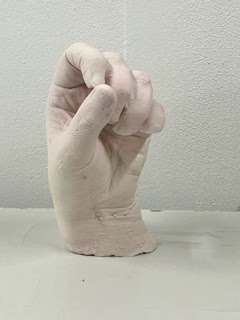
Today I had a play some alginate, in the hope of making a plaster hand to hold a light bulb!

 The brand I used was Babyrice – strange name, but it smelt good – all minty and fresh!  😊

I mixed it up according to the instructions, poured it into a suitably sized container and stuck my hand in it.


It set in about 5 minutes, but it’s quite hard to keep your hand still for that long… I am not the most patient person.


It took a little wiggling to get my hand free, but eventually it popped out leaving a nice hole to cast into.

The colour had also changed from pink to white during the process, this is something to do with the setting process.

I filled the hole with a plaster mix of 1lb of plaster to 1 pint of water.


Then I left it alone for a little while for it to set.  The alginate had turned back to pink again at the point.

The next job was to remove the alginate from the plaster.


I was really pleased with the amount of detail on the plaster, you could see all the wrinkles on my hand quite clearly  😊

But, ALAS, I had managed to miss out some finger parts!

I guess I must have caught some air as I pushed my hand in.

I did get my hand into the position I wanted before pushing it into the alginate – on reflection I should have pushed my hand in open, then formed the shape I think.

I shall have another go and test that theory.

But it was good to have a go, and discover what errors can be made..... and changed in the future.


Wednesday, 6 April 2022

The Kaleidoscope Project - Tartan disc.

 As part of a uni assignment, I am creating a type of kaleidoscope – the viewer will be made from mirrors and the discs will all be different using various forms of architectural glass techniques.

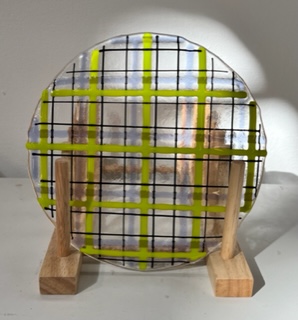
This disc is a fused ‘tartan design.

I started off by cutting a circle out of glass, then I cut some glass ‘ribbons’ and stringer to fit the circle and laid them onto the class.

I actually worked directly into the kiln for this disc as I knew that trying to move it after placing the ribbons and stringers would be very stressful – and probably unsuccessful 😊


I then fired it at 760 degrees to fuse the decorations to the disc.


I was really pleased with this one when it came out of the kiln, I really do like the Tartan effect.

And it looked great through the kaleidoscope viewer.  😊


Tuesday, 5 April 2022

The Kaleidoscope Project - candy stripes disc

 As part of a uni assignment, I am creating a type of kaleidoscope – the viewer will be made from mirrors and the discs will all be different using various forms of architectural glass techniques.

This disc is a fused ‘candy stripes’ design.

I started off by cutting a circle out of glass, then I cut some glass ‘ribbons’ to fit the circle and laid them onto the class, not in any particular order.


Then it went into the kiln and I fired it at 760 degrees to fuse the ribbons to the disc.


The finished disc was lovely and smooth, and the ribbon lines were nice and crisp.

It made a really interesting pattern when looked at through my kaleidoscope viewer.  😊


Monday, 4 April 2022

The Kaleidoscope Project - Mandala Disc

 As part of a uni assignment, I am creating a type of kaleidoscope – the viewer will be made from mirrors and the discs will all be different using various forms of architectural glass techniques.

This disc is a sandblasted mandala design.

I started off my drawing a mandala in a iPad app called Amaziograph.


I found a lovely piece of flashed glass, which is clear glass with a coating of colour on one side.

You can sandblast through the coating to make sections clear glass again.


I used a masking tape and placed the mandala image on the top, and cut through them both with a very sharp craft knife.


Then it was off to the sandblaster to blast away the parts I had cut out.


I wasn’t really prepared for how long it would take to blast through a 1mm layer of coloured glass – this was about 2 hours work!


After a few more hours I was finally getting somewhere…


I removed all of the tape, and popped the piece into a kiln to fire at 650 degrees so that it would soften the sand blasted areas to make it all nice and shiny again.


I’ve still got to grind the edges and maybe put some tape around it to make it a little neater, but so far I am quite pleased with that.


And it looks really cool through my kaleidoscope viewer.  😊


Sunday, 3 April 2022

The Kaleidoscope Project - optical illusion disc

 As part of a uni assignment I am creating a type of kaleidoscope – the viewer will be made from mirrors and the discs will all be different using various forms of architectural glass techniques.

This disc is based on illusion drawings.

I cut a disc of glass and covered it with black glass paint.


Then using a wooden skewer and a straight edge, I scraped away the paint to create an optical illusion within a square shape.


It then went into the kiln to be fired at 650 degrees to set the paint.


Quite happy with the result….


And it looks quite good through the kaleidoscope.


Saturday, 2 April 2022

The kaleidoscope project - making the viewer.

 As part of a uni assignment I am creating a type of kaleidoscope – the viewer will be made from mirrors and the discs will all be different using various forms of architectural glass techniques.

First I need to make a viewer!

It’s quite a simple idea really, three strips of mirror stuck together in a triangle.

I used Duct tape to stick the mirror together and I plan to put it in a decorated tube to make handling it easier.


So far so good though….. I had a good look around our glass classroom and it makes a great viewer  😊


Friday, 1 April 2022

Teapot disaster!

My ugly little teapot didn’t survive the biscuit firing.


It turns out that the base was too thick, and it obviously still held a little moisture so it exploded in the kiln!


A little disappointing, but a learning curve no less.

Next time I will concentrate more on the thickness of the clay throughout.

I am just pleased the explosion didn’t wreck anyone else's work.


Thursday, 31 March 2022

Making a teapot / sugar bowl / jug


Still at home with COVID, I joined a uni class using video calling so I could see what was happening in real time.

This lesson was how to make a jug, sugar bowl with lid and a teapot with handle, lid and spout!

Much harder than it looked!

I switched on my pottery wheel and got to work.

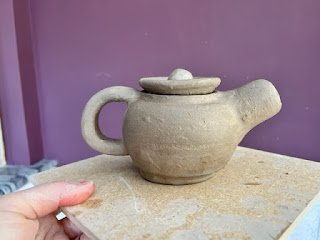
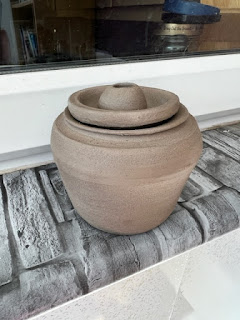
I started off with a shape – this was supposed to be the teapot, but ended up being the sugar bowl.


Next I attempted a lid…. Didn’t manage to get a nice round ball on the top for the handle, but let’s call that a design feature  😊


Spouts are evil!  I mean, just how hard can it be to make a small thin spout?   Very hard.  I made four spouts and this was the most spout like, even though it looked like a stumpy elephants trunk!


And finally a jug, quite pleased with the shape of this one I have to say.


Now it was time to let them all dry a little, while I make some handles and try to figure out how to attach them all together!


Attaching the spout was a tricky procedure, I trimmed to much off it trying to get it to fit the shape of the pot.


…. And we have to address the elephant in the room, that that spout is just a bit too trunk like.   But, at least it should pour well!


Handle on, spout on, lid trimmed to fit!

We have a teapot… might not be the prettiest teapot, but I am rather pleased with it  😊


The sugar bowl was next for a trim – maybe it looks more like a small ginger jar, but again, the lid fits, so I am happy with that.


And my milk jug has a handle!

I found the handles quite tricky to deal with, they either got to dry and cracked, or I just couldn’t make them even enough. More practise needed there!

So, my teaset is not really in good proportion to each other, but I feel a sense of achievement that I have managed to make one.

Let’s see how the firing goes.


Wednesday, 30 March 2022

Stained Glass panel planning

 Last week I was stuck at home with the dreaded COVID.... and I got SO BORED!


I had caught up on all my blogs, and note taking from Uni, I had drawn a few Sacred Geometric designs and done quite a bit of crochet.   What to do next?


I thought I might design a stained glass panel to make - in the theme of my kaleidoscope ideas.


I didn't have paper large enough to do the whole thing, so I drew half and hopefully I can just use the same half again to be able to create the pattern... that's if I have my measurements correct!


I used a protractor and ruler to make sure each piece was the same.


Then I decided to colour it in.... things are always better in colour, aren't they?


I added a key to show what effects I wanted to include and where.  I want to add some sandblasting, painting and maybe some stain.... with a mandala type piece in the centre.

So, now all I need to do is find some glass and make the thing!

Watch this space....

Sunday, 20 March 2022

Kaleidoscope Project – marble disc


As part of a uni assignment I am creating a type of kaleidoscope – the viewer will be made from mirrors and the discs will all be different using various forms of architectural glass techniques.


The first one I wanted to make was to include shop-bought marbles.


First I put the marbles in the kiln to melt down so they had a flat bottom.

This meant I could arrange them neatly onto a disc of glass without them rolling all over the place.

I cut a 15cm glass circle out of window glass and placed the marbles onto it.

Then into the kiln it went up to 820 degrees.

The next morning I was way too impatient and had a sneaky look while the kiln was still at about 100 degrees  (not really recommended in case the piece thermal shocks and cracks.)


Happy with the result.. I think it should make a good disc to view through a kaleidoscope.