Monday, 31 December 2012

A Beaded Pen.

This is a little present I made for my lovely Mother-In-Law - a beaded pen.


She loves green, so I mixed up about 7 different shades of green Japanese Miyuki Delica beads and just beaded them at random.

The pen comes blank, with a pattern sheet so you can draw your own design if you like, but as I was just doing random colours I only needed the row amounts and how many beads to put on.

The panels are made flat, then "zipped up" to close into a tube, the pen then comes apart and you slide the beaded tubes in place.


Makes for an unusual pen to have in your handbag, don't you think?


Sunday, 30 December 2012

Cowgirl Cookie Jars.

Here is a cute little gift idea that I made for some of my friends for Christmas.  Cowgirl Cookie Jars.

First, find a suitable jar - I got these 550ml ones from Asda.
Sterilize the jars by washing well in very hot water, then drying in a hot oven.


I found the recipe HERE, but I fiddled a little with it to make it fit into the jar.

I used 'cups' as it is an American recipe, you can find measuring cups in a few supermarkets now, mine are quite old now but I find I use them a lot.


I mixed the plain flour (1 + 1/3 cups) with a teaspoon of baking powder and a teaspoon of bicarbonate of soda in a bowl, then I put half of it into the bottom of a jar.  I then pressed it down quite firmly with the end of a rolling pin - it is necessary to do this otherwise the rest of the ingredients will not fit into the jar.


The next layer was 3/4 cup of porridge oats, I used the larger ones found in the baking aisle of the supermarket.  Again, press them down to compact them in.


Following that was a nice colourful layer of Smarties, at this time of year you can get pink ones in the Christmas Sweetie aisle, I used half a large tube.  When I put them in I used a spoon to push as many as I could towards the edge of the jar.


I topped these with a layer (half a bag) of white chocolate chips - again found in the baking aisle.  I pushed these to the side too, to give a decent looking layer.


Next came a layer of 1/2 a cup of soft brown sugar, this was quite easy to pack down and sunk into the gaps left by the sweeties  :)


Filling up the jar was the final ingredient which was 1/2 a cup of white sugar, when packed this came to the top of the jar perfectly.


Now, just for the remainder of the flour, it's tricky as obviously the jar is full, but there is a little recess in the lid of the jar, so if the flour was piled up like a little pyramid, the lid would push it down to fit the shape - that was the theory and luckily it worked!


Voila!  Cowgirl Cookie Jars, all ready to label and give away.


But of course........ they needed to be tested  :)

So, you empty the ingredients into a bowl (carefully as the flour is likely to spill out when you pop open the jar) and give them a good mix up.  Add a beaten egg and 1/2 cup of melted butter and mix very well.

Roll into balls about 1.5" big and place on a baking tray lined with greasproof paper.  You WILL need to leave plenty of room inbetween the balls as they spread quite a bit.  You should get about 24 balls out of this mixture.


Bake at gas mark 3 for around 15 mins, which should still leave them a little chewy.


Nom them down quickly before the rest of the family finds them  :)

Friday, 28 December 2012

Bead Buddies Secret Santa.

Every year over on the Bead Buddies Forum we have a Secret Santa Challenge.

Each participant receives the same pack of beads (although in different colours) and an address label.  They need to make something beautiful using as much of the pack as they can, and send it secretly onto their chosen buddy.

Every year it works fantastically and this year was no different.

In our packs we had:

  • Silver Bows
  • Seed Beads
  • Swarovski Crystals
  • Glass Barrel Beads
  • Czech Crystal Drops
  • Compressed Acrylic Owl Focal
  • Beading Scissors

I decided to make from my pack a scissor holder on a long beaded necklace.  When you have little scissors it is so easy to lose them down the side of the sofa, or deep inside a bead box, so I thought if you had them around your neck you would have more chance of keeping them in one place.

I started with a little tube shape, flaring it out a the top so the handles would nestle nicely inside.


I then sewed on the little silver bows and added a fringe with seed beads and drops.

For the beaded necklace part I added the glass beads with crystals and seed beads.


Finally I added the little owl to one ring of the scissors to again make them easier to locate.


I opened the package that I received on Christmas Eve (I am bad like that!!) And I was amused to see that the person making for me had had a similar idea  :)


I am now the proud owner of a cute little scissors holder with a dangly charm.


And a beautiful jangly bracelet.


Part of the challenge is usually to guess who has made the gift for you, judging it by the style of the work, but as I had organised it of course I know who made it for me.  

I would like to say a big THANK YOU to Julie Ramezani for making me such a lovely gift.

Tuesday, 25 December 2012

Testing testing.

My wonderful Hubster has just bought me an iPad mini for Christmas.


Looking through the App Store I found the 'blogger' app, so though I should test it out :)

UPDATE: I found I couldn't place photos where I wanted them with the blogger app, so I had to pay and download the 'Blogpress' app instead - I seem to be able to place photos now so I might be using this method quite a lot :)

Happy Christmas everyone!

Friday, 21 December 2012

Cumberland Rum Butter

I wanted to give my colleagues a little hand-made gift for Christmas, but what to make?  It needed to be something I could do in bulk, that wouldn't take 'too' much time, but would look half decent.

I decided on RUM BUTTER.

Now, for those who do not know, there are two types of Rum Butter - Cumberland and Westmorland.

The Westmorland recipe requires the butter to be creamed into the sugar, whereas in the Cumberland recipe you melt the butter then stir it in.

So basically you need 1lb of soft brown sugar to half a pound of butter and a "glass" of rum.  My glass was rather large, but there's no point having a weak rum butter is there?  :)

Here is how you make it:

First, find a jar (or jars).  I picked this cute little hexagonal one from Hobbycraft.  They were on 3 for 2 at the time so I got a bit of a bargain.


Sterilize the jars by washing thoroughly in boiling water then popping in a hot oven to dry off. Don't forget to do the lids too.


Then, slug a generous splash of Rum into the sugar and stir to mix.


Melt the butter.


Mix the butter into the sugar, this will take a little while as the sugar dissolves.  You will need a good beating arm.


When it is totally mixed through, leave it to cool for about half an hour, then go back and give it a really good beat.  At this point I use the electric mixer to make it a little easier.


It makes the Rum Butter creamier if you repeat this step - leave it for another half hour, then go back and beat it again.  You will see at this point that the colour changes and it becomes lighter.

Next you need to pop it into the jars, I thought a spoon would be too tricky so I filled up a piping bag and piped it in.


(Lots of little jars all full to the brim with delicious Rum Butter)


To finish I added a little material circle, and an ingredient label.


Now, during preparation I managed to drop a blob on the kitchen worktop - Hubster thought this was hilariously funny as it looked like (in his words) "A Turd", he promptly took a photo and shared it on Facebook - the child!


And lastly, a thank you, to my Mother, Vera, for passing on the family recipe and doing a fair bit of the first beating  :)

Wednesday, 19 December 2012

The easiest mince pies.

So, I said I would see you all in 2013, yet here I am blogging again  :)  Oh well.

I thought I would share these easy peasy mince pies - well, they are more of a mince Danish than a pie, but so simple to make, and you don't need lots of ingredients either!

So buy a jar of mince meat  (check ingredients if you are a vegetarian as some use beef suet) and a pack of puff pastry from the chiller.  You will also need a little flour for rolling and a touch of icing sugar for sprinkling.


Sprinkle some flour on your worktop and roll out the puff pastry, try and keep it as neat as possible as it means less waste later.


Roll it out until it is around 2-3mm thick and about as large as a swiss roll tin.


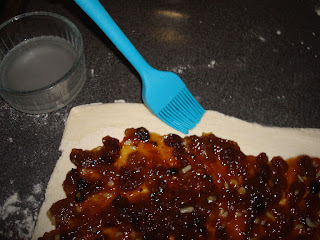
Spread a full (regular) jar of Mincemeat on it leaving a gap at one long edge to seal.


Dampen the bare edge with water.


Roll and press the edge down to seal.


Slice into half inch pieces.


Lay on a baking tray lined with greaseproof paper and sprinkle with a bit of brown sugar if you like.


Bake as Gas 6 for around 20 mins or until they look golden brown.

Leave to cool slightly as the Mincemeat is burny hot when it comes out of the oven - trust me, I know!

Transfer to a cooling rack and when cold shake some icing sugar over the top.


Nom nom!