Monday 30 September 2013

Storecupboard Dinners - Cereal flapjack

Right ok, it's not exactly a 'dinner' but it is made from storecupboard leftovers, so I thought it would count  :)

You know those bits of cereals that get left at the bottom of a packet?  Bits of small stuff and dust?  Not enough to make a decent breakfast so it usually ends up getting thrown out.  Well, no more - make this instead.

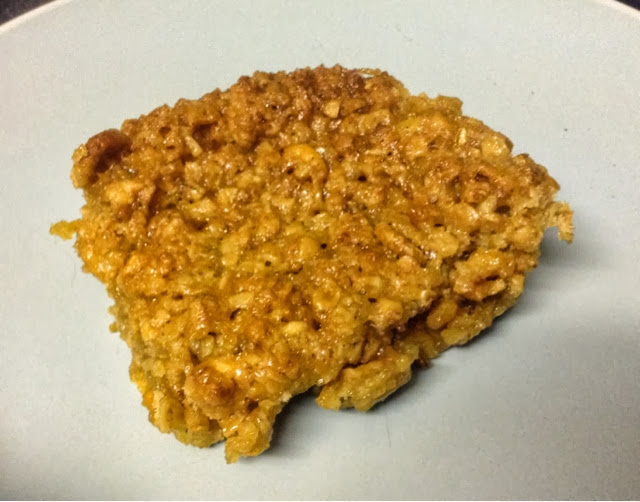
Left-over Cereal Flapjack.

What you need:
  • 6 oz Butter (or Marg you can cook with)
  • 6 oz Golden Syrup
  • 6 oz Sugar (brown, white, whatever you have)
  • 12 oz Cereals, including porridge oats.
  • 2 Tablespoons of flour (any will work)


What you do:
  • Melt the butter, sugar & syrup over a low heat in a pan.
  • Meanwhile, lightly crush your left over cereals and weigh them. You need 4-8oz ish...  (I used Cheerios, Strawberry Clusters and Cornflakes).
  • Make up to 12oz with porridge oats.
  • Remove the syrup mix from the heat when melted & stir in the cereals & oats, along with 2 tablespoons of flour.
  • Mix well then pour into a greased baking tin.
  • If your tin is too large, make a tinfoil 'wall' to stop the mix spreading during baking.
  • Bake at gas 6 for 20-25 mins. Cut into pieces while still warm.
  • Pile on a plate & watch it magically disappear!


Email me through your Storecupboard Dinner recipes and I will feature them in my blog, or if you prefer add a link to your own blog in the comment box.

Sunday 29 September 2013

Storecupboard Dinners - Margret's Bread & Butter Pud

A guest blog from Margret, about her Storecupboard Dinner.


Well it wasn't a full meal, but we had leftover bread pudding yesterday. 

See I defrosted the freezer and found four sad looking brioche rolls that were really not for eating as they were, so I cut them in slices, buttered them, spread some marmalade on them. Then I buttered a dish. 

Now for layers ... one layer of buttered rolls, one layer of sultanas another layer of rolls etc. 

Now for the filling ... oh dear ... not much milk left. OK 1/4 of a pint of semi-skimmed and 1/4 of a pint of water, mixed with 2 eggs (normally I would only use one but with this lack of milk...)
Mix the lot together real well and pour over the rolls etc. in the dish. 


Leave that to stand for a while so the liquid gets soaked up. Then bake it at 160 degrees for about 3/4 of an hour. 


The custard was made from 1/4 pint of milk and 1/4 of a pint of water and using two table spoons of custard powder and 2 table spoons of liquid sweetener it boiled up to a lovely custard. 


Well there you go ... had half of it yesterday and the other half is for afters at lunch today :)


Sounds blooming yummy to me!

Email me through your Storecupboard Dinner recipes and I will feature them in my blog, or if you prefer add a link to your own blog in the comment box.

Saturday 28 September 2013

Storecupboard dinners - Cous Cous Bake

My first "Storecupboard Dinners" recipe.  Cous Cous Bake.

This was actually very yummy, I would definitely make it again.  The idea is to mix it up - change ingredients, swap things about, make your own culinary masterpiece.


What you need:
  • Packet of Cous Cous  (any flavour, I had one with nuts & seeds in it)
  • Protein of some sort (I used Quorn 'chicken')
  • Frozen chopped Garlic
  • Dried Herbs
  • Oil
  • Dried Chilli Flakes
  • Small amount of grated cheese
  • Breadcumbs (either made from fresh bread, or the dried ones in a tub)
  • Tin of sweetcorn


What you do:
  • Pre-heat oven.
  • Make up the cous cous according to the instructions and leave to one side.
  • Pop some oil in a frying pan along with the garlic, dried herbs, chilli flakes, heat.
  • Add in the protein and stir till cooked.  Add the sweetcorn and the cous cous and stir until heated right through.
  • Add enough sauce just to give the mixture a coating.

  • Pop the mixture in an oven proof dish, sprinkle with grated cheese and give it a coating of breadcrumbs.
  • Put straight into the hot oven, top shelf and leave until the breacrumbs brown and the cheese bubbles (10 mins or so)
  • Eat.

Nom nom.


  • Email me through your Storecupboard Dinner recipes and I will feature them in my blog, or if you prefer add a link to your own blog in the comment box.

Storecupboard dinners

Have you ever carefully opened your cupboard or freezer door, with one hand ready to catch the stuff that is bound to all fall out because you have SO MUCH STUFF in there?

You manage to get the door open, and with a swift hand movement, you cleverly make sure everything is still balanced, you pull your hand away, stand back, stare at the bulging shelves and wonder what to make for dinner.

"There's nothing in for dinner" you shout, and send someone to the chippy.

There IS nothing in for dinner, if you don't count the 24 packs of cous cous (they were on offer on Approved Foods), the 4 jars of cheap tomato sauce, the 3 boxes of Ebly, the 7 tins of various soups that no one else in the house will eat but you, the small tin of mandarins  (WHY do we buy those?), the half eaten jars of jam, peanut butter, banoffee curd (yes, really - it's horrible), chocolate spread, marmite.  Then there is the obligatory bags of pasta, rice, macaroni, cous cous (again), lentils, dried chickpeas and dried soya chunks  (that last one might just be my cupboard!!)

Then there's the freezer.  Various half full bags of veggies - parsnips, mixed veg, peas (gotta have peas), chopped onions, sweetcorn, corn on the cobs on the top shelf, followed by Quorn products on the middle shelf, then sad single things on the bottom shelf - solitary burgers wrapped in cling film, sad little slice of quiche wrapped in cling film, lonely chicken kiev wrapped in cling film.  Oh, not forgetting the two packs of home-made soup, lovingly packaged in those re-usable soup bags with the little window on the front to write on what soup it is.   So, what soup is it?   Well, it's a reddish orange soup and an orangy red soup.  Take your pick.

We have set ourselves a challenge in our house, to eat from the cupboards.  Hubster has been having the oddest meals as he is a fussy sod - battered fish with yorkshire pudding and a corn on the cob a couple of days ago, where as I am more likely to experiment and make something from nothing.  Do you fancy joining in and sharing recipes?


I shall call them "Storecupboard Dinners", please feel free to email me recipes (ideally with photos) to soozintheshed@gmail.com and I will blog them, or you can just add a link to your own blog in the comments box so we can all go and visit  :)

Let's mix it up!

Friday 27 September 2013

Leafy Crochet Scarf

Whilst browsing the other day I came across this cute pattern - a leafy scarf.  It was a photo tutorial which was easy enough to work out.   But in case you fancy having a go, here is a written version for you.

An EDC is an American term for an "Extended Double Crochet".  Imagine you are crocheting a Treble, you pop your hook through the stitch, pull through the yarn  (3 loops on hook), yarn around, through two, yarn aroundm through two.  Well with an EDC you pop your hook through stitch, pull yarn through (3 loops on hook) then yarn round, through one, yarn round, through two, yarn round, through two.  Got it?  Good.


  • Chain 8, EDC into 1st ch, Chain 3, EDC into 1st ch, chain 4, turn.
  • Into that first chain space of 3, work 8  ECD  (the first 4 chain counts as 1), then chain 2, EDC into the 3rd stitch along, Chain 3 then EDC into the same space, Chain 4, turn.
  • .... and that is it!    Just repeat the last row.
Off you go then  :)


It makes quite a thin scarf but when doubled over like the above photo it looks really good around a neck.  It's never going to keep you warm in a howling wind, but it makes a wonderful accessory.


I used James C Brett yarn - Moonlight Sonata, which is mainly acrylic with a touch of wool and mohair, and of course some sparkle.

I love the way it runs through the colour changes.


Thursday 26 September 2013

Zentangling

I did a Zentangle class at Hobbycraft yesterday, the first one of it's kind, but I think I will do some more as it was very enjoyable.


We sat down with a canvas each, a Sharpie pen and a whole host of patterns.

We started by dividing our canvas space into 6, in a random fashion, then continued to fill in the spaces with a different pattern in each.


I just couldn't let mine get finished with no colour, so I added a red border  :)


The finished Zentangles - Judith's, mine and Mabel's.

They did a great job didn't they?


The next Zentangle class, if you should fancy joining me, is on Hobbycraft, Carlisle, on Monday 28th October at £6.00-7.30pm.   It is £10 and you get a Sharpie pen to take home and your canvas to work on included.  To book, call  01228 812362

Wednesday 25 September 2013

Jewellery class at Hobbycraft

Last night saw in another beginners Jewellery Class at Hobbycraft in Carlisle.


The two ladies, Jeanette and Tori, seemed to have loads of fun, mixing beads and colours and coming up with designs that they loved.


We did earrings  (3 pairs) a tigertail necklace with a dangly pendant and a sliding cord necklace.


I made these earrings as samples, sometimes I like just messing about with beads you know  ;)


Actually, I am giving the purple and green ones away on my Facebook page, pop along and put your name down if you fancy them  :)

Tuesday 24 September 2013

Waterfall Cake Topper

I originally made these beaded cake toppers for a wedding cake, there was a large one on the top, with smaller ones pushed into the side on an angle.


I have made this one with Gemstones, but you can use any beads that you desire, just make sure they are not too heavy for the wire. This design also looks great as a hairpiece if added to a hair-comb, or as a plant pot decoration.


You will need:

  • 75cm of 0.8mm wire 
  • 2.5m of 0.5mm wire 
  • Selection of beads (approx 40 in total) 
  • 1 x Posy Pick )available from Cake Decorators
What you do:

  • Cut a piece of the thicker wire -15cm long. 
  • Cut a piece of thinner wire 50cm long and hold a piece of thick together with a piece of thin leaving about 3cm loose. 
  • Start to twist the thinner wire around the thicker wire in a uniformed coil, make three twists. 
  • Take a Gemchip or bead, thread it onto the wire and hold it in position about 3cm from the main thick wire. 
  • Holding the thick wire tight in one hand, use your other hand to twist the beaded wire until it forms a tight coil and stands up on its own. 
  • Twist the thinner wire around the thicker wire 5 times over the space of 1.5cm and repeat step 5 with another bead or gemchip, this time placing it closer to the main wire. 
  • Repeat from Step 5 until you have 7 or 8 beads in various heights along the wire. Twist your wire a few times round to finish. 
  • Curl the end of the wires two or three times round a round nose pliers, or knitting needle. 

  • Make 5 of these stems. Then bunch them all together, it doesn’t matter about the design at this stage as you can move them about later. 
  • Take a piece of the thinner wire and bind all the ends together. 
  • Push all ends into a posy pick (from Cake Decorators – this saves the metal touching the cake) using a dab of glue if necessary. 
  • Bend the wires to form a pretty waterfall feature.

© Sue Simmons /The Bead Shed 
SEPTEMBER 2007

Saturday 21 September 2013

Crochet Conversion Charts

When teaching crochet I often get students bringing me a pattern of what they would like to make.  More often than enough it is a pattern they have bought online and uses the American crochet terms.

Now, although all the crochet stitches in the UK and the US are the same, we use different terminology.

For example, in the UK we would use the term TR for Treble Crochet, for exactly the same stitch, used in a US pattern it would be called a DC, but we also use the term DC, but for a Double Crochet, which they refer to as SC (Single Crochet)  Are you confused?

I have put together this little chart, hope it helps somewhat.

I put these charts in photo format as well as the text format so you could click and save them to your laptop, tablet, iPad, phone etc and it might be useful to have them with you when you go yarn shopping.

Crochet Terms Conversion

These Crochet stitches are the same but they use different terminology, so you might pick up a pattern not realising that is an American pattern and work away with the UK stitches when they should be the USA ones.  
A couple of ways of working out what pattern it might be if it does not state it on the pattern, is look for "SC", UK patterns will not use the term "SC", failing that, look for the spelling of "Colour", if it is spelt "Color" it may well be an American pattern so you will need to use the American stitches.

UK
USA
CH - Chain
CH - Chain
DC - Double Crochet
SC - Single Crochet
TR - Treble Crochet
DC - Double Crochet
HTR - Half Treble Crochet
HDC - Half Double Crochet
DTR - Double Treble
TRC - Triple crochet
SL ST - Slip Stitch
SL ST - Slip Stitch


Another question I get asked a lot is about yarn weight.  Again, the US terms are different to the UK terms, and people are just no sure how to work it out, so here is another little chart.

Yarn Ply & Hook Size

Use this information as a guide, you may need to change your hook size if you are a tight or loose crocheter.  Always do a swatch if needed.
Sometimes yarn makers put their own gradings on the labels, have a look see if they also have a suggested needle size on there, it will help you work out what alternative you could use.
Check out the yarn label if it has a knitting needle size on there

UK
USA
Numbered
HOOK SIZE
1 ply
Laceweight
0
0.6mm - 1.5mm
2 ply
Fingering
0
1.5mm - 2.5mm
3 ply
Sock
1
2.25mm - 3mm
4 ply
Sport
2
2.5mm - 3.5mm
DK
DK/Light Worsted
3
3.5mm - 4.5mm
Aran
Worsted
4
5mm - 6.5mm
Chunky
Bulky
5
7mm - 9mm
Super Chunky
Super Bulky
6
9mm or larger


Friday 20 September 2013

So many draft blogs.

I am well aware that I an "being quiet", which obviously means I am up to no good  ;)

Well, actually, I am not being that quiet, you should see all the blogs I have written up and in draft form - the reason?  I decided in my infinite wisdom, that I would do a "crochet along" on my blog, a simple crocheted mandala style doily thing that people could join in with.  But, when I was writing the blog it suddenly hit me that non crocheters might want to join in and therefore I would need to show them the basic stitches.

Still with me?   ....  good.

SO... I thought I should so a blog post on simple crochet stitches.  I sat down with a hook and a ball of yarn and got to work, only the photos didn't work, you couldn't really see where the yarn was going - I needed movement.

SO....(lightbulb moment)  a video tutorial.  I got Hubster to stand above me while I crocheted a few stitches.  Yep, it would work.

SO..... I phoned Daddy L and begged his light tent and a small tripod, afterall Hubster wouldn't hugely be happy standing above me for hours on end holding a camera.

SO.... I had to go and tidy up the craft room in order to find the camera to sit on the tripod and charge it up, up to then I had been using my iPad.  Ok, that's all sorted, camera charged, ready to rock.

SO.....  I had to go and set up a You Tube account, THIS took me ages as I wanted to use the user name "SoozInTheShed" and it wouldn't blooming well let me - well, it did let me then suspended me as I wasn't using a "real name"  Seriously??   I had to Google how to add a user name.  You Tube is not the easiest site to get around. Still, got there in the end.

SO..... everything is in place now, ready to press play, as soon as they are done I can upload part one of my "Crochet Along" Mandala.

Me and my big ideas!

Wednesday 18 September 2013

Magic Ring / Loop in Crochet

Often a pattern calls for a magic ring or loop to start a project.  The difference between using a magic ring and say a chain of 4 and a slip stitch, is that you can pull the MR shut and therefore making the hole in the middle disappear.

Magic loops are so much easier to demonstrate than explain, so let's see if I can do a step-by-step photo tutorial to try and make things a little easier.

So, instead of making a normal slip knot, you do this  (no knots)...

  • Wrap the yarn around your fingers like shown in this photo.

  • Pop your hook through the hole and pull the yarn through from the back to the front.

  • As if doing a chain stitch, pull your yarn through the loop you have just made.
  • Pull upwards until it is tight.

  • Now, pull the working end of your yarn so the stitch tightens up enclosing your hook (keep your tension tight here as this loop will work loose otherwise).

  • Start working your pattern, working your first number of stitched into the loop.

  • Once all the stitches are in place, pull the tail tight and slip stitch into the first stitch to join.