Showing posts with label architectural glass. Show all posts

Monday, 4 April 2022

The Kaleidoscope Project - Mandala Disc

 As part of a uni assignment, I am creating a type of kaleidoscope – the viewer will be made from mirrors and the discs will all be different using various forms of architectural glass techniques.

This disc is a sandblasted mandala design.

I started off my drawing a mandala in a iPad app called Amaziograph.


I found a lovely piece of flashed glass, which is clear glass with a coating of colour on one side.

You can sandblast through the coating to make sections clear glass again.


I used a masking tape and placed the mandala image on the top, and cut through them both with a very sharp craft knife.


Then it was off to the sandblaster to blast away the parts I had cut out.


I wasn’t really prepared for how long it would take to blast through a 1mm layer of coloured glass – this was about 2 hours work!


After a few more hours I was finally getting somewhere…
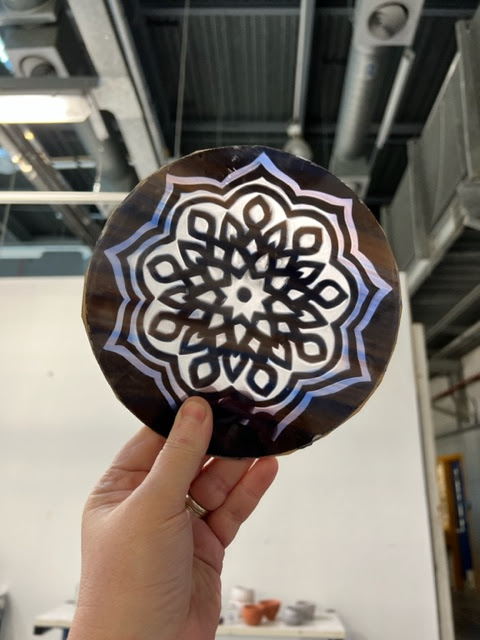

I removed all of the tape, and popped the piece into a kiln to fire at 650 degrees so that it would soften the sand blasted areas to make it all nice and shiny again.


I’ve still got to grind the edges and maybe put some tape around it to make it a little neater, but so far I am quite pleased with that.


And it looks really cool through my kaleidoscope viewer.  😊


Monday, 14 February 2022

Stained Glass Panel

My first attempt as proper leaded stained glass – I have done numerous amounts of copper foiled stained glass, and I have edged some of those pieces in lead to make them sturdier, but I have never made a fully leaded piece – until now.


First I drew a ‘cartoon’ (a design on paper) and cut 25 squares of glass exactly the right size as the cartoon.


It’s really important to get the squares exactly right so that the lead runs straight along the lines.

The next step was to cut the lead to match.  The vertical strips ran in one piece, while the horizontal strips were cut to be slightly smaller than the glass squares.


Once all the pieces of lead were cut, I then ‘blocked’ it by hammering some nails in behind piece of wood to keep everything in place.


The next step was to cement it.  I made a putty out of lead cement and whiting and pushed it inbetween the glass and the lead with my thumb.

I then coated the whole lot in a layer of whiting and brushed it all off.


The final job was to give it a polish with black polish, and it was done!


Tuesday, 8 February 2022

Glass Painting - my Dad!

So, this was something very different for me.  Glass Painting!   - I don’t mean painting o glass with those Vitrea paints, this technique is painted and fired making it permanent.

The piece is fired in between layers so once you are happy with a layer, you can fire it, then work on it again without risking the layer you’ve already done.

First I needed a photo to work from – I used this one of my Dad, taken about 30 years ago.

Black and white photos work best as you can then copy the shades.

The paint powder was mixed with gum Arabic to make it a good consistency for painting with.

I placed the photo under a piece of glass and painted on the outlines.


This then went into the kiln to bake at around 650 degrees.

Quite pleased with the outcome – it does resemble my Dad somewhat.


The next step was to work in a kind of reverse painting style, but covering the whole thing in paint and scraping back the light areas.

This was all very new to me, I have never done much art, but it was good fun.


There were quite a lot of scraping involved to get the light bits back to how light I wanted them.  

Then I textured the background – I could have removed the paint from the background, but I thought it looked quite nice with a criss-cross texture instead.


And this is my finished piece.

I am so pleased with it as it really does look like my Dad!

I am definitely trying this technique again.


Friday, 4 February 2022

Sandblasting little squares

A lesson in using the sandblaster today.

First of all I cut 12 small squares of glass, then piecing them back together I stuck some sticky backed vinyl all over them. 

I then drew a basic flower image that I had found on the internet.

Next, I cut the lines out of the flowers with a sharp craft knife. The parts I cut away were the parts that I wanted blasted by sand.

The sticky backed vinyl wasn’t quite sticky enough, so I started again with strips of masking tape which was a bit stronger.


Once I had given them a good blast in the sandblaster, I removed them from the tape, cleaned them off and started to wrap each square in copper foil.

I then fluxed the copper foil and soldered it all back together again.

Not the neatest work I have done, but I think it looks ok, and shows off the sandblasting nicely.