Showing posts with label crochet along. Show all posts

Monday, 1 January 2018

2018 Temperature Blanket project.

Have you heard of the Temperature Blanket project?

Well, quite simply it is a row of crochet (or knitting, if you prefer) each day, matching the colour of the yarn to what the temperature is that day.

If you Google 'Temperature Blanket' you will come up with load of ideas and patterns, but if you would like to join in with mine then please feel free   :)

I have set up a Facebook group so we can all share our progress as we go along - you can find it HERE, just click the JOIN button.

So, we are going to make this one in 8 colours - it is impossible to know just how much you will use of each as each day might be different, so one ball of each is a good place to start, buying more as you might need it.

I chose to do mine in Stylecraft Special DK, which is a gorgeous soft acrylic yarn in delicious colours.  These are....Matador, Tomato, Grass Green, Lime, Aspen, Petrol, Emperor and Magenta.


I have devised my own temperature chart to go with these colours, basing it on the UK weather system.  Hopefully at some point we will get to use all the colours.

A little bit about my design idea then....... some people quite fancy the idea of doing a blanket, but if you do a row a day, you are looking at a 356 row blanket, which if you are using Trebles is going to be rather large.  Large is ok if you want large of course, but it's also quite a commitment in time, so my plan is to work four separate pieces and join them at the end.  It means that we will work for 364 days as it's dividable by four  :)

We shall call them "Quarters".  We will need to 'borrow' days from other quarters to make the pattern fit, but I will remind you of that as we progress - so don't worry about it now.

Jan / Feb / Mar (90 days)  (Quarter 1 - Lowest Temp)
Apr / May / Jun (91 days)  (Quarter 2 - Highest Temp )
Jul / Aug / Sep (92 days)  (Quarter 3 - Highest Temp)
Oct / Nov / Dec (92 days  (Quarter 4 - Lowest Temp)

So, how to check your temps.  To get the most out of each colour, I suggest taking either a low or high temp reading for each quarter as shown above.  If you were to pop over to the Met Office Website and put in your area, you will get both a low and high reading for that day.  (or you can use any weather apps you might have on your phone.)


And here are the colour rules..... so, as you can see from above, the temp for Carlisle today was a low of 3 degrees and a high of 8 degrees.  As we will be working on Quarter no:1 we will use the LOW number.

3 degrees on the colour chart means you would use PETROL for this particular day.


If you find you do not have time one day to do your row, DON'T PANIC, just jot down the temp for that day and play catch up when you do have time.

The pattern!   Finally, we have come to the part where the pattern is revealed.  As promised, it is a very easy pattern, basically just stripes, but every Sunday we shall pop a different row of stitches in so you can see your weeks work build up, I think that would be quite nice.

So.... shall we begin?

I choose to use a 4mm crochet hook, it is my hook of choice for DK yarn, but you may wish to use a 4.5mm or a 3.5mm - whatever you are most comfortable with.

We will be using the HTR stitch, which works like this......  Yarn round hook, insert hook into stitch, pull yarn back (3 loops on hook). Yarn round and draw through all three loops.

FOUNDATION ROW:

Chain 93, work a HTR into the 3rd chain from the hook and HTR into each chain following.  (91 stitches)  Leave yarn attached just in case tomorrow is the same colour  :)


FOLLOWING ROWS:  (not Sunday)

Ch 2, HTR into the BACK loop only of each stitch.

If you are not familiar with using the back loop of the stitch, let me show you where it is.
When you put your hook through your stitch you usually get two strands of yarn above your hook (ignore the one already on there)


We will just be using the back loop of each stitch, the one marked by the green thread.  It gives a lovely ridged finish to the work.


Do a stitch count every so often to make sure you keep to the 91 stitches, otherwise you will end up with a triangle  :)

Tomorrow, I will show you how to join a new yarn colour.

I will pop back in a few days with Sunday's row.

Happy hooking!!

Sunday, 24 May 2015

Crochet Along - Afghan Blanket - Square 6

If you would like to know what this Crochet Along is about, then please click on INTRO to read all about it  :)

Welcome to Square 6.


You can find previous squares by clicking on the links:
Square 1
Square 2
Square 3
Square 4
Square 5


I am using Hayfield Bonus Aran yarn with a 4.5mm hook.  Gauge is not important, although all of the squares do need to be the same size.    Check they are square by folding your work into a triangle and seeing if the edges meet.  The pattern is written in UK crochet terms.


  • Chain 23, not too tight.

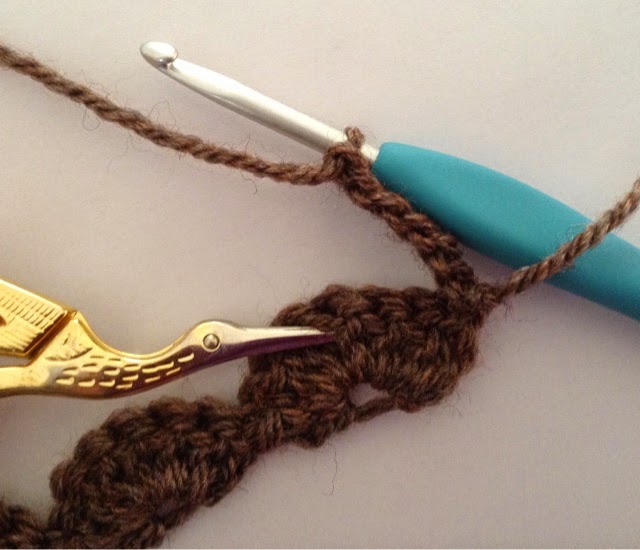
  • Now you are going to work into the 3rd chain from your hook  (do not count the loop on your hook as a chain, work where the scissor point shows)

  • Work a Treble into this stitch  (Yarn round hook, through the stitch, pull yarn back through  (3 loops on hook) yarn around, pull through two stitches (2 loops on hook) yarn around, pull through 2 stitches  (1 loop on hook)

  • Now work into the next stitch as shown by the scissor point and work a DC into this stitch (Put hook through the stitch, pull yarn back through  (2 loops on hook) yarn around hook, pull through two stitches  (1 loop on hook)

  • ***In the next stitch work a TR, and in the next a DC - continue from *** right across the chain, you will end on a TR in the last stitch.

  • CH 2 and turn.  (This CH2 counts as a DC)
  • Now working into the 1st stitch, where the scissor point shows...

  • Work a TR.  Into the next stitch you need to work a DC..... into the next a TR... and the next a DC..... and so on, alternating TR's and DC's.


  • Every row will end with a TR and every row will start with a CH2 followed by a TR.

Take a look at your stitches, you will see that from the row below each alternate one (the previous TR's) sits slightly higher than the DC's.  For this pattern you will be working TR's into the previous row's DC's and DC's into the previous row's TR's.   Alternating the stitches will give you a nice textured effect.  

Try to learn to recognise your stitches rather than counting, as this will make the job much easier  :)

  • Continue with the pattern until the square is square!   You can count rows if you wish (approx 20 rows), but I find this tedious and keep loosing count anyway. :)


Make another 11 of these squares - 12 in total.

This is how your week six squares will work within the final make-up.


I will be back next week with Square number 7.

Saturday, 9 May 2015

Crochet Along - Afghan Blanket - Square 5

DIf you would like to know what this Crochet Along is about, then please click on INTRO to read all about it  :)

Welcome to Square 5.


You can find previous squares by clicking on the links:
Square 1
Square 2
Square 3
Square 4


I am using Hayfield Bonus Aran yarn with a 4.5mm hook.  Gauge is not important, although all of the squares do need to be the same size.    Check they are square by folding your work into a triangle and seeing if the edges meet.  The pattern is written in UK crochet terms.


  • Chain 25, not too tight.

  • Now you are going to work into the 4th chain from your hook  (do not count the loop on your hook as a chain, work where the scissor point shows)

  • Work a Treble into this stitch  (Yarn round hook, through the stitch, pull yarn back through  (3 loops on hook) yarn around, pull through two stitches (2 loops on hook) yarn around, pull through 2 stitches  (1 loop on hook)

  • Now work FIVE more Trebles into the SAME stitch.

  • ***Skip TWO stitches and SS into the next, where the scissor point shows.

  • Skip TWO stitches and into the next work SIX Trebles.
  • Repeat from *** - you should end with a SS into the last stitch.

  • Turn and CH 6.

  • Into the top of the fan from the row below, you want to make a SS right in the centre, having three Trebles on each side, as shown by the scissor point in the photo.

  • CH 6 and SS into the top of the next fan, as before.


  • Repeat all the way across until you reach the last fan.  SS into the last fan then CH3.

  • Now work a TR into the first TR of that last fan, as shown by the scissor point.

  • Turn.  Work 6 Trebles into the SS on top of the fan from the previous row, as shown by the scissor point.


  • SS into the chain space from the previous row.


  • Then work 6 Trebled into the top of the next fan.

  • Repeat all the way along until you come to the last chain space. You need to SS into the 3rd chain of this chain as shown by the scissors.

  • These are the two rows that form the pattern.

  • Repeat the two rows until you have 7 rows of fans, then end on a chain and SS row to finish off.


Make another 11 of these squares - 12 in total.

This is how your week five squares will work within the final make-up.


I will be back next week with Square number 6.

Thursday, 9 April 2015

Crochet Along - Afghan Blanket - Blocking your Squares

If you would like to know what this Crochet Along is about, then please click on INTRO to read all about it  :)

This post is about getting your squares ready to put together into the final blanket.   I could have written this at the end, but I thought it might be useful to block as you go, then you can check your squares are indeed square, and will work together nicely when joining.

You can find previous squares by clicking on the links:
Square 1
Square 2
Square 3


So, you will need an ironing board  (or table, or mat) and a steam iron.


Get your iron up to heat, and place your first square on the board.   Now you are going to steam your square - no touching iron to material, it is going to be blocked simply with the use of hot steam.

Give your iron a good few puffs of steam about an inch above your square.


Remove the iron (otherwise you will burn your fingers) and manipulate the square into an exact square shape.  Pushing the corners out and making sure the edges are straight.  You can use a ruler if you like.


And now you should have a perfect square - and the template to steam all your other squares too.


So, leaving that first square in place, add a second on top.  Note how I have all the start chain tail and the end tail in the same place.  This ensures each square will end up the same.


Give it a good few puffs of steam, and with your fingers manipulate it to fit the bottom square as close as you can.


Repeat with your other squares  (12 in total for each design) piling each one on top then steaming and manipulating to fit.


You will end up with a beautiful pile of steamed, flat squares.


Now for the next set of squares.....  Using Square 1 as the template this time, add your next square pattern on top.


Steam and manipulate in the same way until it fits.


Keep adding squares, steaming and fitting.


And you have another set done.


Lovely!


So each set of square you do, steam them in this way, always using Square 1 as the template to make sure there is as little variation in size as possible.

It will take you ages to steam all 96 squares once finished, so it might be a good idea to make a start on them now  :)

Share photos of your steam squares on my Facebook page if you like  :)