Showing posts with label marbles. Show all posts

Sunday, 20 March 2022

Kaleidoscope Project – marble disc


As part of a uni assignment I am creating a type of kaleidoscope – the viewer will be made from mirrors and the discs will all be different using various forms of architectural glass techniques.


The first one I wanted to make was to include shop-bought marbles.


First I put the marbles in the kiln to melt down so they had a flat bottom.

This meant I could arrange them neatly onto a disc of glass without them rolling all over the place.

I cut a 15cm glass circle out of window glass and placed the marbles onto it.

Then into the kiln it went up to 820 degrees.

The next morning I was way too impatient and had a sneaky look while the kiln was still at about 100 degrees  (not really recommended in case the piece thermal shocks and cracks.)


Happy with the result.. I think it should make a good disc to view through a kaleidoscope.


Monday, 29 November 2021

Marble Run

Life through a marble series

Acrylic metallic paint & vintage glass marbles


 For this piece I decided to let marbles do the work.

 My Dad used to be a picture framer, so I raided his attic for some pieces of mount board.  I found some pieces with circular holes cut out which I though would work very well.

I laid one board with a circle cut out on top of a full sheet.


I found some old vintage school type marbles in my shed, and took out my metallic acrylic paints.

I chose colours that would compliment each other and not blend into each other to create a muddy colour.

Green

Purple

Red

Gold

Silver

I covered a marble in paint then I rolled it along the mount board  - or rather I attempted to.  The paint clogged up the rolling effect so the marble needed a good flick to help it on it’s way.  If it stopped before I wanted it to I gave it another flick.


It was a bit of a messy project  😊


I actually liked the end result way more than I thought I would, I might even put this on my wall!


This image is both the boards as planned laid on top of each other.


This one is the underneath board turn around to show an image inversion – like viewing through a marble might look.


This one is just the top board on it’s own.


And this is the bottom board on its own.


Friday, 2 May 2014

Photographing Marbles

Hubster has started to regularly post pictures of his marbles on his Facebook page.  He has taken some persuasion as he doesn't usually like to show off his work.  You never know, this time next year I might have persuaded him to sell a few too!

The big issue with marbles is photographing them.   They are a nightmare to show off the real beauty.  They are an item that you need to hold in your hand, and turn so you can see the way the colours move within.

Then there is the reflection.   Everything seems to reflect of a marble, whether it is the window, the overhead light, the flash of the camera.  It all shows up there for everyone too see.

We are on a mission to get the perfect marble photograph.


This one needed to be taken from two view points, as I mentioned before you just cannot get an idea of the movement from a mere photograph.


But you can also have a bit of fun with them,  how's this for a novel marble holder?

It looks very heavy for that little chap.

Fun with magnification  :)


You might recall me saying that my Dad, (aka Daddy L) is a photographer, so I set him a challenge - photograph a marble  :)   Here he is in action.


This is my attempt, with the iPad, using my own body to block the light, and no flash.  No reflection, but a pretty dull looking photo.


Here is Daddy L's, the marble is actually sitting in a bowl of water, so the water is actually filtering the reflection out.  No flash, so still a little dark, but the colours are shown off much much better.


The experimentation will continue, but in the meantime if you want to see more of Hubster's marbles, you can find his Facebook page HERE.

Friday, 6 July 2012

Making Marbles at Tuffnell Glass.

Last weekend, the Hubster and myself had booked ourselves on a Marble making course at Tuffnell Glass.

So, on the friday evening, after work, we set off from home and drove for 3.5 hours to Bridlington, where we had booked a little seaside B&B.

Saturday, we arrived at Tuffnell House headquarters where the marble class was being held.

Our tutor was Jan Rigden-Clay, lovely lady and very very talented. 


I had previously met Jan, having been on a course with her at the Flame Off, with Pati Walton.   
Here are some of Jan's own marbles.


So, saturday, we learnt to make marbles, or rather I did.  Andrew can already make a decent marble, but he wanted to learn some different techniques.  I had only made a couple of really bad ones before in soft glass, the glass we were using on this course was Boro.  It works a little differently and I struggled a bit to start with.


I was getting so cross with myself for producing such badly shaped marbles.

The first one was just a two colour marble, to learn how to form the nice round shape.


Second, we did a vortex marble, with frit.  It is like looking into a deep pool.


The final one of the first day was a "wig-wag" marble.


Sunday was a bit better, I must have had my marble head on as I seemed to be getting the hang of it.

The first one of this day was a "Fireworks" marble, with a deep depth of dichroic glass inside.


This is the back of the same marble.


Another frit vortex marble.


And an implosion marble, I enjoyed making this one and seeing how it turned out.


Definately something I plan to continue, I really enjoyed making them.  Even though each marble can take 1 - 1.5 hours to make!


Monday, 11 June 2012

My first marbles.

So, you all know I make beads right?  Glass beads that is, made in my workshop using a dual gas torch (propane and oxygen) and then popped into the kiln overnight.

So, yesterday, I fancied a glass session.

Kiln on, check / tanks on, check / glass chosen & washed, check / cup of tea, check.

I sit down to make some beads and........ no mandrels dipped!!!

Now, for those that do not know, the mandrel is a thin rod of steel (in my case, a cut down welding rod) dipped in bead release, which is a kind of clay slip.  This stops the glass sticking to the metal when you are wrapping the glass around to form the hole in the bead.

You can 'flame-dry' bead release, but 9 times out of 10, in my case, it cracks, so I much prefer it to be air-dried.

So, there I am, torch lit, glass in hand, no mandrels.  Bum.

The Hubster is beside me on his whopping great big man torch.  He doesn't make beads, he makes marbles, as beads are girly.  Basically though a marble is a bead with no hole, right?

"Make a marble", he says.

Make a marble?  Well, I suppose I could try, after all we are both booked in on a marble making class with Jan Ridgen-Clay at the end of the month, and I have NEVER even made the smallest marble.

This is Jan's website...

http://www.worldofmarbles.com.au/

So, I took some instruction from the Hubster (trust me, this rarely happens) and made my first marble.


Then I sent him away and made another  :)


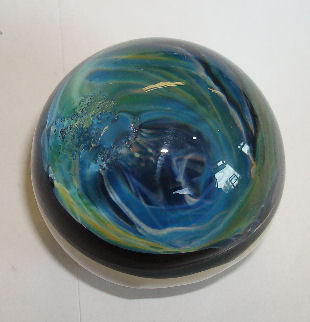
This morning, the marbles were waiting for me on the bench.

The colours are rubbish, and the shape is rubbish, but they are recognisable as marbles I guess.

More practise needed I think :)


Oh, and if you are interested, the Hubster has just set up his own Marble Gallery Facebook page, you can find it here...
https://www.facebook.com/iMarblesUK