I have some news to share with you. I have a new job!
Yep, you read correctly, I have a new job. At Hobbycraft. What could be more perfect for a crafter?
I wasn't even aware that I was looking for a job, I know that sounds a bit daft, but driving past an empty store in Carlisle, I noticed that there was a Hobbycraft sign outside. I could hardly contain my excitement on the way home....Carlisle, getting a Hobbycraft! Whoop.
Whenever we go anywhere in the UK, I find myself Googling, finding and visiting the nearest HC, there is always something 'new' to try in there. Last time I bought resin, still not used it but plan to...
Anyway, I digress. So I went on the HC website to see when the shop was to open, and found the 'jobs' link. Light bulb moment, I could happily work there, I thought, so I filled in the online application, ended up being invited for an interview and, much to my delight, was offered a job.
I will be just working a couple of 4 hour shifts a week, which is perfect for me with all the other stuff I do. The Bead Shed has been quite quiet since the Royal Mail price increases, so it will be a nice change to be out, mixing with other people, and getting paid for the pleasure :)
If you are local to Carlisle, check out the Hobbycraft website, they are offering a free gift to the first 100 people through the door on Saturday 8th Sept. You might be a lucky one.
If you see me there, come up and say ' Hi' :)

Tuesday, 24 July 2012


Wednesday, 18 July 2012
Implosion Beads
One of the skills I learnt on the Marble Class was how to do implosions. Now I have touched on these once before .... way way back in February 2009 when I had a class with Laura Sparling. I didn't practise the skill once home as I was concentrating on encasing, which is what I really wanted to learn to do way back then.
In the marble class we did an implosion within a marble design. My interest in them was reignited, so once home I sat down at the torch to play...
Implosion beads are not for the impatient. You have to, very slowly, allow the glass to drop which drags the 'petals' down. There is a lot of practising required to get them anywhere near decent, never mind perfect.
First I tried some regular sized beads, but I was unhappy with how the glass didn't have enough room to make the pattern drag properly.

I felt the beads needed to be bigger to get a good effect, so I made some teardrop shaped ones. I was quite pleased with these - a long way to go, but a good start.


This one was a double imlposion, I did a teardrop first, then added more glass and imploded it the opposite way, then shaped it into a barrel.

Now, if you want to see some perfect (and I mean PERFECT) implosions within marbles, check out this page.
http://www.kobukiglass.com/mableinfo.html
In the marble class we did an implosion within a marble design. My interest in them was reignited, so once home I sat down at the torch to play...
Implosion beads are not for the impatient. You have to, very slowly, allow the glass to drop which drags the 'petals' down. There is a lot of practising required to get them anywhere near decent, never mind perfect.
First I tried some regular sized beads, but I was unhappy with how the glass didn't have enough room to make the pattern drag properly.

I felt the beads needed to be bigger to get a good effect, so I made some teardrop shaped ones. I was quite pleased with these - a long way to go, but a good start.


This one was a double imlposion, I did a teardrop first, then added more glass and imploded it the opposite way, then shaped it into a barrel.

Now, if you want to see some perfect (and I mean PERFECT) implosions within marbles, check out this page.
http://www.kobukiglass.com/mableinfo.html
Monday, 9 July 2012
A free knitted scarf pattern.
I often sign up for newsletters on craft sites. I don't always read all the newsletters, but last weekend the word "FREE" caught my eye..... as it does :)
It was a free knitting pattern for a scarf. Nothing unusual there really, a scarf is one of those things that most people will knit at some point (presuming they knit of course). But this one just had something about it that I liked.
I go walking in the Lakes and Fells quite a bit, and a scarf is a bulky thing to have, although warm and useful they can be a bit cumbersome. If it's too long it gets caught up in everything, if it is too short then it keep falling off. What I liked about this pattern, that it was a short scarf with a way of keeping it in place - genius! Why didn't I think of this?

So, as I was going away that weekend, I grabbed some needles and a couple of balls of wool out of the huge stash I have and took it with me. Alas, I had only done 4" of work when I realised I would need some stitch holders (which were 4 hours away at home). It was the weekend we had gone to Bridlington for the Tuffnell Glass Marble Class. My parents had blagged a lift with us so they could have the weekend by the sea-side, so on the saturday I sent my mother out on a mission to find me some stitch holders. Within an hour she had them, from a charity shop at the princely price of 20p each :)

There was a small error in the pattern I noticed (just stitch counts) but I just ignored it and it worked fine.


It is so cosy warm, and sits beautifully on the neck.
I have checked the newsletter and I can 'forward to a friend', so if you would like a copy give me a yell and I will send it onto you.
It was a free knitting pattern for a scarf. Nothing unusual there really, a scarf is one of those things that most people will knit at some point (presuming they knit of course). But this one just had something about it that I liked.
I go walking in the Lakes and Fells quite a bit, and a scarf is a bulky thing to have, although warm and useful they can be a bit cumbersome. If it's too long it gets caught up in everything, if it is too short then it keep falling off. What I liked about this pattern, that it was a short scarf with a way of keeping it in place - genius! Why didn't I think of this?

So, as I was going away that weekend, I grabbed some needles and a couple of balls of wool out of the huge stash I have and took it with me. Alas, I had only done 4" of work when I realised I would need some stitch holders (which were 4 hours away at home). It was the weekend we had gone to Bridlington for the Tuffnell Glass Marble Class. My parents had blagged a lift with us so they could have the weekend by the sea-side, so on the saturday I sent my mother out on a mission to find me some stitch holders. Within an hour she had them, from a charity shop at the princely price of 20p each :)

There was a small error in the pattern I noticed (just stitch counts) but I just ignored it and it worked fine.

(Had a little doodle on this photo to show you how it works)

It is so cosy warm, and sits beautifully on the neck.
I have checked the newsletter and I can 'forward to a friend', so if you would like a copy give me a yell and I will send it onto you.
Friday, 6 July 2012
Making Marbles at Tuffnell Glass.
Last weekend, the Hubster and myself had booked ourselves on a Marble making course at Tuffnell Glass.
So, on the friday evening, after work, we set off from home and drove for 3.5 hours to Bridlington, where we had booked a little seaside B&B.
Saturday, we arrived at Tuffnell House headquarters where the marble class was being held.
Our tutor was Jan Rigden-Clay, lovely lady and very very talented.


I had previously met Jan, having been on a course with her at the Flame Off, with Pati Walton.
Here are some of Jan's own marbles.


So, saturday, we learnt to make marbles, or rather I did. Andrew can already make a decent marble, but he wanted to learn some different techniques. I had only made a couple of really bad ones before in soft glass, the glass we were using on this course was Boro. It works a little differently and I struggled a bit to start with.


I was getting so cross with myself for producing such badly shaped marbles.
The first one was just a two colour marble, to learn how to form the nice round shape.


Sunday was a bit better, I must have had my marble head on as I seemed to be getting the hang of it.
The first one of this day was a "Fireworks" marble, with a deep depth of dichroic glass inside.


Definately something I plan to continue, I really enjoyed making them. Even though each marble can take 1 - 1.5 hours to make!
So, on the friday evening, after work, we set off from home and drove for 3.5 hours to Bridlington, where we had booked a little seaside B&B.
Saturday, we arrived at Tuffnell House headquarters where the marble class was being held.
Our tutor was Jan Rigden-Clay, lovely lady and very very talented.


I had previously met Jan, having been on a course with her at the Flame Off, with Pati Walton.
Here are some of Jan's own marbles.


So, saturday, we learnt to make marbles, or rather I did. Andrew can already make a decent marble, but he wanted to learn some different techniques. I had only made a couple of really bad ones before in soft glass, the glass we were using on this course was Boro. It works a little differently and I struggled a bit to start with.


I was getting so cross with myself for producing such badly shaped marbles.
The first one was just a two colour marble, to learn how to form the nice round shape.
Second, we did a vortex marble, with frit. It is like looking into a deep pool.
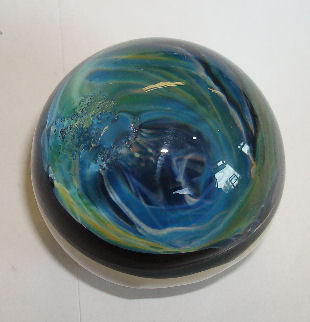
The final one of the first day was a "wig-wag" marble.

Sunday was a bit better, I must have had my marble head on as I seemed to be getting the hang of it.
The first one of this day was a "Fireworks" marble, with a deep depth of dichroic glass inside.

This is the back of the same marble.

Another frit vortex marble.
And an implosion marble, I enjoyed making this one and seeing how it turned out.
Definately something I plan to continue, I really enjoyed making them. Even though each marble can take 1 - 1.5 hours to make!
Tuesday, 26 June 2012
Gill Curwen at Rag Rug Club.
A couple of years ago I decided I would like to try rag-rug making, so I managed to track down a local group that met up once a fortnight. This group is part of the U3A, (University of the 3rd Age), and is run by a lovely rug maker called Judith Harrison.
I have made 3 or 4 rugs to date now, you can find them on my Opus Moon Facebook page. I always use the proddy method, having never ventured into any of the other techniques.
About a year ago I was teaching at Higham Hall, and I got talking to another tutor who was also there that weekend. It was Gill Curwen from Bapple & JoJo. Gill makes rugs for a living and had a degree in rug making. We kept in touch via Facebook and I asked her if she would come to our class to give a little talk and show off her work.
She very kindly agreed, and today was that day.
Walking into the room I was met by the most colourful array of gorgeous rugs. I took a few photos, but I only had my phone with me so they are not the best quality pics.


I am jam packed full of new ideas and inspiration now, can't wait to start and put some of those ideas into action.
You can find more of Gill's work on her Facebook Page.
I have made 3 or 4 rugs to date now, you can find them on my Opus Moon Facebook page. I always use the proddy method, having never ventured into any of the other techniques.
About a year ago I was teaching at Higham Hall, and I got talking to another tutor who was also there that weekend. It was Gill Curwen from Bapple & JoJo. Gill makes rugs for a living and had a degree in rug making. We kept in touch via Facebook and I asked her if she would come to our class to give a little talk and show off her work.
She very kindly agreed, and today was that day.
Walking into the room I was met by the most colourful array of gorgeous rugs. I took a few photos, but I only had my phone with me so they are not the best quality pics.


You can find more of Gill's work on her Facebook Page.
Sunday, 24 June 2012
Needle Felted Birds
I thought I would treat my Mum, Vera, to a class at Higham Hall.


Leafing through the booklet I spotted a Needle Felted Bird class, in conjunction with Woolfest, just a day class which was perfect as Mum doesn't like to leave Dad on his own too long. (She worries)
So at 8.00am Thursday morning we set of for Higham.
The class was being run by Sue Allan from Sewsister.
Neither of us have ever done felting of any form before, so we were total newbies. We walked into the room to find a couple of examples, and got immediately excited. Not sure what we were expecting, but it wasn't quite this!

We started with two pieces of hand-made felt which we cut into a "segment" shape, sewed it around, (leaving a gap) then stuffed.


We then took lumps of "wool tops" and needle punched them into the felt in whatever pattern we chose. I picked a load of wool tops in a pinky purple colour-way, and punched them in in stripes, adding squares of silver organza ribbon for patches of sparkle, and a twisted strip of blue for a curly wing effect.


Mum decided she was making a cockerel, so chose reds, oranges and browns for her colour-scheme.


Once the bodies were complete, we then went on to make felt beaks, and wired legs before the final assembly.

I have named mine "Burd", the Cockerel is called "Dennis".

We had a fantastic day, the tutor was wonderful and we were both chuffed to bits with our fantasy birds.
One classmate made this magnificent creature.

And a pic of everyones birds together. What a colourful display.

I wasn't overly happy with the eyes on Burd though, I had taken a selection of beads and sequins with me but none of them seemed to fit. So when I got home I took off the googly eyes he had and added a button with a bead on top, he seems to like them :)

Burd now has pride of place on top of the TV.

Monday, 11 June 2012
My first marbles.
So, you all know I make beads right? Glass beads that is, made in my workshop using a dual gas torch (propane and oxygen) and then popped into the kiln overnight.
So, yesterday, I fancied a glass session.
Kiln on, check / tanks on, check / glass chosen & washed, check / cup of tea, check.
I sit down to make some beads and........ no mandrels dipped!!!
Now, for those that do not know, the mandrel is a thin rod of steel (in my case, a cut down welding rod) dipped in bead release, which is a kind of clay slip. This stops the glass sticking to the metal when you are wrapping the glass around to form the hole in the bead.
You can 'flame-dry' bead release, but 9 times out of 10, in my case, it cracks, so I much prefer it to be air-dried.
So, there I am, torch lit, glass in hand, no mandrels. Bum.
The Hubster is beside me on his whopping great big man torch. He doesn't make beads, he makes marbles, as beads are girly. Basically though a marble is a bead with no hole, right?
"Make a marble", he says.
Make a marble? Well, I suppose I could try, after all we are both booked in on a marble making class with Jan Ridgen-Clay at the end of the month, and I have NEVER even made the smallest marble.
This is Jan's website...
http://www.worldofmarbles.com.au/
So, I took some instruction from the Hubster (trust me, this rarely happens) and made my first marble.

Then I sent him away and made another :)

This morning, the marbles were waiting for me on the bench.
The colours are rubbish, and the shape is rubbish, but they are recognisable as marbles I guess.
More practise needed I think :)

Oh, and if you are interested, the Hubster has just set up his own Marble Gallery Facebook page, you can find it here...
https://www.facebook.com/iMarblesUK
So, yesterday, I fancied a glass session.
Kiln on, check / tanks on, check / glass chosen & washed, check / cup of tea, check.
I sit down to make some beads and........ no mandrels dipped!!!
Now, for those that do not know, the mandrel is a thin rod of steel (in my case, a cut down welding rod) dipped in bead release, which is a kind of clay slip. This stops the glass sticking to the metal when you are wrapping the glass around to form the hole in the bead.
You can 'flame-dry' bead release, but 9 times out of 10, in my case, it cracks, so I much prefer it to be air-dried.
So, there I am, torch lit, glass in hand, no mandrels. Bum.
The Hubster is beside me on his whopping great big man torch. He doesn't make beads, he makes marbles, as beads are girly. Basically though a marble is a bead with no hole, right?
"Make a marble", he says.
Make a marble? Well, I suppose I could try, after all we are both booked in on a marble making class with Jan Ridgen-Clay at the end of the month, and I have NEVER even made the smallest marble.
This is Jan's website...
http://www.worldofmarbles.com.au/
So, I took some instruction from the Hubster (trust me, this rarely happens) and made my first marble.

Then I sent him away and made another :)

This morning, the marbles were waiting for me on the bench.
The colours are rubbish, and the shape is rubbish, but they are recognisable as marbles I guess.
More practise needed I think :)

Oh, and if you are interested, the Hubster has just set up his own Marble Gallery Facebook page, you can find it here...
https://www.facebook.com/iMarblesUK
Sunday, 22 April 2012
Time for a change.
Things are changing in The Bead Shed, check out TBS's blog and see what's happening.
http://thebeadshed.blogspot.co.uk/2012/04/time-for-change.html
http://thebeadshed.blogspot.co.uk/2012/04/time-for-change.html
Thursday, 5 April 2012
Not every experiment is successful.
You know when you get something in your head, and in your head it looks fantastic? You can also work out in your head exactly how to make it work and what to use. It happens to me, a lot. Sometimes it works, sometimes it fails miserably :)
Yesterday, it failed miserably.
I decided for some really weird reason, that a string picture would look great. You know those pictures you used to make in school with paint and string? Seeing it written down makes me think it wasn't such a great idea in the first place.
So, I got a pack of acrylic paints, and a ball of string, and a decent sized canvas. Then I looked at it for about a week not quite knowing where to start.

So, yesterday, with my A Level art daughter Shona on board, we made a start.
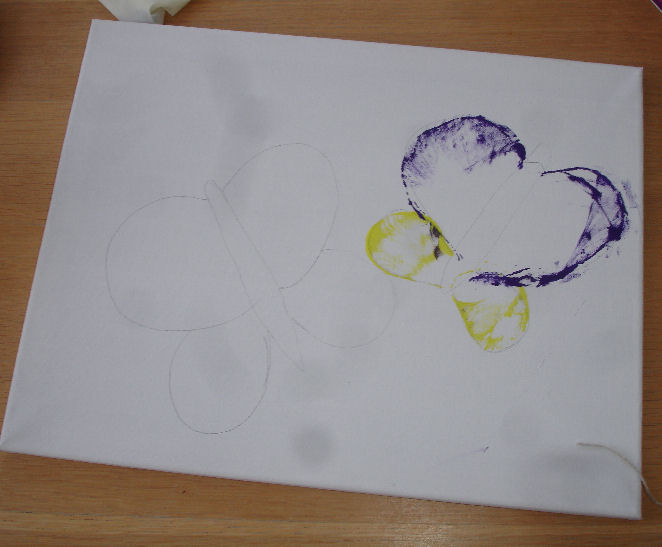
I sketched a rough guide onto the canvas, cut up some string, then covered it in paint, layed it on the outlines, and pulled it off.


What a blooming disaster, we laughed so much at the mess, there was paint everywhere, all over our hands like we were 4 year olds.

The whole time my father, Lawrence, sat opposite shaking his head, tutting and laughing at the same time.

I decided not to proceed, as it was just a scribbly mess, so threw out the half mile of toilet roll, loads of paint covered paper plates and dribbled of painted string.
At this point Shona decided she could use the canvas and gave it a back wash in purple. If it is anything like her last one I bet it will be fabulous! Watch this space.

Shona's last painted canvas. A blue strawberry with red lips for 'pips'.


Yesterday, it failed miserably.
I decided for some really weird reason, that a string picture would look great. You know those pictures you used to make in school with paint and string? Seeing it written down makes me think it wasn't such a great idea in the first place.
So, I got a pack of acrylic paints, and a ball of string, and a decent sized canvas. Then I looked at it for about a week not quite knowing where to start.

So, yesterday, with my A Level art daughter Shona on board, we made a start.
I sketched a rough guide onto the canvas, cut up some string, then covered it in paint, layed it on the outlines, and pulled it off.



The whole time my father, Lawrence, sat opposite shaking his head, tutting and laughing at the same time.

I decided not to proceed, as it was just a scribbly mess, so threw out the half mile of toilet roll, loads of paint covered paper plates and dribbled of painted string.
At this point Shona decided she could use the canvas and gave it a back wash in purple. If it is anything like her last one I bet it will be fabulous! Watch this space.

Shona's last painted canvas. A blue strawberry with red lips for 'pips'.


Subscribe to:
Posts (Atom)