Friday, 9 October 2015

Broomstick Crochet Wristwarmers - free tutorial.


Broomstick crochet looks very impressive, but it may seem a little scary.  It's not!  There are only two rows to learn, and one of them you will already know if you crochet.

Instructions are given in two sizes, regular adult and teen size in brackets.


Stitches explained:

Chain Stitch (CH) - Yarn around hook (from the back) and pull the new yarn through the loop on your hook.  This is ONE chain.  Repeat as needed.
Double Crochet (DC) - Put hook through work, draw yarn back through (2 loops on hook) yarn around hook (from the back) draw yarn through the 2 loops on the hook.

Slip Stitch (SS) - Put hook through work, draw yarn back through work and the stitch on your hook.


I used James C Brett Monsoon yarn, which is an Aran Weight, and a 4.5mm hook.


Lets start.  Chain 41 (36) stitches.

Row 1. DC (Double Crochet) into the 2nd chain from the hook and all the chains following. (40 (35) stitches)

Row 2. The loop you have on your crochet hook, pull it large and pop it over the dowel rod.  

You may wish to wrap the elastic band around the end of the dowel to prevent lost stitches.
Now working in a manner that will be odd to the regular crocheter, you will be working back across the chain stitch, from left to right.
*** Put your hook through the next stitch, bring the yarn through, pull the loop large and slide it onto the dowel.


You now have two stitches on the dowel.

Repeat from  *** until you have 40 (35) loops on your dowel.

Row 3.  Slide your crochet hook into the first FIVE loops, making sure it is at the TOP of the dowel, opposite the DC row.

Pull your yarn through these five stitches and make a chain stitch  (this is your turning chain and is used at the beginning of every row, just like this.)
Now for the really scary bit!
Slide all of your stitches off the dowel, don't worry, they won't go anywhere as you have knotted your first one in place.

With your fingers, fiddle with those first FIVE loops that you made a stitch into, until you can see the hole running through them all.
Then make 5 DC's into that hole.

Now pick up the next five loops and make 5 DC's into them as you have just done, but no chain stitch this time, that is only ever in the first one.

Work across, working 5 DC's into each set of 5 loops.

Row 4.  The last loop you have on your crochet hook - pull it up and place it on your dowel.
For each DC you will pull through a new loop as in Row 2.  .  You should count 5 loops for each set of 5 DC's.

And basically, that is the pattern!
Repeat Rows 3 & 4 for 10 repeats, (11 repeats in total) then break of the yarn leaving a long tail for sewing up.
Assembly.
Fold the piece in half lengthways, then sew together 4 pattern repeats down from the top.  Skip the next 3 pattern repeats and just weave your yarn through so it cannot be seen, then sew up the final 4 pattern repeats to the bottom.  Use the marks on the photo as a guide.

Thumb.
Attach your yarn to the base of the join in the hole and DC 1 stitch. 
DC 6 stitches up one side, DC 1 in the top join, and DC 6 down the other side  (14 stitches)  SS to join.
CH 2  then DC 13, SS to join. Break off yarn and sew it in.
Wear and enjoy!

www.soozintheshed.co.uk

If you would prefer a printable PDF version of this pattern, you can find it here:
www.soozintheshed.co.uk/broomstickgloves.pdf

And the winner of the Miffy books is.......

The Miffy books winner has been drawn and the winner is......


Congratulations, I am sure these will be well loved books.

Please contact me on soozintheshed@gmail.com so I can arrange your books to be sent to you  :)

Thursday, 8 October 2015

Amigurami Owls - free pattern


Amigurumi - what is it?  Many people ask me that question, and the answer is....

... the Japanese art of knitting or crocheting small stuffed animals and anthropomorphic creatures. The word is derived from a combination of the Japanese words ami, meaning crocheted or knitted, andnuigurumi, meaning stuffed doll. Amigurumi are typically animals, but can include artistic renderings or inanimate objects endowed with anthropomorphic features, as is typical in Japanese culture.

When people learn to crochet they usually learn flat, so crocheting in 3D can seem a bit daunting - but it really is very easy, once you understand the concept of increasing and decreasing to give you the shape you need.


I have been asked a few times to put on a crochet workshop for Amigurami, but when I do my workshops I like people take take home a finished product if at all possible, or at least have all the skills to finish the item off at home.  So I needed to come up with something that could be started and hopefully finished in two hours, but included all the parts that would be needed to continue with Amigurumi later on.

I designed these little owl fellow.  Easy to make, quick to complete and cute to look at   :)


Here is the pattern for you if you fancy having a go.   I made these in DK yarn weight with a 4mm hook.

BODY - Round 1. CH 2, then work 6 x DC's into the 2nd CH from your hook. (6 stitches)
Pull up a length of scrap yarn into the last stitch (to use as a stitch marker)
Round 2. Work 2 x DC's into EACH of the 6 stitches  (12 stitches)
Pull the scrap yarn up through the last stitch.
Round 3. (DC 1 into next stitch, then work 2 x DC's into the next) Repeat all the way around (18 stitches)
Pull the scrap yarn up through the last stitch.
Round 4. (DC 1 into next 2 stitches, then work 2 x DC's into the next) Repeat all the way around (24 stitches)
Pull the scrap yarn up through the last stitch.
Round 5. (DC 1 into next 3 stitches, then work 2 x DC's into the next) Repeat all the way around (30 stitches)
Pull the scrap yarn up through the last stitch.
Round 6-13. Work 8 straight rounds (30 stitches)
Pull the scrap yarn up through the last stitch of each round.
Round 14. (DC 1 into next 3 stitches, then DC2tog) Repeat all the way around (24 stitches)
Pull the scrap yarn up through the last stitch.
Round 15. (DC 1 into next 2 stitches, then DC2tog) Repeat all the way around (18 stitches)
Pull the scrap yarn up through the last stitch.
Round 16. (DC 1 into next stitch, then DC2tog) Repeat all the way around (12 stitches)
Pull the scrap yarn up through the last stitch.  STUFF.
Round 17. (DC2tog) Repeat all the way around (6 stitches)
Pull the scrap yarn up through the last stitch.
Round 18. (DC2tog) Repeat all the way around (3 stitches)
Finish off yarn and sew in the tail.
EYES - Round 1. CH 2, then work 6 x DC's into the 2nd CH from your hook. SS to join. (6 stitches)
Make TWO.
FEET - Row 1. CH 2, then work 2 x DC's into the 2nd CH from your hook. Turn. (2 stitches)
Row 2. CH 2, then work 1 x DC into the base of the chain stitches then 2 x DC's into the next stitch. Turn. (4 stitches)
Row 3. CH 2, then work 1 x DC into the base of the chain stitches then 2 x DC's into each stitch. Turn. (8 stitches)
Row 4. CH 2, then work 1 x TR into the next two stitches, DC in next two and TR in next three. Turn. (8 stitches)
Row 5. CH 2, then work 1 x TR into the next two stitches, DC in next , SS in next two, DC in next  and TR in last two. Turn. (8 stitches)
Row 5. CH 2, then work 1 x TR into the base of the chain then a TR into the next stitch, DC in next , SS in next two, DC in next  and TR in next  two then DC in last. Break off yarn. (10 stitches)
WINGS - Row 1. CH 6, then DC into the 2nd CH from the hook and the following next two stitches. TR in the next stitch, then work 6 x TR's into the last stitch.
Now you are going to work up the other side of your chain - no turning.
TR in the next stitch, DC in the next three and SS the join.  Break off yarn.
Make TWO.
ASSEMBLY - First sew the feet in position, next the eyes and finally the wings.
Add beads to the centre of the eyes and embroider a little beak on with orange yarn.

For a printable PDF version of this pattern, please visit:

www.soozintheshed.co.uk/amiowls.pdf

Saturday, 3 October 2015

Afghan Blanket Course - done!


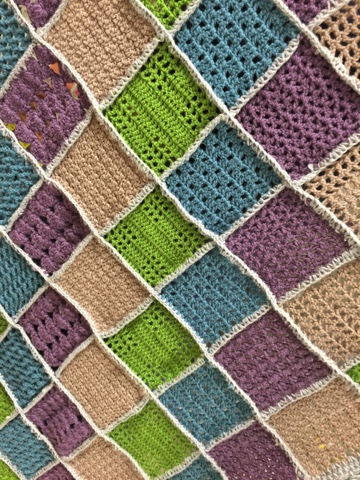
I have just finished teaching a 10 week course on crochet.  The aim was to make an Afghan Blanket, using a total of 96 squares in 8 different patterns.

Not everyone got them finished, afterall, it is quite a mammoth task to crochet a blanket, but they all got a good way, and five got finished.  Everyone seemed so happy with the results.

The colour choices were amazing too - each one looked so different, even if there was only one yarn colour swap.

Vera's blanket.

Kate's blanket.

Claire's blanket.

Jane's blanket.

Ami's Blanket


The course was so successful that I am going to do it all over again, in January.

If you fancy it, you need to know only the basic crochet stitches.  Just chain and one stitch will be enough knowledge, I will teach you the rest, and you will need to commit to a little time each week to finish off the squares.   You will get at least one square a week done in class, maybe even two, then the rest need to be finished off at home.

If it sounds like something you might like to do, you can find the details by clicking HERE.  The price includes ALL the yarn needed to make the full blanket, plus a full set of crochet hooks.

Tuesday, 29 September 2015

Do you remember Miffy? FREE GIVEAWAY

Do you?  That little cute bunny rabbit that was in a series of books, originally created by Dick Bruna?  Thought you might  :)


I remember a good few years ago making a few birthday cakes with Miffy on - which was good as it was so easy to do, solid colours and simple lines - just my kind of copying  :)

Anyway..... Miffy is back!  All modernised and up-to-date.  It is coming to the Tiny Pop pre-school channel, starting on 2nd October at 7pm.  This is the "cuddle-time" slot which allows parents to have a wee cuddle and watch TV before bed.


As it happens I will have my baby Granddaughter, Hope, that evening so we are going to cuddle down to watch it before bed   :)

I have a collection of five books to give away to one lucky person to celebrate this event.


All you have to do is comment on this blog by Friday 2nd October or over on my Facebook page, and I will use a Random Name Generator to pick one lucky winner who will receive all five books.

Oh, you can also join in with a "Miffy Twitter Party" on Friday at 1.00pm.  I am hoping to be there to see what it is all about   :)


Don't forget to comment o be in with your chance of winning the books.

Tuesday, 22 September 2015

Summer classes for young folk - 2015

Following on from my Kid's Club post about the classes I held in Hobbycraft  over the summer every Tuesday........ also on offer, each Friday was a schedule of classes for older young folk age about 8-16, this was a more structured class with a skill to be learnt.

The first week I had a group of young ladies that came to learn how to use a sewing machine.   They threaded bobbins, threaded the machine, changed the needle and the presser foot, tried out different stitches and finally went on to make their very own pin cushion each.


The next week we did recycled rag-rug making, using hessian backing and old clothing to make the designs.  I forgot to grab an end photo, but they would take a bit of finishing off at home anyway  :)


But, a couple of weeks later one of the young ladies brought this in to show me - she had finished her rug, isn't it glorious?   The voile fabric works so well with the others to make it luxurious.


Following on from that was a knitting class.   Although they had a choice of lots of colours of yarns, they all seemed to pink pinks and purples, except one who chose green to match her green needles  :)


The week after knitting was crochet.  Lot's of hooking going on, and just check out that Granny Square!


Simply fabulous for a young beginner.


The following week was learn to Patchwork, and I am so annoyed that I forgot to get an end photo for this one as we had an array of brightly coloured patchwork flower, which were so beautiful.


And finally, we did Bunting, on the sewing machines.   Great fun was had with this class, and the bunting produced was brilliant, so colourful and cheery - something every girl should have for her room!


And didn't they do well, they looked pretty pleased with their makings   :)


Thank you all for attending, it was lovely to meet everyone and I hope to see you again at future events.

.

Friday, 18 September 2015

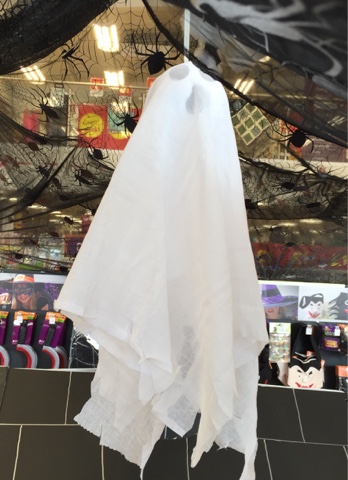
Easy (not so scary) Ghost

I just made these cute little ghosts for a Halloween display at work.


I found the tutorial online ages ago and memorised it, but can't find it again to link to - so apologies for that, but here are the instructions as I roughly remembered them.   (sorry to the original designer for not crediting you, if you know who you are, shout out!)


So, you need a styrofoam ball (any size) some styrofoam glue (as some other glues can melt the styrofoam), a piece of ribbon for hanging, a Sharpie pen and some see-through-ish fabric.  I used Muslin and some scissors.


Draw a ghosty face on the ball and colour it in with the permanent marker.


Next, take something to make a small thin hole in the top of the ball. I used a knitting needle, but anything thin and pointy will do.


Put a blob of glue in the hole and poke in both ends of your ribbon.  Leave to dry.


Cut your fabric into a square. The bigger the square, the floatier your ghost will be. (is 'floatier' even a word?)

Fold the square into half, and half again, then snip off a tiny corner where all the folded points are.  This will make a little hole.


Thread the ribbon on top of your ghost ball up through the hole.


Take your scissors and snip away at the fabric to make it looks frayed and tatty.


And hang it up!   

It's that simple, but so effective.  And a little bit cute, which I guess ghosts are really not supposed to be.


Wednesday, 16 September 2015

Stanley The Sparrow


You may remember that a few weeks ago I went to the book launch of Kerry Lord's new book Edward's Menagerie Takes Flight.  Well, while I was there I was given an exclusive pattern for a sparrow - a proper cute little fellow too.

I couldn't wait to get to work on him.... 


He is so cute when he is finished,  Not sure if it is the eyes, or the tummy, or the knobbly knees, but it all adds up to cuteness overload.


He has fluttered off to a new home now, where he has been named 'Stanley'.
I think it suits him very well  :)


Sunday, 13 September 2015

Sparkly Crystal Necklace / Bracelet / Earring Set

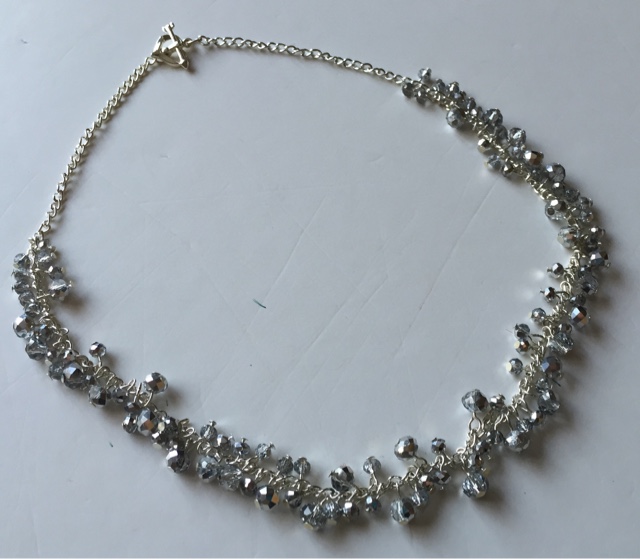
I have just finished a commission for a sparkly beaded jewellery set.

The brief was a bracelet and matching earrings - not too fussy, no colour, sparkly, on silver.

I got some gorgeous half silvered rondelle crystals from Hobbycraft in 8mm and 6mm sizes along with some silver plated chain and findings.

Each crystal is strung separately onto a headpin, then a loop formed before attaching it to a link in the chain.  As you can imagine, it took a little time  :)  But the result is worth it I think - lightweight dangly earrings, with plenty of sparkle.


The matching bracelet was finished off with a cute heart and arrow shaped toggle clasp.


The recipient must have like it as she came back and ordered a matching necklace to go with them.

I set to work again... pinning and looping.   I only put the crystals some of the way round as the weight of them stops the necklace from spinning and the clasp ending up at the front.


Again this was finished with the heart toggle.


It's a change revisiting old techniques, and putting the yarn down for a while.   ;)


Friday, 11 September 2015

Halloween Costume/Poncho - Free Tutorial


A couple of weeks ago I was asked to come up with a Halloween cape/poncho for the Hobbycraft blog.   I was sent a nice pile of fabrics including netting with spider webs on it, which is super cute.


The brief was to make it for an 8yr old, which was a wee bit tricky as I don't have an 8yr old, and my manequin, Claudette, is a little well endowed in the chest department to get a good measurement off   ;)


So, I borrowed a neighbours child, took a few measurements and got to work.

It is really easy to make and you can adapt the pattern to suit a different theme - like make it in purple to be a wizard, or in white to be a snowflake for Christmas.

It is up on the Hobbycraft Blog right now, with step-by-step photograph instructions   :)  Oh, as some of you may know I have a slight aversion to feathers, so the mask isn't one of my creations   :)

http://blog.hobbycraft.co.uk/how-to-make-a-raven-costume/


Let me know if you make one.