Showing posts with label sewing. Show all posts

Wednesday, 17 February 2021

How to make easy bunting.

 I have just done a small length of bunting to go into my mini shed project... I get asked all the time how to make bunting, so I thought I would write it all down in case anyone fancies having a go.

How, you can obviously spend a lot of time making bunting, cutting and sewing and turning and ironing, and sewing some more.... or you can cut a few corners and make it easier for yourself.


Some buntings are made by sewing two triangles of fabric together, then turning it the right way out, before pressing then sewing it to the bunting tape.  If you need bunting that looks good both on the back and the front, then this is the method you should do, but if you want something a bit quicker that only needs to be seen on one side only, then follow this tutorial.

The photos I am sharing are step-by-step photos of my mini bunting (perfect for a Barbie Doll House), but I will give you a regular bunting size in brackets - of course you can make it any size you like.

Grab your favourite fabric.  You will also need some stabilizer (found in an craft/haberdashery store), a length of bias binding, webbing or cosgrain ribbon.  (length depends on how long you want your bunting to be)  You will also need some Pinking Shears.

First off cut your fabric into strips that measure approx 5cm (20cm) and do the same with the stabiliser.   Iron the stabiliser onto the back of the fabric - use a piece of greaseproof paper between the iron and the fabric to save any excess glue getting stuck onto your iron plate.

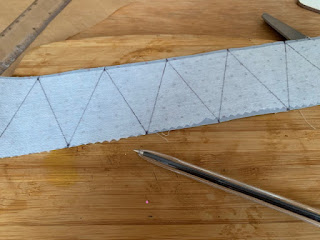
Mark across the top in increments of 5cm (20cm)

Then on the bottom put the first mark at 2.5cm (10cm) then every 5cm (20cm) after that.  The marks should now be inbetween the top ones.

Mark diagonally from a bottom mark to a top mark, then again back across, this will give you perfect triangles.


Using Pinking Shears, cut up the triangles.  By using the Pinking Shears you stop any fraying that would occur by using regular scissors.  The fabric is also less likely to fray with the stabiliser behind it as it makes it sturdier,


Take your tape, and if you need to make a loop at the end for hanging, do this now by turning the end over and sewing across.

Then folding your tape over the top of each triangle, simply sew down the tape making sure you catch the triangle fabric in-between.

You can add the triangles immediately after each other, or space them out a bit if you want the final length to stretch further.


And it is as simple as that!

How much will you make?


Monday, 22 January 2018

Teaching beginners to sew

One of my most popular workshops is a Learn To Sew one.  I run this as a one day class, or a 4 x 2 hour course - both cover the same basic rules of learning to use a sewing machine.

I held one of these full day classes last week.

The first hour is spent looking at the sewing machine and working out what all the buttons do.  We change needles, swap presser-feet, learn to thread and wind bobbins and a bit of trouble shooting too.

Then we go on to play and practise the stitches, running up loads of different lines on pieces of sheeting - that bit is much more fun than it might sound, trying out all the various stitches that a sewing machine can offer can be really interesting.

After that, it's time to make things!  Each project is chosen to give a skill of some sort.
 We start off with a simple pin-cushion, the skill in this is cutting straight lines and sewing straight lines, learning to take the fabric in and out of the machine, and at the end of quite a few rows you get a lovely, useful, pin-cushion. 

I forgot to take photos of these at the last class so I can't show you those, but I can show you what they made next - a gorgeous cushion cover.  A very simple style, but perfect for beginners as it shows construction. It is very easy to make a cushion cover, but one of those things that seem quite advanced.


And the last thing we do on this workshop is a fully lined zipped purse.  When I tell the attendees that they will be putting a zip in by the end of the day, they always look shocked/amazed/frightened, but they do it, and they are usually super chuffed with themselves.


If you fancy tackling your own sewing machine, or are thinking of getting one, why not try this class yourself.... you can find out what is on offer by visiting....www.soozintheshed.co.uk/store

Monday, 8 May 2017

A randon Quilt Top from Charm Squares

Do you know one of those days when you have LOADS to do.  You go to your workroom to get started, not knowing which of the many "must get this finished today" projects to start first - you walk past a piece of fabric, or in this case a pack of charm squares, and think "I will play with these instead"?

Yeah, those days.

I bought this pack of charm squares ages ago, just to see what they were like.  I have never had the inclination to do anything with them, they didn't inspire me, they just sat on my desk, still wrapped, minding their own business.

Then, of course, when I an super busy, they want to be used!!


So, I got them out, tried not to sort them in anyway whatsoever, I really tried to use them randomly - failed a little bit by swapping some of them about.   But I simply sewed them into strips.


Then I sewed the strips together.  Then edged them in some fabric I found in my stash that matched quite well.


And that was that.  I haven't done anything else with it since. It has sat in the same place since then, on my cutting table - meaning I have had to cut on my ironing board  (as usual).  My inspiration has gone.... whittered away on the wind.  I have no use for a blue cartoon themed quilt top, but I guess I should finish it anyway........... at some point. In the future.


Wednesday, 29 March 2017

Fabric Padded Sewn Letters

I recently made some cute padded letters for Granddaughter Hope to hang in her bedroom.


They are so easy to do and take barely any time at all.

You simply draw your letter on a piece of fabric with a heat-sensitive pen (which means when you iron it the ink disappears) then  sandwich some wadding in-between two pieces of fabric, with the drawn on one on top.

With a sewing machine, or even by hand if you wish, sew around the letter you drew.


Then take some pinking sheers and leaving about 5mm around the stitching, cut carefully around the letter.

See?  Simples!


Now to do some for Granddaughter Ellie.  :)

Sunday, 12 March 2017

A sitting cushion for Milly the Cat

I used to spend a small fortune on beds for my cats, but will they sleep in them?  No, they will not!  We leave the beds in the places that the cat lies to sleep - but instead of using the bed, they just find somewhere else to sleep.

But, after making a huge bean-bag - which you can find HERE - I had a few 'beans' left over. I didn't want to waste them, or bin them, but equally I didn't want to store them.  So, I thought, I would make a mini bean bag, for a cat.

And do you know?  She likes it!!  I was quite surprised.


So, first of all I decided on a size 40cm x 40cm, I took some calico and cut a simple rectangle measuring 42cm x 64cm.


I cut it in half so each piece measured 42cm x 32cm and hemmed and stitched one long side only - I used a red thread and a fancy stitch on my sewing machine, just because.


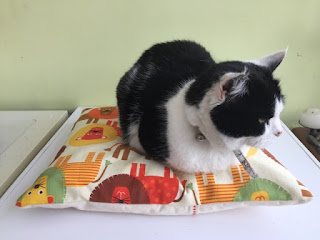
I then took some thick curtain fabric with cartoon lions on - well cats for cats and all that - and cut it at 42cm x 42cm.

With the right side of the Lion fabric facing up, I laid one piece of calico (facing down) on top with the raw edges matching and the sewn edge facing the centre.


Then I laid the second piece on top of that - also facing down.


A quick sew all the way around, trim the corners, turn the right way in and Voila!  You have a bean bag cushion cover.

Just make a basic bean bag pouch, measuring 40cm square, out of some sheeting, fill it with beans  and pop it inside.


I still can't get over the fact that Milly actually uses this cushion - maybe because she thinks it isn't really hers?

Thursday, 1 December 2016

Cute Christmas Purses - free tutorial

Sometimes you just don't know what to buy someone for Christmas so you end up giving them money.

But money just seems a bit impersonal, don't you think?  Obviously very useful, but it can look like there has been very little effort or thought when you give money - in fact, the opposite is probably true, you have probably spent so much time thinking and rejecting ideas that by the time you decide to give some money it is the best idea ever!!

Anyway, to make your gift of money look a little more exciting, why not make a cute purse from Christmas Fabric to pop it in?  They will get a lovely hand-made gift then too.


Fully lined, with a zip, you can whip these cuties up in no time - about 30 minutes all in.


I have popped some instructions for you below.  Let me know if you make some wont you?


How to make:  (use a 10mm seam allowance throughout)
  1. ·         Take your zip and measure the outer fabric to match it.  Cut two pieces of fabric the length of the zip and whatever depth you wish to make.
  2. ·         Cut two more pieces the same size for the lining.
  3. ·         Place the outer fabric on the desk facing UP, place the zip on the top edge facing DOWN, place the lining on top to match facing DOWN.  The zip will now be sandwiched in-between the two fabrics.
  4. ·         Using a zipper foot, sew carefully down the zip line. You will have to stop half way, put your needle down, lift your presser foot and close or open the zip to enable a neat line across.
  5. ·         Open up the pieces and place them back to back with the zip facing up at the top.
  6. ·         Place the 2nd piece of outer fabric on the desk facing UP, place the zip on the top edge facing DOWN, place the lining on top to match facing DOWN.  The zip will now, again, be sandwiched in-between the two new pieces of fabric.  Sew it as before.
  7. ·         Open the layers, open the zip half way, and place the outer together RIGHT SIDE TO RIGHT SIDE, and the inner together RIGHT SIDE TO RIGHT SIDE. Pin or clip the sides of the zips making sure the zip edges face DOWN into the lining fabric side.
  8. ·         Pin or clip around to hold it all in place, change to a regular presser foot then sew all the way around, but leave a small gap in the bottom edge of the lining for turning.
  9. ·         Clip the corners and trim away any access, then turn the right way in.  Sew a neat line across the bottom of the lining to close the gap before tucking the lining into the pouch.


Wednesday, 30 November 2016

Memory Cuddle Cushions, from a Loved One's shirt.

I was recently commissioned to make some cushion covers from men's shirts.  The gentleman who owned, and obviously wore the shirts, had passed, so these cushions were to be a precious memory of him.

First of all I was told they were to be for a 16"  (40cm) cushion pad.  And there lies the first issue. You would think that you could just cut a square and sew it up, wouldn't you?  But at no point could I get a 16" measurement that incorporated the logo too  (Ralph Lauren).    The measurement across the shoulders was less than 16", but if I dropped down I lost the logo as the measurement down from that didn't measure 16" either.

So, a bit of artistic cutting and rebuilding was needed.

First I took off the sleeves (both of them), and sewed a little fabric under the shoulder seams to make up to 16" (plus seam allowance of course) across.  I cut off the back and used it to panel in a piece at the front, therefore utilising the buttons from the front to be the opening for the cushion at the back.

To make it less cushiony and more "shirty" I sewed a sleeve back on the front, laying across the chest.  I also left the neckline in place, sewing up all the gaps by hand.


So, as you can see, I managed to get the logo in  :)


And the back.... perfect button opening for the cushion to pop in and out for laundering.


So, that was one done, onto the next.  

The blue one was a bit trickier again as it was short sleeve, so a huge lack of fabric to work with. 


 So what I did was I simply cut a square out of the main part of the shirt to include the neckline and logo, hemmed it all the way around and appliqued it to a plain square taken from the back of the shirt.


Again, I used the buttons from the front to make the opening for the cushion to pop in and out.
  The blue method was definitely easier, and both look good I think!


I hear the recipient was pleased anyway, and that's the main thing   :)

Friday, 18 November 2016

Personalised Christmas Napkins, that cleverly become crackers!

I am constantly trying to think up new class ideas - I like to do some of my classes in two hour slots, as I find this is a nice time frame for people to keep their concentration levels up, and create something pretty too.

Christmas Crafts have usually bypassed me (nah Humbug and all that) but I made an extra effort this year to put on some Christmas Craft ideas. 
One of them will be this..... a handy personalised Napkin that trebles up, one as a place setting and the other as a gift cracker.  (Obviously it doesn't 'crack', but you know what I mean)


The initials are cut from Christmas themed fabrics and appliqued onto the hemmed and stitched linen squares, then rolled around a cardboard tube with a little gift in.


If you fancy doing this workshop, and why would you not?  after all, it's playtime, on a sewing machine!!, just give me a shout   :)

Sunday, 13 November 2016

Crazy Quilted Christmas Stockings

A week or so ago I ran a workshop for Crazy Quilted Stockings.

I LOVE the Crazy Quilting technique, used with a sewing machine it is such a pleasing thing to do and surprisingly easy.

I originally made the stocking for the Hobbycraft Blog a little while ago, so thought it would be a good one to run out as a workshop too.


Three lovely ladies came along, they chose the Fat Quarter packs that they wanted to use and we got to work.  Cutting, snipping, sewing, ironing, cutting, snipping, sewing, ironing..... it's a very repetitive craft  :) 

I was so absorbed in stocking making that I forgot to get any action shots, but here are the finished stockings in all their glory.

Two ladies chose the same colour schemes, while another went for something a little different.


I, myself, made a sample one, but it is not yet finished so you will have to wait to see that one  :)  Let's just say, it is very bright colourful and funky, not traditional at all.


Thanks for coming ladies, if you are reading, it was a blast, and you did fabulously.

Don't forget if you fancy making one yourself you can find my tutorial over on the Hobbycraft Blog.  (click on the link :)  )

Saturday, 25 June 2016

A "drop-in" purse making event

I tried a new type of workshop last weekend, a drop-in class where you could just roll up, make something and go on your way again.

This was a little coin purse workshop and cost only £5.00 to make your very own lined, zipped purse.

I only had three people attend, which in a way was good as I wasn't overwhelmed, and of course those people might return to other classes  :)  It was very quiet as it was the Cumberland Show that day too, so maybe everyone was away visiting that.

Anyway, they all got to work with their sewing machines - this young lady has never used a machine before so she did marvellously.


They got to choose their own fabrics of course, then match them with a zip.  These are the results.

A pink number with fabric from the same Fat Quarter pack so they team up perfectly.


Some Kirsty Allsop Charm Pack pieces which worked nicely together and that bright blue zip just finishes it off beautifully.


And last, but not least, teaming a teal and white design with a dusky pink lining worked really well.


Thanks to you ladies that came, I will pop this class back on sometime and try it again  :)