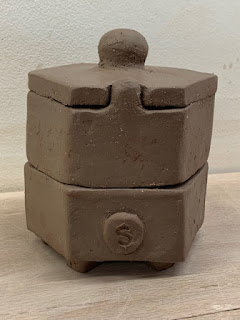
Another first in ceramics today for me – learning how to slab build.
With slab building you have to roll out the clay to your desired thickness (using a clay roller, rather the by hand) and leave it to dry to the correct dryness.
If it is too soft the slabs will not be sturdy enough to
build with, and it it’s too dry then with just crack and break. – this may take
some time to get right!
Our task was to build a box with a fitted lid, a knob on the lid and feet on the base.
I thought I would do a hexagon shaped box, I had to mitre the sides so they all fit
together nicely – this was a good bit of guesswork to be fair, rather than mathematical
preciseness.
My feet were a bit rubbish to be fair, a bit clunky – but it had feet so I had ticked that box.
The lid needed to fit without
falling in – but because my hexagon wasn't a true shape, my lid would only
fit if placed in one direction. To
solve this I added a knob to the front of the box and cut a gap in the lid,
which means the lid can only be put on in the way it will fit. (Hope no one notices !)
I will be really interested to see how this turns out, I hope it survives the kiln firings.
These boxes are going to go
into a Raku firing later on in the module. Before then it will be fired in a biscuit fire
at 800 degrees, then glazed with a Raku Glaze.


No comments:
Post a Comment
I would love to hear from you, questions, comments and salutations all welcome.