Showing posts with label bunting. Show all posts

Wednesday, 17 February 2021

How to make easy bunting.

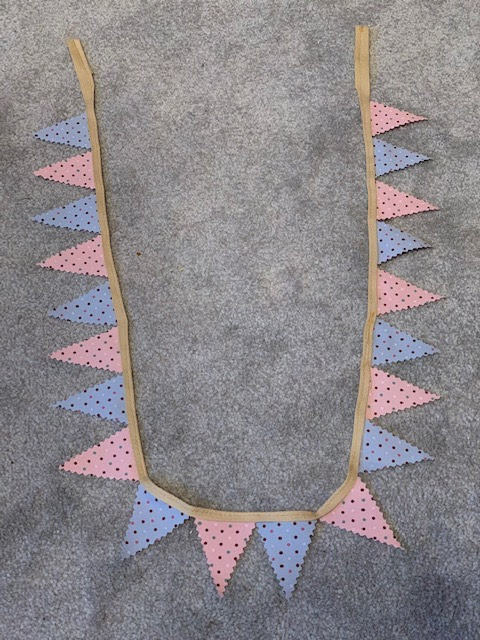
 I have just done a small length of bunting to go into my mini shed project... I get asked all the time how to make bunting, so I thought I would write it all down in case anyone fancies having a go.

How, you can obviously spend a lot of time making bunting, cutting and sewing and turning and ironing, and sewing some more.... or you can cut a few corners and make it easier for yourself.


Some buntings are made by sewing two triangles of fabric together, then turning it the right way out, before pressing then sewing it to the bunting tape.  If you need bunting that looks good both on the back and the front, then this is the method you should do, but if you want something a bit quicker that only needs to be seen on one side only, then follow this tutorial.

The photos I am sharing are step-by-step photos of my mini bunting (perfect for a Barbie Doll House), but I will give you a regular bunting size in brackets - of course you can make it any size you like.

Grab your favourite fabric.  You will also need some stabilizer (found in an craft/haberdashery store), a length of bias binding, webbing or cosgrain ribbon.  (length depends on how long you want your bunting to be)  You will also need some Pinking Shears.

First off cut your fabric into strips that measure approx 5cm (20cm) and do the same with the stabiliser.   Iron the stabiliser onto the back of the fabric - use a piece of greaseproof paper between the iron and the fabric to save any excess glue getting stuck onto your iron plate.

Mark across the top in increments of 5cm (20cm)

Then on the bottom put the first mark at 2.5cm (10cm) then every 5cm (20cm) after that.  The marks should now be inbetween the top ones.

Mark diagonally from a bottom mark to a top mark, then again back across, this will give you perfect triangles.


Using Pinking Shears, cut up the triangles.  By using the Pinking Shears you stop any fraying that would occur by using regular scissors.  The fabric is also less likely to fray with the stabiliser behind it as it makes it sturdier,


Take your tape, and if you need to make a loop at the end for hanging, do this now by turning the end over and sewing across.

Then folding your tape over the top of each triangle, simply sew down the tape making sure you catch the triangle fabric in-between.

You can add the triangles immediately after each other, or space them out a bit if you want the final length to stretch further.


And it is as simple as that!

How much will you make?


Monday, 13 June 2016

Air-dry Clay name bunting

As I run workshops for young folks, I keep having to come up with new ideas so they keep coming back to take part.

Sometimes the ideas just ping into my head and sometimes I have to dig deep to find things that inspire me enough to make.

Now, this is a surprising one, especially as you might have read my previous blog about my awful attempts at pottery, but I picked up a block of Air-Dry clay and a tub of Wilton Alphabet Cookie Cutters.

Rolling out the clay to shortbread thickness, I then looked about for things to texture it with.  I am SURE I have texture plates somewhere... just cannot find them!

The first thing I used was some hessian sacking.... BIG MISTAKE, the clay was suddenly covered with tiny brown hairs that took ages to pick off.  I used bubble wrap and lace for other pieces, along with just jabbing other pieces with various tools to create a pattern.


I also wanted the clay to be painted at the same time - normally you would need the clay to dry before painting it, but then I would need to make parents buy paints to take away which seemed a bit unfair.

After a chat to some colleagues we came up with the plan of mixing acrylic paint with PVA glue which would form a kind of thick glaze which wouldn't be too wet and which shouldn't hinder the drying out stage afterwards.

And you know what?  It worked!


As for the workshop, it went really well...


Sunday, 27 March 2016

Crochet Easter/Spring Bunting - Free Tutorial


I am aware that is probably a little late for me to tell you about this Easter Bunting that I made for the Hobbycraft Blog, but hey!  Bunting is not just for Easter, and this gorgeous soft springtime colours mean you could drap it around your house to feel all fresh and springy, ready for summer.

It is made in crochet, UK terms, and you can find the step-by-step photo tutorial over on the Hobbycraft Blog.


Do let me know if you make some.

Wednesday, 15 April 2015

The Devil's Porridge Museum - Easter Crafts

Easter weekend saw me trotting (well driving) down the M74 to Eastriggs in Scotland, where the Devil's Porridge Museum is now situated.  It has recently moved from it's former building into this nice, clean and modern place, which is a contrast from the WW2 exhibits nestled inside  :)

It is on the main road at Eastriggs, just past Gretna, towards Annan.


This was my working area, on the mezzanine floor, above the exhibits  (I will share more about the museum at a later date).


The Easter crafts on offer was some Duck Taped rattly eggs....  (eggs with beads in them  :) )


And some Easter Egg bunting.


I was there for three days in total and had a great time.  So if you popped along, and are reading this, then thanks for coming. Hope to see you again soon :)


Thursday, 12 March 2015

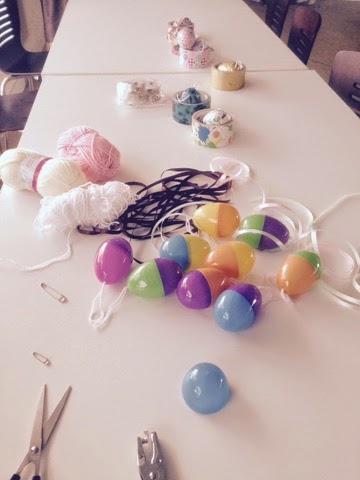
Easter Egg Bunting

Bunting is so 'in' at the moment, so why not make bunting out of lots of different things?   Easter Eggs even!!


I got a template from THIS website, but I edited it slightly to remove as much background as I could, therefore making my eggs a little bigger on the page.  Click HERE to find the one I used.


Then I got to work, colouring them in with my Sharpie pens   :)


Next, I very carefully cut them out, I wanted them to remain egg shaped if I could, so I concentrated hard  :)


Now time for a couple of hole.  Two holes, so that the ribbon could thread in and out and the eggs would hang nicely.


The holes are every so slightly smaller than the width of the ribbon, which means the eggs stay in place when threaded - otherwise you could pop a little smidgen of glue or sellotape on the back to hold them where you want them.


A loop in the end of the ribbon for easy hanging.  I used about a meter and a half of ribbon, for a sheet of 9 eggs on A4 card.


And Voilà!  Egg Bunting.   :)


Are  you going to make some?


Monday, 31 March 2014

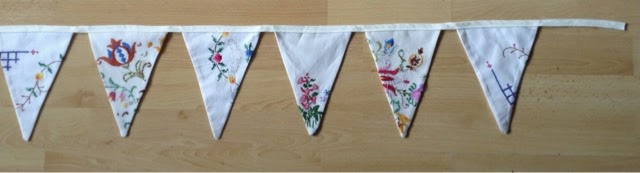
Upcycled Vintage Bunting


Do you remember that bundle of vintage lovelyness I got at a table top sale the other day?   Well, I mentioned that I had a cunning plan of what to do with it, and here it is....  I was going to chop it all up and make some bunting!

Now I know that some people might be having a mild heart attack at the thought of me cutting up other peoples work, but the way I see it is that this stuff was probably destined for the land-fill once the table top sale was over if it didn't sell, so I have rescued it and giving it a whole new life while showing off the best bits  :)


First off I needed a template, so I took this napkin/hanky piece and worked out the best shape to get the most from it.


It ended up being 150mm across by 220mm down the edges.


Not great as some bits were going to be left out, but it worked.


Ta dah!


These 'chair backs' were greats, I got two lovely pieces out of each of those.


I used just a plain cream lining fabric for the backs.  Once you have cut one out you can just go along the strip with barely any wastage.


Back and front.


Putting the pieces good side in, it was time for Sally Singer to do her magic.  


A quick turn the right way in, with a little jiggery pokery with a pin to get the point out and it was starting to look the part.


Time to iron.  They looked so nice when pressed.  (Hey Mum, look at me, using an iron!!)


14 pieces in total.


Now to lay them out to try and work out if there is to be any patterning.


Pattern decided, it was now time to add the ribbony bit.  Having not ever made bunting before I wasn't totall sure what to go with.  In the end I decided on Bias Binding.  I didn't want it too thick so bought a 10mm one.  Well, that was a mistake wasn't it?  I couldn't get the tops of the bunting to stay in the binding long enough to even pin it, never mind sew it.    Back to the shop to buy a 25mm one.   This worked better, but I didn't like the look of it so ended up folding it in half on the front side and pressing it.  

I think it works.


Now I needed to find somewhere to hang it to photograph it!   Hallway cupboard doors?  (I had Hubster standing at the door trying to stop the light coming through the glass panel - didn't work.


Hall floor then.  In sections....


It measures just under 2.5 meters long.  I went up to visit my Mother for Mother's Day yesterday and meant to take it with me so I could drape it in her lovely garden... but forgot!


This is going to be entered into the Bead Buddies Forum monthly challenge, which is "bunting"  :)  You may recall I entered some pom-pom bunting a couple of weeks ago.  Will let you know how I get on  :)

Saturday, 8 March 2014

Pom Pom bunting

Do you remember that the challenge last month on the Bead Buddies forum was Bob Marley?

Well, this month is is Bunting.  The brief is you can enter up to three times, three different piece of bunting using different mediums.

My first entry is pom-pom bunting  :)


Perfect for a child's bedroom window don't you think?   


Cute and fluffy.


Everyone loves a pom-pom.

Oh, if you want to enter yourself, why not pop along and make yourself a profile and join in?  :)

http://www.beadbuddies.co.uk/forum