Showing posts with label cushion. Show all posts

Wednesday, 10 January 2018

Funky Crochet Chevron Cushions

Over the festive season this year I took home four balls of Stylecraft DK yarn and an idea to make a crochet cushion.

In my head I had a psychedelic zig-zag of colour - just the thing to chuck on your sofa to brighten up a cold winter.

The first one didn't work so well, it was rather baggy ... but I could see the potential.

I quickly made a cushion pad to help me along - all I had in the house that I could use was a spare pillow and a very old vintage sewing machine.  I opened up the pillow, took out the stuffing and used the fabric to make the case. I drew around a wastepaper bin to get the round shape I needed, then sewed it and re-stuffed it. (but I also ordered some as it's so much easier  :) )


FOUR attempts later I finally had a cushion that fit the pad perfectly, and had no baggy bits - I mean, who wants baggy bits anyway?


I feel I did get the result I was aiming for in my head, and during the process I was inspired to take the idea to make different things, so keep your eye out for those.... coming soon.

I am planning to make this into a kit very soon - I do have to re-make the cushion so I can photograph it for the tutorial, hopefully I can get that done quite soon.   In the meantime let me leave you with all four sides of the two cushions.


Sunday, 12 March 2017

A sitting cushion for Milly the Cat

I used to spend a small fortune on beds for my cats, but will they sleep in them?  No, they will not!  We leave the beds in the places that the cat lies to sleep - but instead of using the bed, they just find somewhere else to sleep.

But, after making a huge bean-bag - which you can find HERE - I had a few 'beans' left over. I didn't want to waste them, or bin them, but equally I didn't want to store them.  So, I thought, I would make a mini bean bag, for a cat.

And do you know?  She likes it!!  I was quite surprised.


So, first of all I decided on a size 40cm x 40cm, I took some calico and cut a simple rectangle measuring 42cm x 64cm.


I cut it in half so each piece measured 42cm x 32cm and hemmed and stitched one long side only - I used a red thread and a fancy stitch on my sewing machine, just because.


I then took some thick curtain fabric with cartoon lions on - well cats for cats and all that - and cut it at 42cm x 42cm.

With the right side of the Lion fabric facing up, I laid one piece of calico (facing down) on top with the raw edges matching and the sewn edge facing the centre.


Then I laid the second piece on top of that - also facing down.


A quick sew all the way around, trim the corners, turn the right way in and Voila!  You have a bean bag cushion cover.

Just make a basic bean bag pouch, measuring 40cm square, out of some sheeting, fill it with beans  and pop it inside.


I still can't get over the fact that Milly actually uses this cushion - maybe because she thinks it isn't really hers?

Wednesday, 30 November 2016

Memory Cuddle Cushions, from a Loved One's shirt.

I was recently commissioned to make some cushion covers from men's shirts.  The gentleman who owned, and obviously wore the shirts, had passed, so these cushions were to be a precious memory of him.

First of all I was told they were to be for a 16"  (40cm) cushion pad.  And there lies the first issue. You would think that you could just cut a square and sew it up, wouldn't you?  But at no point could I get a 16" measurement that incorporated the logo too  (Ralph Lauren).    The measurement across the shoulders was less than 16", but if I dropped down I lost the logo as the measurement down from that didn't measure 16" either.

So, a bit of artistic cutting and rebuilding was needed.

First I took off the sleeves (both of them), and sewed a little fabric under the shoulder seams to make up to 16" (plus seam allowance of course) across.  I cut off the back and used it to panel in a piece at the front, therefore utilising the buttons from the front to be the opening for the cushion at the back.

To make it less cushiony and more "shirty" I sewed a sleeve back on the front, laying across the chest.  I also left the neckline in place, sewing up all the gaps by hand.


So, as you can see, I managed to get the logo in  :)


And the back.... perfect button opening for the cushion to pop in and out for laundering.


So, that was one done, onto the next.  

The blue one was a bit trickier again as it was short sleeve, so a huge lack of fabric to work with. 


 So what I did was I simply cut a square out of the main part of the shirt to include the neckline and logo, hemmed it all the way around and appliqued it to a plain square taken from the back of the shirt.


Again, I used the buttons from the front to make the opening for the cushion to pop in and out.
  The blue method was definitely easier, and both look good I think!


I hear the recipient was pleased anyway, and that's the main thing   :)

Wednesday, 22 June 2016

Giant Floor Cushion - Free Tutorial

I made a giant floor cushion for display in Carlisle Hobbycraft recently.

I love this fabric the colours just work so well.   I teamed it with a purple and a dusky pink for the back of the cushion and just used the print for the front.


If you would like to make one they are VERY easy, just straight sewing required - no zips or buttonholes  :)  The instructions are below.


How to make:
The Liner: 
·         First of all we will make the liner, from the lining fabric cut two squares each measuring  62cm x 62cm. 
·         Place the fabric squares together and leaving a 15cm gap for stuffing on one side, sew all the way around the square using a 10mm seam allowance.
·         Clip the corners neatly, turn the right way, stuff as required and hand-sew the gap closed.
The Cover: 
·         Using Fabric A, cut a square measuring 62cm.
·         Using Fabric B, cut a rectangle measuring 62cm x 42cm.
·         Using Fabric C, cut a rectangle measuring 62cm x 42cm.
·         Take Fabric B and fold over one of the 62cm sides by 10mm and press flat, fold it over again and press flat again. Sew down this seam neatly.
·         Repeat the last step with Fabric C.
·         Place Fabric A right side facing up on your table, and place B on top, right side facing down, with the raw 62cm edge matching the sides and the sewn seam towards the centre.
·         Place Fabric C on top of this with the raw edge matching the opposite side and the sewn seam towards the centre, overlapping Fabric B.
·         Pin into place.
·         Sew all the way around using a 10mm seam allowance - no gaps for turning.
Clip the corners and turn the right way in through the envelope gap created.

Saturday, 18 June 2016

Battenberg Beanbag - free tutorial

I recently had a request from Hobbycraft to create an easy to make beanbag.

Sometimes when I get these requests it takes me a while to think up something to fit the brief, but other times the ideas just "POP" into my head.  This was a popping idea.

Why on earth I had Battenberg in my head I do not know, although I do like a slice now and again.

So, I made a beanbag to look like a slice of Batternberg, completed with 'apricot jam' piping.

Are you hungry now?


If you want to make one for yourself, then pop over to the Hobbycraft blog where you will find all the step-by-step instructions.


Wednesday, 9 March 2016

A colourful, crochet Blossom Cushion

A couple of years ago I made a Blooming cushion.  It was adapted by a blogger I follow from another person's pattern.   Anyway, I always thought the petals never sat right for me, or at least on the one I made, so I worked out a way of making it flatter, and easier for people to make.  Well, we all like easy don't we?

So, after some jiggery pokery, a lot of frogging  (rip it - rip it) and some shorthand notes typed into my iPhone, I worked out my own version.

I will type it up soon, I promise, but in the meantime I thought you might like to have a little look.

Using Hayfield DK Bonus yarn throughout, I started with the first few rounds.


then I added a dusky dark blue,  Hmmmmm, not sure if I like it or not.....


So I frogged it and put an orangey coral colour in instead.
Then after asking advice on my Facebook page, I decided to put the blue back in again  :)


The result was a 16 row riot of colourfulness.  Blossoming petals everywhere!!

I finished it off with a large, cream fabric covered vintage button.


The back I just did plain rounds, with no petals.  It worked up so much quicker!!!


So, as I mentioned, I will be writing this pattern up, so watch this space   :)

Monday, 7 March 2016

Monochrome Crochet Cushion

You know those times when you are sitting on the sofa and you need to craft?  I had just finished one project and really could not be bothered going to the shed to root out new products for a new project, so I had to make use of what I had in the living room.    (I have a storage pouffe box thing with bits of yarn in).

I found a black yarn and white yarn and got to work making a cushion.

Now, if you have followed me for a while I guess you will know that I like colour in my work, black and white just doesn't rock the boat for me.  Black is good, always, and teams up with anything.  White, however, is my least favourite colour to work with.  It;s just ..... boring!


But, I managed and created this cushion front.   But by the time I had done one side I was bored with the pattern so changed it about for the other side.

Now, don't look at this one too long as you might find yourself being hypnotised!


You are getting sleepy......


Well, its finished now, and I really don't like it at all  :)   I should stick to my gut feelings and work with what I feel is right.   As I said, black and white just does not rock my boat.

Tuesday, 27 October 2015

Embellished cushion making

A couple of weeks ago I ran my embellished cushion making class.


It's great fun this class as you just chop up fabric, sew it together and add trimmings, and it creates beautiful results.

I take my over-filled box of Fat Quarters along and let people choose their own patterns and colours. My other "must have" is a pad of graph paper so they can draw their own pattern out.

Chop & sew, add ribbons, buttons, sew some more.  What fun!


It really is a great little project for using up scraps.


Thursday, 15 October 2015

Knitted Cushion Cardi - free tutorial


This pattern is written in two sizes - the 16" one is shown in RED while the 18" one is shown in GREEN.
You will need:
  3  (4) x 100g Mega Chunky Yarn
  3 (4) Buttons
  10mm Knitting Needles
  Step-by-step instructions
Sewing Up Needle


1. We are going to be using the thumb method of casting on, so start by making a slip knot  about a meter (1.5 meters) in from the end of your yarn and placing it over one needle. Pull close but not too tight.
The loose part we will now call the TAIL, and the bit attached to the ball we will call the WORKING YARN.
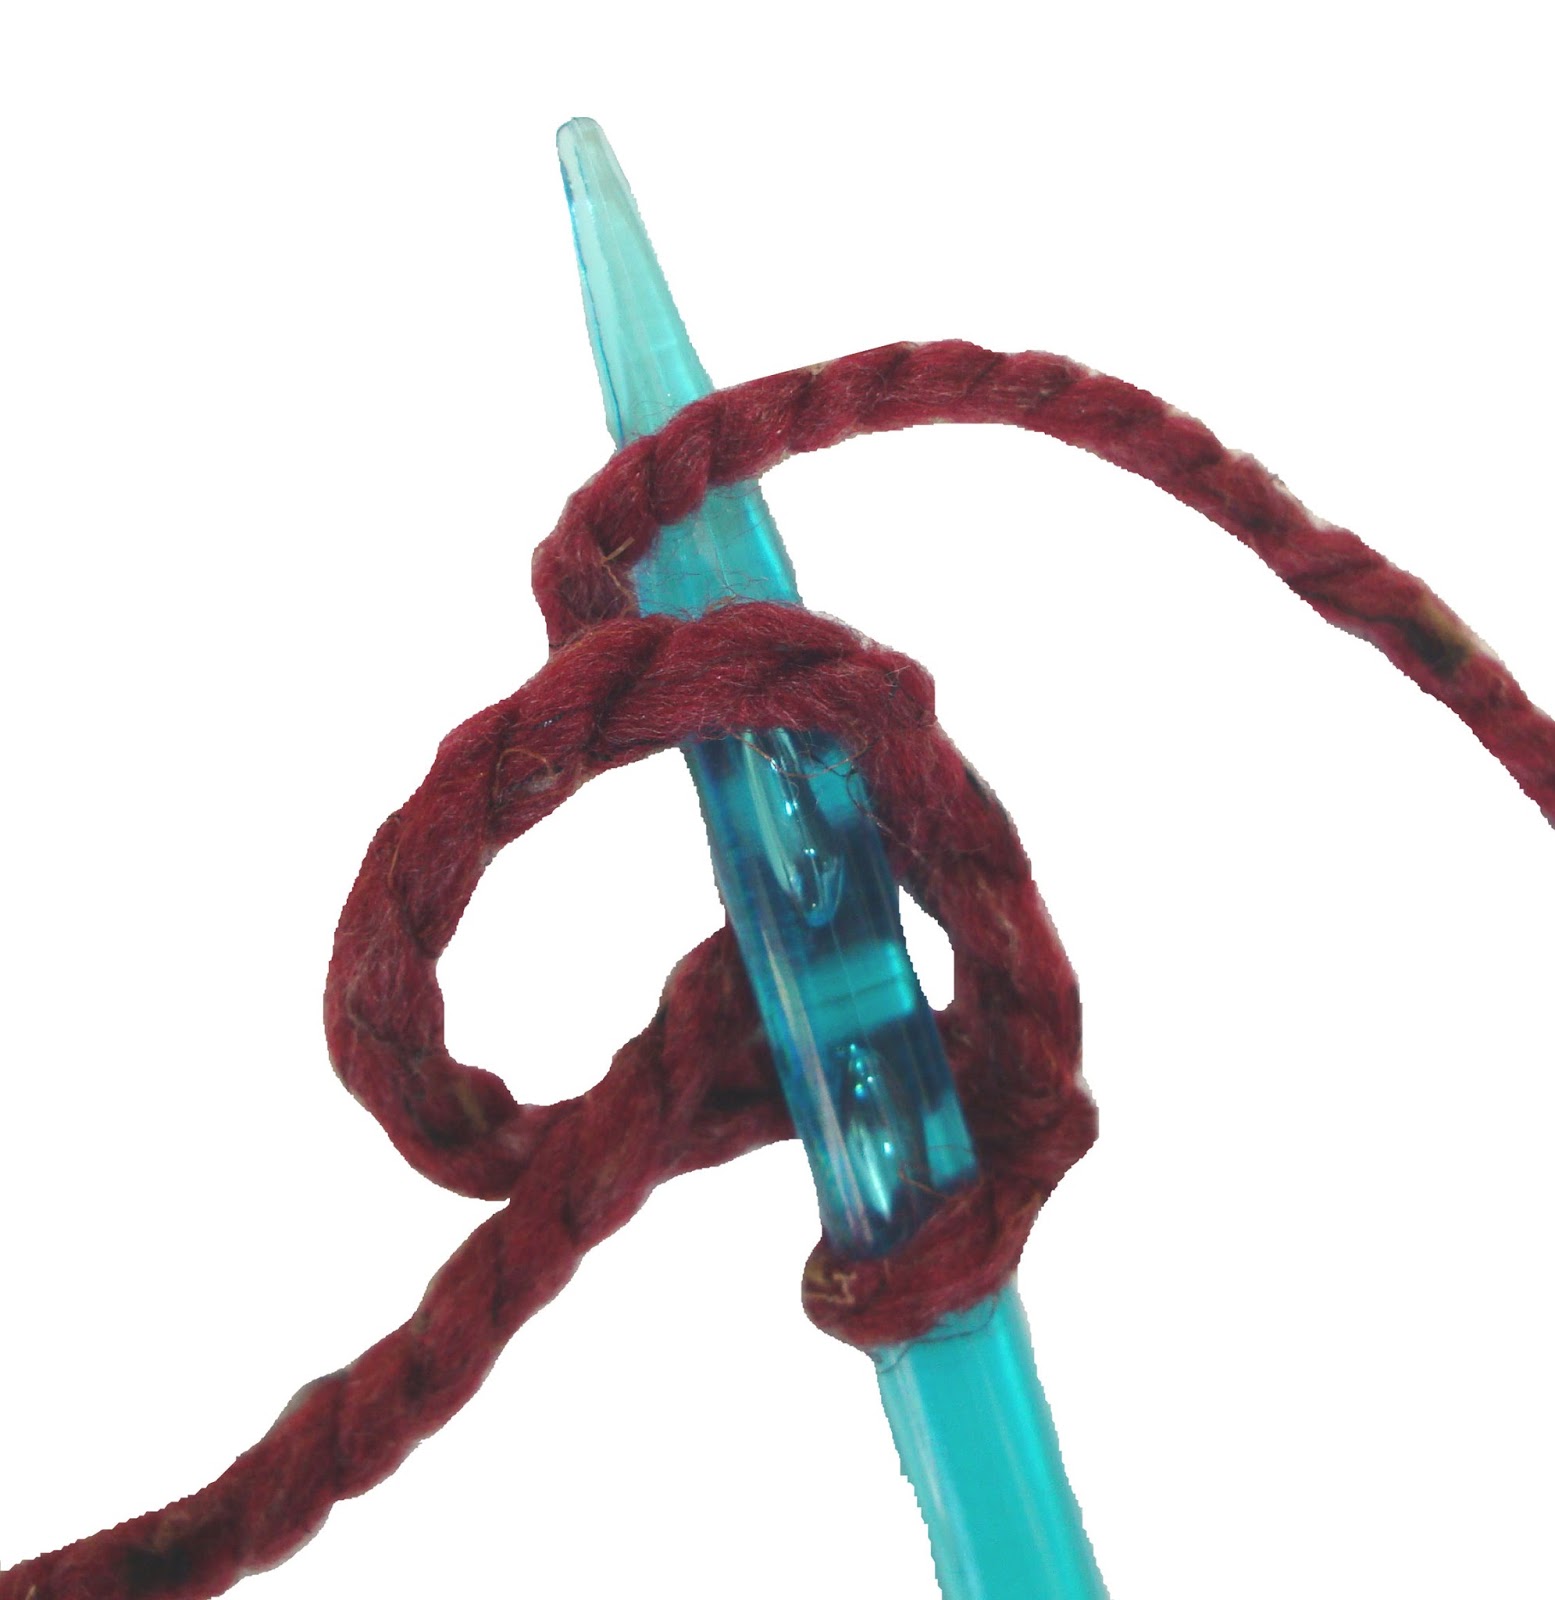
2. Holding the needle in your right hand, and the working yarn also in the right hand, use the long tail to twist and wrap around the needle as shown in the first picture.  Bring the working yarn over the top of the needle as show in the second.

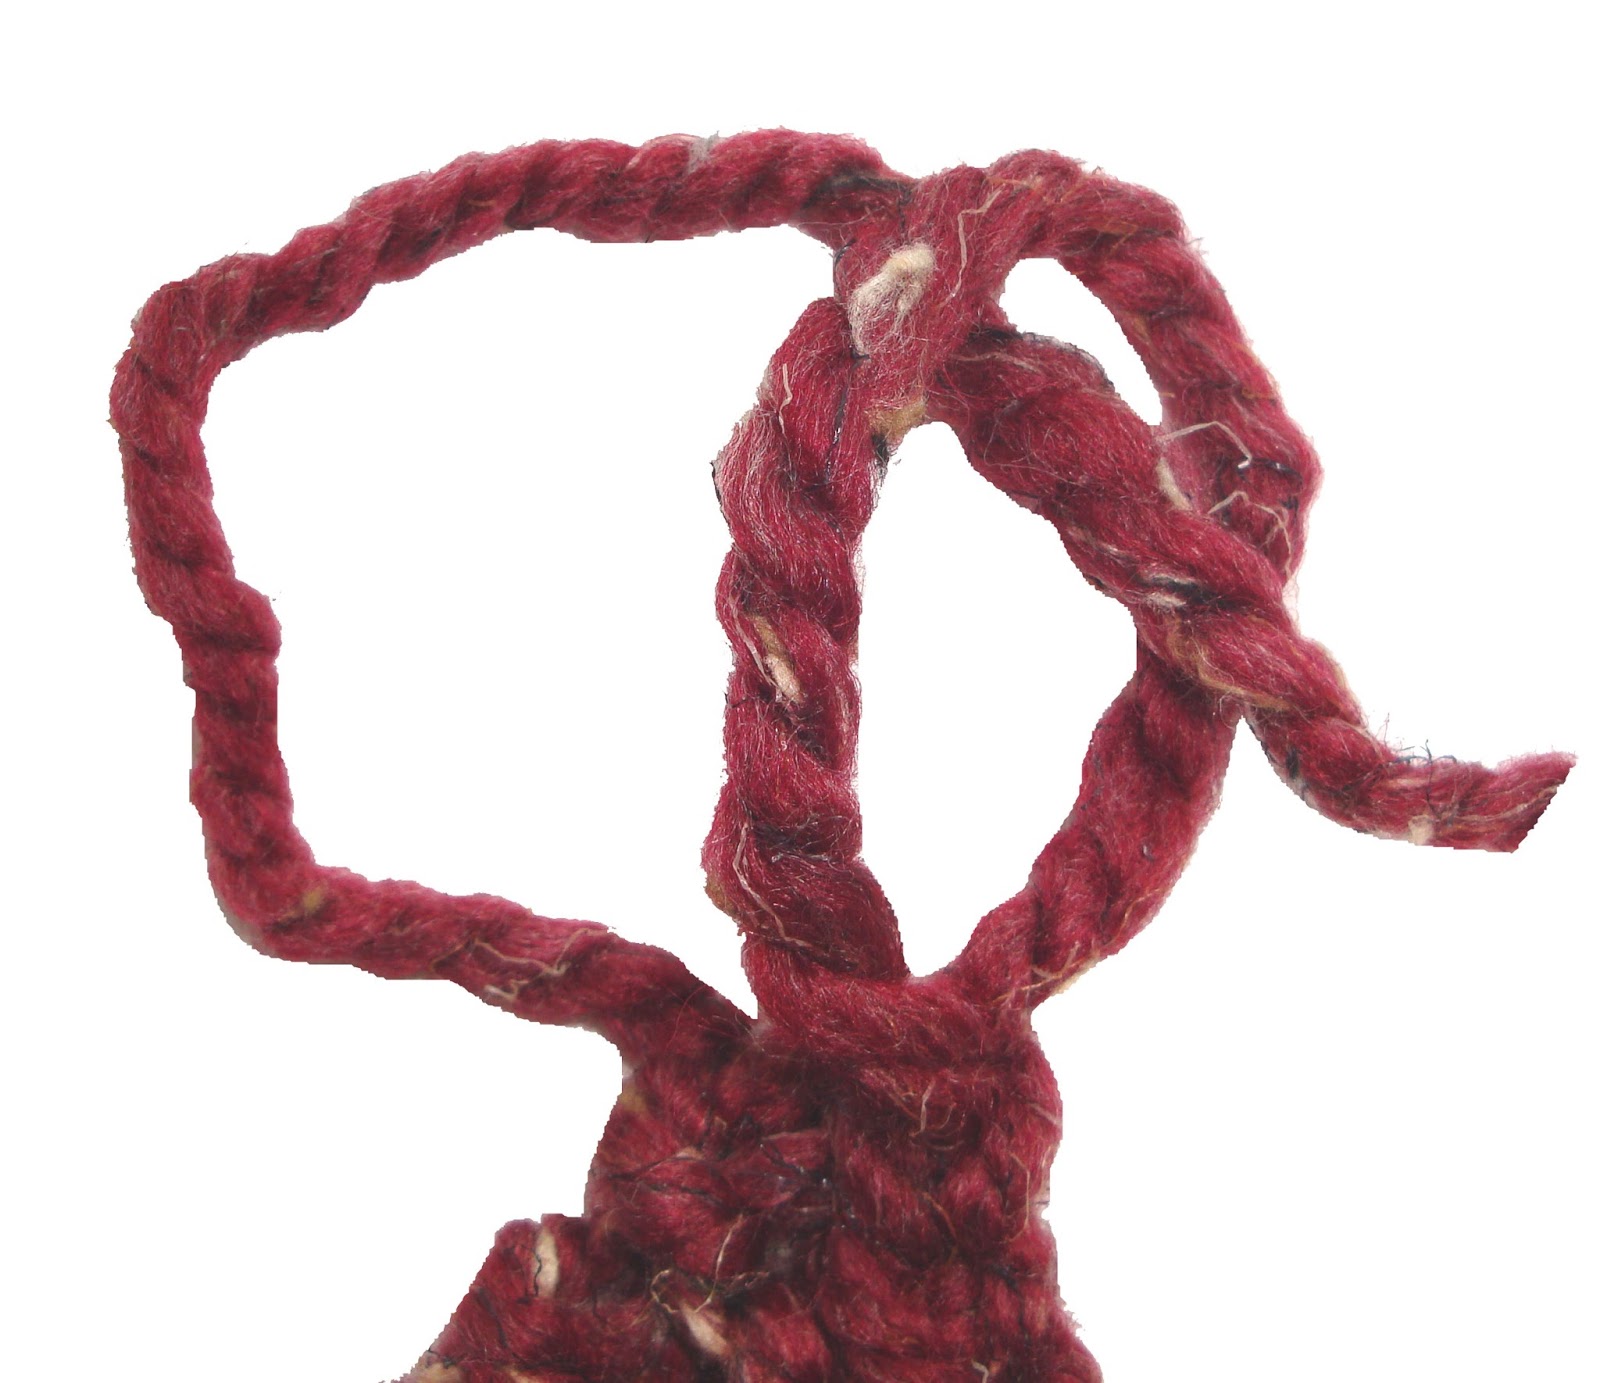
3. Take the first loop, as shown in the first picture, and lift it over the top of the needle, trapping the working yarn as you do so.


4. You now have TWO stitches.
5. Repeat Steps 2 and 3 until you have 30 (40) stitches.
6.  Now working back across the stitches we are going to Knit.
Start by inserting your empty needle into the first stitch as shown, wrap your working yarn around the top of that needle....
7. ....bring the needle down, making sure you catch the loop of yarn that you have just put on, and bring it through the stitch.  Then carefully move the stitch up the needle and off.
This will leave your new stitch on the empty needle.

8. Repeat step 7 all the way across.
Knit another two rows in the same way.

9. In this row we are going to make the buttonholes.  Start by knitting 8 (6) stitches and stopping.
Insert your left-hand needle into the second last stitch on the right-hand needle and past it over the top of the last stitch.  This is a "Cast Off" stitch.
Knit one single stitch, then cast off in the same manner, taking the second last one over the new one you have just added.
10.  You will now be left with 6 (4) stitches, a space and a single stitch.
** Knit 7 (9) then cast off 1, knit 1 then cast off 1.
Repeat from **(1) 2 times more. Knit last 5 (3) stitches. 
You should now have 24 (32) stitches and 3 (4) spaces.

11. Knit 6 (4) then stop.  *** Turn your work around as if you are going to work back again.

 12. Now, insert your right hand needle into the top stitch on the left hand needle, wrap your yarn around as if going to knit, but this time pull the loop through and put it back onto the left hand needle.  This is a Cast On stitch and you have just added one extra stitch to your work.  Now add another in the same way.

13. Turn your work around again, so that the working yarn is on the right hand needle and working back along the left hand needle knit 6 (8) stitches.
Repeat from *** 1 (2) times. Then knit the final 6 (4) stitches.  30 (40) stitches in total again.
14. Now you just knit until your yarn runs out!
Too add another ball, try and do it at one end so to save having a knot in the middle of your cushion.  A meter (1.5meters) is usually enough to complete a row so you can judge if you have enough spare to do that extra row.
 15. At the end of your 3rd (4th) ball make sure you have at least 2 (3) meters left for casting off and sewing up. 
To cast off simply knit 2 stitches, then pass the first one over the second.  Knit another stitch and again pass the first one over the second.  Continue.

 16. To finish, pass the yarn through the last loop and pull tight.
17. You should now have a piece that looks like a rectangle.  Don't worry about those ends of yarn just yet as you can use them to sew up your cushion as you go.
 18. Fold one edge into the centre, then the other edge into the centre, overlapping them by about 3 inches. Make sure the edge with the buttonholes is sandwiched at this stage.

19. Start sewing one edge up, making sure you sew through all THREE layers at the join.  Then join the opposite side in the same way.
20. You will be left with an envelope of sorts. Sew in all your ends and turn the cushion cover the right way out.
21. Sew your buttons on to match the holes.  I start my yarn at one button then weave it across for the rest of the buttons, saves finishing the yarn of each time.
Stuff with a 16" (18") cushion pad.

Cuddle your cushion with pride!

www.soozintheshed.co.uk

You can find a printable version of this cushion here:  www.soozintheshed.co.uk/cushioncardi.pdf