Tuesday, 26 April 2016

A rather posh lady with a fascinator

At Hobbycraft in Carlisle they like to inspire their customers with finished projects dotted around the store.  I had the chance of messing about with a styrofoam head to make it look interesting.  Well of course, I have to be dragged kicking and screaming into any crafty project, but, you know, I thought I would help them out.  (in other words, I grabbed the head and ran with it before they could change their mind!)


So, I gathered supplies.  The head, of course, and a couple of nice decopatch papers to compliment each other.  A fascinator base and some ribbons along with some beads on a length.


I covered half the head with one decopatch paper design.


And the other half with the other, trying my hardest to keep a straight line down the middle of the face.


Then it was time for the fascinator.  No feathers in this fascinator, I hate the blooming things!!


I started by attaching the thickest ribbon with a couple of stitches, then looped it randomly around securing it with a few stitches as I went.


I quite like the effect, but of course, it needed more than that.


I added a second ribbon in this same way, and then a third  (It's hard to see from the photo but the second and third are pale pink and silver)


Time for the length of beads, added in exactly the same way, but then I decided to add a dangle bit, as you do.
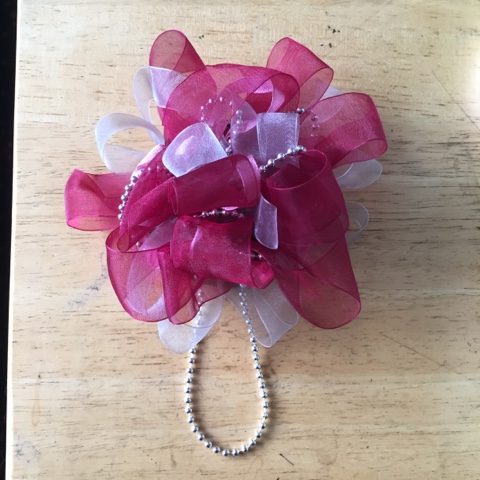

I hot glued it to the side of her head - don't worry, she didn't feel a thing.


Now she is all ready to go on display above the styrofoam section in Carlisle Hobbycraft.  Pop in and see her if you like  :)


Monday, 25 April 2016

End of the year Giveaway Blanket

Throughout this year I am periodically working on a new blanket.   It will be made from the free balls of yarn that I seem to pick up from magazines.   As it happens I don't actually buy any magazines, the yarn just gets donated to me from friends to do something with  :)


And this is what I am going to be doing with it this year.....
A C2C, or Corner to Corner crochet blanket.  I am just going to work until each ball of yarn runs out and let it find it's own colour pattern.


If you would like to be in with a chance of winning this blanket towards the end of the year then please keep an eye on my Facebook page for more details.  I will post updates on my blog, here, as I go along.

Sunday, 24 April 2016

C2C Baby Blanket - blue for a girl

When my son told me he and his girlfriend were expecting a baby, I knew I had to double up my blanket making skills and get some blankets made for the new arrival.  At this point I was wishing I had not made as many for Hope when she was on the way as I had to match the number of blankets made  -  I am not there yet and new baby Ellie is a month old now!!

Ellie's mum's favourite colour is blue, and years ago I made her a blue granny square blanket using this James C Brett Woodlander yarn.  I had a few balls left, so what better than to make Ellie a blanket to match her mummy's?

I decided on a C2C pattern.  C2C is Corner to Corner crochet, worked across a diagonal creating a lovely basket weave effect.  I did 5 rows of the variegated blue, then broke it up with a line of white.


It's a really quick stitch to work and the blanket grew quite quickly.


Then, it was done, time for some edging.  I decided on a shell pattern to go all the way around the edge.  Ellie's mummy loved it   :)


Better get on with making blanket number 2....and 3.....

Saturday, 23 April 2016

How to rainbow dye your hair

Ok, I am not one for plastering my photo all over the internet, and I am a bit reluctant to do it now, but it was a kind of craft project, and it might be useful to someone wanting to create a similar effect.

I dyed my hair rainbow!!

Of course there was some preparation stages, my hair was blue/black a few months ago and I have gone through the process of stripping and bleaching it in the vain attempt of going grey gracefully and having that beautiful silver hair I see on so many people.  Mine ended up a yellow, that looked not unlike a nicotine stained yellow.  It had to go!

I really didn't want to go back to black  (hey, that sounds like a song title right there!) so what else?  Blue, Pink, Purple.... how about all of them?

I had some Crazy Colors in the cupboard from a few years ago.  I had the tiniest bit of Violette (top left in pallette) and some Pinkissimo (middle bottom in pallette) and Peacock Blue (bottom right in pallette).  I also had some Colour Freedom in Poppy Red (bottom left in pallette).  I bought some Directions dyes to go with them, Apple Green (tub at top, not in pallette) Lavender (top right in pallette) and Flame (middle top in pallette).


First I washed and dried my hair with just a mild shampoo - no conditioner.  Then sectioned it off into random pony tails.


Then the dying began.  Now I did have help with this, my daughter-in-law Marie was on hand to get the bits I couldn't have possibly got.  In fact, she did it all  ;)

Once each bit was coloured we wrapped it in cling film and left it to set.  (Oh, that scruffy pink top is my painting/hair dying t-shirt, just in case you wondered).


Nice mess huh?   I left the dye on for a good hour, it says 15 minutes on the tubs but I like to make sure I get the most out of the colours.  I wouldn't recommend not following instructions for bleaches etc.... but these semi-colours seem to be ok with leaving them a bit longer.


A shampoo, good conditioning and blow drying later and we are done!  Rainbow hair.   :)


Send me photos if you do yours wont you?   :)

Friday, 22 April 2016

Patchwork Turtle - free tutorial

A little while ago I was asked by Hobbycraft to create a soft toy, aka Stuffie, tutorial.  It needed to be easy to make, but with a little skill, and using the Heather Jacks (winner of last years Sewing Bee) Fat Quarters.

I scribbled some ideas, including a dinosaur, a rabbit, a mushroom and a turtle.   The Turtle won, even though it was still just a pencil drawing I could imagine it's cute little buttony eyes and it's cuddle-able shape.

So I got to work, cutting, sewing, stuffing, tweaking.... and this little chap was born.

The shell is sewn by hand and the limbs either by hand or machine.


If you would like to make one for yourself, then the step-by-step photos are over on the Hobbycraft Blog.

Thursday, 21 April 2016

The North Lakes Tattoo Convention


Every year I am a little bit envious when the North Lakes Tattoo Convention is on in Carlisle, this is because it is usually the same weekend as the Flame OFF, which is a convention for Glass Workers held in Uttoxeter, and we are usually away attending that show.

But this year it was on the weekend before.... so I just had to go didn't I?  Hubster isn't into tattoo - he obviously doesn't mind mine, or at least he says he doesn't!, but he is clear skinned all the way through.  So I went with more like-minded people  ;)

WAS NOT going to spend any money, after all the Flame Off was the following weekend.  WAS DEFINITELY NOT going to buy a tattoo.

So I watched as my sister Julie sat down for the most beautiful Peacock  (she wasn't going to have one either!).  I wanted it!  

I hate feathers, but there is something about Peacock feathers that are quite stunning I think.  I just wish they didn't flap them about so much.


Isn't it beautiful?

By now the buzz of the machines was calling, Shona and I were just wandering about looking at the amazing art work when I suddenly found myself leafing through Jason Corbetts design book.  Jason specialises in black work and dot work, and although all of my other tattoos (way too many to count) are very brightly colours, I felt drawn to his work.  After a chat about swirls and curls and paisley patterns, he agreed to tattoo me.  He free-handed a beautiful paisley dot work pattern on my arm, then got to work tattoing it on.


I love it.


Poor Shona was abandoned as Julie and I got tattooed, but once we were finished we decided that she should have something too, it wasn't fair for us two to have one and not her was it?   We found a great artist called Rich Pearson who had a pretty butterfly design.  Before long all three of us had decided to have similar butterflies.


Shona asked for something "not too girly" and Rich suggested a traditionally coloured style, in black and red.   Not a colour she would have gone for and initially she dismissed the idea, then changed her mind and went for it.  I had planned purple and teal as my colours, but after seeing how fabulous her colours looked I changed my mind and went for those traditional colours too.
Julie stuck with purple  :)

Shona's....

Julie's.....

Mine....

Now hang on, that's two tattoos for Julie, two for me, once for Shona.... she needed another  ;)  We are SUCH bad influences.
 I should say at this point, that Shona was already tattooed, in fact her number is twelve right now, so it wasn't a totally inappropriate suggestion, although her Granddad would say different.


She chose this gorgeous lady from Alex Bage, she had to wait a while to get a slot, but so worth it.


As well as tattoo artists there was stuff for sale, clothes, bags, jewellery etc....  I found a cute little stall to buy the other little girls in my life a little gift.  A fabulous unicorn dress for Hope.


And a tattoo design jacket for Ellie.


There is a tattoo convention in Blackpool in August.  I think we might be visiting  ;)

Wednesday, 20 April 2016

Beautiful things made by creative young people.

Last week I ran my usual school holiday activities for young people.

I do two different workshops, the younger ones are age 3-12 (ish) and last around 30-40 minutes, which is about right for concentration levels of the younger peeps.

The older sessions are from around 8-16 yr olds and last about 2 hours.  They really get to grips with an activity in these sessions and see it right through to the end.

This time on offer was..... Yarn Wrapped Wreaths.


Brooke came and made herself the most wonderful wreath.  She chose a lilac yarn with a complimenting air-force blue.  We then found some gorgeous lilac roses to match.  She looks pretty pleased with it, and rightly so!


The next session was bunting making, but using a sewing machine.  The young ladies had to first draw and cut their own pattern template, then choose the fabrics before cutting and sewing them all along the length of some cosgrain ribbon.


How beautiful are these bunting lengths?  I think there are some pretty bedrooms somewhere in Carlisle that are decorated by this gorgeous bunting.


French Knitting was the following session - do you remember French Knitting?  We used to call ours a "Knitting Nancy" when I was young  (A good while ago I can tell you!)

Just look at the concentration coming from these guys!  How lovely to see boys crafting and these two enjoy it lots as they come to most of my sessions.


Another little French Knitter, deep in thought. It's a tough decision deciding what colour yarn to have next you know.


I thought they might get as far as seeing their work pop out from the end of the knitting doll, but by the time the session was over they all had really good length tails.


Beaded Bangles came next, I thought a few more bangles might have been made but so much time was spent searching about in the bead box that productivity was low - although incredibly beautiful, with lots of patterns and pretty colour choices made.


And last, but not least, for this school holiday was Button Tree Canvasses.


First of all they painted a tree, then decorated it with loads of pretty coloured buttons.  Adding butterflies and flowers too.   Works of art they were.


Even though the ladies were presented with the same materials, the results were very different and equally impressive.


Thank you so much for coming if you did, the reason I put these sessions on is for people like you, so keep on crafting and I hope I will see you all soon!