Monday, 30 November 2015

Extending Baby James' blanket

Way back in May I made a baby blanket for my great-nephew James, you can find that post HERE.

This was the result.

But, as babies do, James grew, and consequently outgrew his blanket, so it needed to be made bigger.
 I unpicked the fluted fan edging and luckily found some of the same W.I Soft & Cuddly Yarn and just added more rounds in clusters of three Treble Crochets.

Round and round and round I went, six extra balls in total, until it was small bed size.


Hopefully this will last the little chap a good while longer now   :)

Saturday, 28 November 2015

The Mucky Ducky open evening

I was recently invited to an open evening of a quirky new establishment names The Mucky Ducky - now how is that for a superb name?

Situated in Corporation Road in Carlisle (near the Civic Centre), it is upstairs in a almost barn like building, full of character, raw bricks and wooden beams.  Very atmospheric.


There was an amazing spread laid on, of which we didn't participate as we had a table booked for dinner later on, but it did look delicious.  And of course a glass of bubbles, which we did participate in  :)


The sales offerings are quirky, vintage, or vintage style, and up-cycled, which is so "in" at the moment.  I will pause here and let you have a look around.....


Isn't that dresser above just divine?  I just wish I had room for that in my house, it really is beautiful.

If you would like to follow the going ons at The Mucky Duck, then you can find the Facebook page here...
www.facebook.com/TheMuckyDucky

Wednesday, 25 November 2015

Festive Rum Butter Recipe

Now that we’re heading into December it’s now acceptable to get in the festive spirit!

Personal touches are what makes Christmas so special, and so with this in mind, Wren Kitchens have asked a range of food, craft & interior bloggers to help them put together their #24DaysOfWren interactive advent calendar – which showcases a variety of Christmas inspiration behind each window! With everything from mince pies…to handmade nativity outfits it aims to get everyone in the festive spirit!  I was thrilled to be asked, so here is my Christmas offering.

RUM BUTTER.  Is there anything more perfect to spread on your toast on Christmas morning?  I think not.

Now, for those who do not know, there are two types of Rum Butter - Cumberland and Westmorland.

The Westmorland recipe requires the butter to be creamed into the sugar, whereas in the Cumberland recipe you melt the butter then stir it in.

So basically you need 1lb of soft brown sugar to half a pound of butter and a "glass" of rum.  My glass was rather large, but there's no point having a weak rum butter is there?  :)

Here is how you make it:

First, find a jar (or jars).  I picked this cute little hexagonal one from Hobbycraft.


Sterilize the jars by washing thoroughly in boiling water then popping in a hot oven to dry off. Don't forget to do the lids too.


Then, slug a generous splash (be quite generous, you do want to taste it) of Rum into the sugar and stir to mix.


Melt the butter.


Mix the butter into the sugar, this will take a little while as the sugar dissolves.  You will need a good beating arm.


When it is totally mixed through, leave it to cool for about half an hour, then go back and give it a really good beat.  At this point I use the electric mixer to make it a little easier.


It makes the Rum Butter creamier if you repeat this step - leave it for another half hour, then go back and beat it again.  You will see at this point that the colour changes and it becomes lighter.


I leave it another 15 minutes and give it another whisk to make it light and fluffy.

Next you need to pop it into the jars, I thought a spoon would be too tricky so I filled up a piping bag and piped it in.


(Lots of little jars all full to the brim with delicious Rum Butter)


To give as gift I added a little material circle to make the lid prettier, and an ingredient label.


If you want to see the rest of the crafty Advent calender, then please visit:  http://www.wrenkitchens.com/blog/24-days-of-wren/

Tuesday, 24 November 2015

My yarn patterns are now on Ravelry

Yep, just as it says in the title, I have now put most of my yarn patterns and tutorials on Ravelry.


What is Ravelry, I hear you ask?

Well, it is a community for knitters, crocheters, weavers, spinners - all kinds of yarn loving people.

You can search for patterns, to buy or for free, you can put amounts of yarn that you have in the search box and it will give you patterns for that amount.  It's all very clever.

You can add friends, and join groups.  There is so much to learn and I have to admit it is a little overwhelming at first.  I am still only 10% there myself right now!  But, I am trying to learn a little bit more about finding my way around every day.

You do need to sign up for an account, but it is free.  And I promise, once you get into it, it will always be your first call for pattern searches   :)

Anyway, this is me. Pop off and download some patterns if you like  :)

http://www.ravelry.com/people/Soozintheshed

Sunday, 22 November 2015

Crazy Chick Crochet Shelf Sitter - free tutorial


Crazy Chick is a cute 'shelf sitter.  Textured yarn can be a little challenging to work with, but stick with it, the result is worth it.  It is made on a smaller hook than usual to make it a more solid texture.

You will need:
 50g Fancy Textured Yarn
  Yellow Yarn
  Coloured Yarn
  4mm Crochet Hook
  Sewing up needles
  Thread
  Stuffing
  Felt
Googly Eyes (the sew on kind)


Stitches explained:

Chain Stitch (CH) - Yarn around hook (from the back) and pull the new yarn through the loop on your hook.  This is ONE chain.  Repeat as needed.
Double Crochet (DC) - Put hook through work, draw yarn back through (2 loops on hook) yarn around hook (from the back) draw yarn through the 2 loops on the hook.
Half Treble Crochet (HTR)- Yarn around hook (from the back) put hook through work and draw yarn back through (3 loops on hook) yarn around hook, draw through 2 loops on hook, yarn around hook, draw through 2 loops on hook.
Treble Crochet (TR) - Yarn around hook (from the back) put hook through work and draw yarn back through (3 loops on hook) yarn around hook, draw through 2 loops on hook, yarn around hook, draw through 2 loops on hook.
Double Treble Crochet (DTR) - Yarn around hook TWICE (from the back) put hook through work and draw yarn back through (4 loops on hook) yarn around hook, draw through 2 loops on hook, yarn around hook, draw through 2 loops on hook, draw through 2 loops on hook.

Slip Stitch (SS) - Put hook through work, draw yarn back through work and the stitch on your hook.


Body. Using the fancy  yarn, start with a slip knot then make 2 chain stitches. 
From here you will be working into the 2nd chain from the hook as shown by the thinner hook in the photo.

 Row 1. So, into that stitch work 6 x DC's, then SS into the first stitch to join into a ring. (6 stitches)

Row 2. Chain 2, then DC into the SAME stitch.  Then make 2 x DC's into EACH following stitch, SS to join into first stitch.  (12 stitches)

Row 3. Chain 2, then DC into the SAME stitch.  Then make 2 x DC's into EACH following stitch, SS to join into first stitch.  (24 stitches)
Row 4. Chain 2, then DC into the next stitch.  Make 2 x DC's into the NEXT stitch, *then a single DC into the next TWO stitches, followed by 2 x DC's into the NEXT stitch*  repeat from * to * all the way round.  (you will end on a 2 x DC into the same stitch)  (32 stitches)
Row 5. Chain 2, then a single DC into the next 2 stitches.  Make 2 x DC's into the NEXT stitch, *then a single DC into the next THREE stitches, followed by 2 x DC's into the NEXT stitch*  repeat from * to * all the way round.  (you will end on a 2 x DC into the same stitch)  (40 stitches)
Rows 6-16. Work 11 rows in straight rounds without increasing.  Each row should have 40 stitches.
Row 17.  Chain 2, then DC into the next two stitches.  Miss a stitch and DC into the next.
* DC 3, then miss a stitch and DC into the next Repeat from * to * all the way round.  (32 stitches)
Row 18.  Chain 2, then DC into the next stitch.  Miss a stitch and DC into the next.  * DC 2, then miss a stitch and DC into the next Repeat from * to * all the way round.  (24 stitches)
Row 19.  Chain 2,  * miss a stitch and DC into the next.  Repeat from * (12 stitches)
Row 20. Stuff your work firmly before working this next part.  Working in rounds, miss a stitch then DC in the next, round and round until the hole is closed.   Break of your thread and sew the hole securely with the tail.
Wings.  (Make 2)
CH 10 with the pink yarn.
Row 1. DC into the 2nd CH from the hook and in the next TWO stitches.  Work a HTR into the next THREE then a TR into the next TWO.  Into the last stitch work - 3TR / 3DTR / 3TR  (all in the same stitch)
Instead of working back down the row now we are going to turn and  work back down the foundation chain so it makes it into a spine almost.
Work a TR into the next TWO stitches, then a HTR into the next THREE, followed by a DC into the next TWO and finally SS into the first stitch to join.
Row 2. CH2 and DC into the same and the following FOUR stitches, work a HTR into the next FIVE stitches, then 2 x TR's into the next.  Put 3 x TR's into each of the next THREE stitches followed by 2 x TR's into the next.  Put a HTR into each of the next FIVE stitches, followed by a DC into the final FIVE stitches. SS to join.
Feet.  (Make 2)
CH 5 with the pink yarn.
Row 1. DC into the 2nd CH from the hook then work a HTR into the next , then a TR into the next.  Into the last stitch work  6 x TR's (all in the same stitch)
Instead of working back down the row now we are going to turn and  work back down the foundation chain so it makes it into a spine almost.
Work a TR into the next stitch, then a HTR into the next, followed by a DC into the next TWO and finally SS into the first stitch to join.
Row 2. CH2 and DC into the same and the following TWO stitches, work a HTR into the next TWO stitches.  Put 3 x TR's into each of the next THREE stitches followed by a HTR into the next TWO then a DC into the next THREE.  SS to join.  Leave a long enough thread to use for sewing to the legs.
Legs.  (Make 2)
CH 20 with the yellow yarn.
Work 2 x DC's into the second chain from the hook, then 2 x DC's  in every CH across. It will start to curl.  Cut the yarn leaving a long tail to sew with.
Attach the foot to the bottom.
Assembly.
Sew the wings to the side of the body.
Attach the legs to the underside  (the feet will turn, but that's part of the charm)
Sew on the googly eyes, cut a triangle out of the felt and tack along the top at the same time.
Display your Chick with pride!

www.soozintheshed.co.uk

Saturday, 14 November 2015

Poncho + Blanket = Ponchet (Crochet Tutorial)

A while ago I sent a very cheeky Tweet to DMC Creative, asking for a hand-out of their lovely Natura XL yarn to do a big project with.   I had already had a few balls of this to review - find that review HERE - and I fell in love with it.
The yarn is 100% cotton, so so soft and beautiful to handle, so obviously I wanted to do something else with it.  A blanket!


Nothing done by halves in this Shed.

I made an agreement with DMC that I could have the yarn to create the pattern, as long as it was featured on the Hobbycraft blog, as other patterns of mine have been in the past.   So off I popped to check that would be ok  (well, actually, I fired an email off, but you get what I mean).  Hobbycraft wanted to tweak my blanket idea into something "wearable" like a poncho, or a cardi.  I was still set on my blanket.

Time for a little bit of compromise then.  How about a blanket you can wear?

And the Ponchet idea was born.  A totally useable blanket, with a removable panel which leaves a head sided hole so it can be worn.  Perfect for festivals and camping.


So, you can sit on it......


Or wear it.

You can wear it square on....


Points down....


Or with the removable square as added detail...


Whatever you choose    :)

If you fancy making one for yourself, then you can find a step-by-step photographic tutorial on the Hobbycraft blog.  Enjoy   :)  (and do send me a photo if you do one)

http://blog.hobbycraft.co.uk/blanket-poncho-crochet-pattern/

Thursday, 12 November 2015

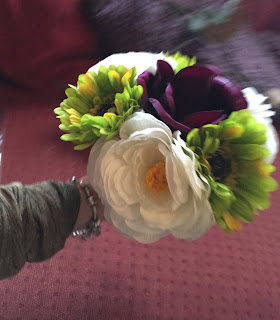
A wedding posy / bouquet

My daughter and her partner got married recently, and I offered to make the bouquet.

Now, this was, on reflection, a bit silly, considering I had never made one ever before and didn't really have a clue where to start.   But, it can't be that hard?  right?

Well, it was a little bit.  Holding all the stems together while I bound them with wire, then having to cover the whole handly bit in ribbon that just wouldn't stick.  I had glue and petals everywhere!!


The bouquet was a secret until the big day as it matched the buttonholes, which the bride was not allowed to see.

I used lime green gerberas as what was the buttonholes, and added a dark purple rose along with some white flower - no idea what they are as my knowledge of gardening is well below par.  I only know what a gerbera is as I had to re-order some more so learnt the name  :)


I whipped all the stems together with a jewellery wire, then wrapped the handle in a gorgeous iridescent ribbon.


It went down well.  Phew!!   And I have to admit, I was pretty pleased with my efforts too  :)


Wednesday, 4 November 2015

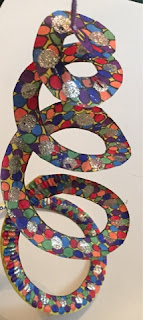
How to make a Curly Wurly Snake Plate


with winter looming and the weather looking decidedly dodgy, you may be wondering what activities you can do with the young 'uns.  Well, how about this for a cheap and cheerful craft?  I am sure you remember making them at school, but it is always nice to have an update and a reminder on how to do things, so here one is   :)

This is a well priced craft as you can buy packs of paper plates for as little as £1.00, all you need on top of that is a pack of colouring pencils or felt tips, and maybe some other bits like tissue paper, glitter, stickers etc....

So, grab a paper plate and draw a spiral on it. staring at one edge, then using the rim as a guide before evenly drawing around to the centre.  Stop at a good point so that the middle looks like a snake head.


Next you can draw some kind of pattern if you like, or just freehand from here on in.  I chose circles for this one as you don't have to be too neat, but it looks quite good when finished.


Start to colour in your pattern....


Building up the colours slowly  (which takes more time, which means more concentration and tired nippers at the end ; ) )


Then you can use your finger to blob some dots of glue all over and sprinkle with glitter - if you so desire.


When your plate is totally dry, using some scissors  (and maybe an adult if the kid's are quite young) carefully cut around the original spiral mark you made, all the way to the centre.


With a hole punch, or the end of the scissors, make a hole in the 'nose' and thread through some yarn for hanging.


Then shake it out and you have a curly, wurly hanging snake.


If you have older children, you can get them to draw more ornate patterns, like scales.