I recently made some cute padded letters for Granddaughter Hope to hang in her bedroom.
They are so easy to do and take barely any time at all.
You simply draw your letter on a piece of fabric with a heat-sensitive pen (which means when you iron it the ink disappears) then sandwich some wadding in-between two pieces of fabric, with the drawn on one on top.
With a sewing machine, or even by hand if you wish, sew around the letter you drew.
Then take some pinking sheers and leaving about 5mm around the stitching, cut carefully around the letter.
See? Simples!
Now to do some for Granddaughter Ellie. :)
Wednesday, 29 March 2017
Friday, 24 March 2017
Juicy Lemon 'n' Lime Crochet Baby Blanket
I was commissioned to do a baby blanket. I love commissions off this lady as she is always more than happy to step away from the traditional blue & pink stuff and gives me something interesting to do.
She wanted something pastel, colourful but neutral so I suggested this lovely lemon & lime coloured Baby Print yarn from Hobbycraft.
Teamed with a ball of white to break it up - although having made it I don't think the white was required at all, it blends in like it looks like it is part of the ball.
And so a lovely, soft, gender neutral baby blanket was made. Big enough to use in a pram, car seat and later on, a cot.
Thursday, 16 March 2017
Mandala Art Class
Here in The Shed we have ran a couple of Mandala Art classes.
As I have freely admitted previously, I don't do art, so I work with Marie Lawrence who delivers the class in The Shed for me.
These seem really popular, and the best bit is, you don't need to be an artist to create these fabulous pieces of work.
Marie takes people through the design part step-by-step, and they get to practise shapes and patterns on paper before moving onto the canvas. She brings loads of inspirational pieces with her for people to use within their own work.
And you truly don't need to be an artist before you attend, just look at the work produced.
If you fancy this class, then keep an eye on the website for the next one coming soon.....
www.soozintheshed.co.uk/store/
As I have freely admitted previously, I don't do art, so I work with Marie Lawrence who delivers the class in The Shed for me.
These seem really popular, and the best bit is, you don't need to be an artist to create these fabulous pieces of work.
Marie takes people through the design part step-by-step, and they get to practise shapes and patterns on paper before moving onto the canvas. She brings loads of inspirational pieces with her for people to use within their own work.
And you truly don't need to be an artist before you attend, just look at the work produced.
www.soozintheshed.co.uk/store/
Monday, 13 March 2017
Quilting Exhibition at Rheged
I was lucky enough to receive an invitation to the opening of the Quilting Exhibition at Rheged, Penrith, Cumbria.
Now, I have done a little bit of random quilting in my time, just basic stuff, but enjoyable none-the-less, but this exhibition has given me so much inspiration and the urge to do more as soon as I can!
I must apologise for my rubbishy photos, the lighting in the exhibition played havoc with my phone camera - but it's a really good reason for you to go and view the marvellous quilts yourself.
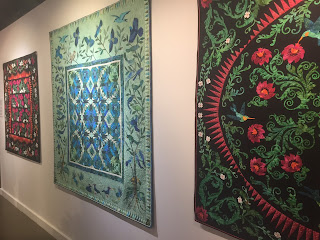
In the meantime have a look at these beauties.
Just how much detail can you put in a quilt? Amazing.
This one caught my eye, it is a giant shirt made up from collars, cuffs, pockets and yokes of old shirts, held together with threads. Very cleverly done.
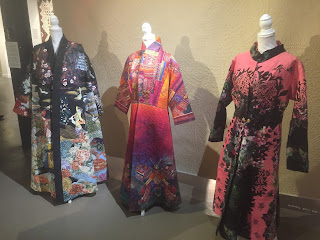
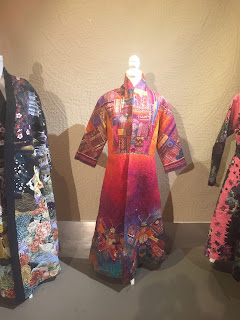
I particularly loved these quilted coats. At £6,000 they were a little beyond my budget - but I would have had the rainbow one in the centre. Alas, it was not for sale that one, so my decision was made for me :)
Would you even believe these scenes were actually quilts? No, me neither! Such precision.
These pebble and beach scene pieces really caught my attention too, I just love the formation of the pebbles out of the fabric (then painted with fabric paint). You were not allowed to touch the quilts, but if we were, this would be the one I would want to feel. It looks so tactile.
How unusual is this clock piece? It was very detailed and you need to get up close to see all the marvellous beauty and intricate work.
These pieces are a collaboration of two crafts, a woodwork frame with quilted pieces within. Very clever.
This piece is fabulous, the ultimate in up-cycling. It is a mattress cloth that the artist picked up from a car boot sale. She then embroidered a poem all over the lines, it was really quite poignant and thought provoking.
Last but not least, a bit of quilting fun, with a nod to the Cumberland Wrestlers with padded, quilted pants and embroidered vests.
There was loads more than I managed to photograph, including a private collection of very, very old quilts in amazing condition.
If you are near by, do go and visit and see these beautiful pieces for yourself. The exhibition runs until Sun 23rd April, and you can find more details here... https://www.rheged.com/event/new-quilting/
Now, I have done a little bit of random quilting in my time, just basic stuff, but enjoyable none-the-less, but this exhibition has given me so much inspiration and the urge to do more as soon as I can!
I must apologise for my rubbishy photos, the lighting in the exhibition played havoc with my phone camera - but it's a really good reason for you to go and view the marvellous quilts yourself.
In the meantime have a look at these beauties.
Just how much detail can you put in a quilt? Amazing.
This one caught my eye, it is a giant shirt made up from collars, cuffs, pockets and yokes of old shirts, held together with threads. Very cleverly done.
I particularly loved these quilted coats. At £6,000 they were a little beyond my budget - but I would have had the rainbow one in the centre. Alas, it was not for sale that one, so my decision was made for me :)
I even got to "meet the maker", the lovely Marijke van Welzen, who was modelling her own work :)
Would you even believe these scenes were actually quilts? No, me neither! Such precision.
These pebble and beach scene pieces really caught my attention too, I just love the formation of the pebbles out of the fabric (then painted with fabric paint). You were not allowed to touch the quilts, but if we were, this would be the one I would want to feel. It looks so tactile.
How unusual is this clock piece? It was very detailed and you need to get up close to see all the marvellous beauty and intricate work.
These pieces are a collaboration of two crafts, a woodwork frame with quilted pieces within. Very clever.
Last but not least, a bit of quilting fun, with a nod to the Cumberland Wrestlers with padded, quilted pants and embroidered vests.
There was loads more than I managed to photograph, including a private collection of very, very old quilts in amazing condition.
If you are near by, do go and visit and see these beautiful pieces for yourself. The exhibition runs until Sun 23rd April, and you can find more details here... https://www.rheged.com/event/new-quilting/
Sunday, 12 March 2017
I'm sorry for not Blogging much
I have been pretty absent from the Blogging scene for a few months.
I have been so busy setting up the new workshop, putting classes on, designing new classes, working on the new web site.... blah blah, you know how it is!
But a few people have messaged me to ask where my ramblings are, so I guess some folk are missing the random chat.
All I can say is.....
And I promise to make a bit more of an effort and let all you blog followers know what is happening in The Shed (and there is plenty of it, I can tell you :) )
Birthday Parties in The Shed
One of the things I offer in my new workshop is Craft Parties. Birthday Parties, Hen Parties, Baby Showers, Retirement Parties and more...
Last week I had my first two Birthday Parties for youngsters.
I cater for up to 12 children from age 8 (the birthday child can be 8, meaning some of the friends might be 7) but as a special favour for a friend I did a party for Ava age 6.
Ava wanted a Troll Party, so everything was Troll themed.
First we made some decoupaged rainbow houses for a little Troll to live in.
I was so busy that I completely forgot to take photos of all the fabulous little Troll houses, but they were great.
Then after some party food provided by Grandma and a fabulous Troll cake....
... we went on to make some Troll Hats. Again I forgot photos, but the hats were fab, fleece strips glued onto a cardboard cone and decorated.
Lots of little girls (and a couple of boys) went away quite happy with their makes.
And just two days later another party happened. This time it was for Izzy, who turned eight.
The theme this time was fairy gardens.
We started by painting Toadstools, which could be for little birds to feed, or of course Fairies to hide in.
They were painted beautifully in fabulous metallic colours.
After food, again brought to the event in party boxes, they went on to do some scratch-art magnets in the shape of fairies (and a cat for the young man).
The more black you scratch off with these magnets, the more colour you reveal. There was some lovely patterns here..
If you fancy a party for your youngster, we cater to all budgets and themes (if we can!)
Just contact us :)
www.soozintheshed.co.uk/childrens_parties.htm
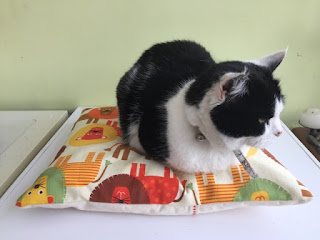
A sitting cushion for Milly the Cat
I used to spend a small fortune on beds for my cats, but will they sleep in them? No, they will not! We leave the beds in the places that the cat lies to sleep - but instead of using the bed, they just find somewhere else to sleep.
But, after making a huge bean-bag - which you can find HERE - I had a few 'beans' left over. I didn't want to waste them, or bin them, but equally I didn't want to store them. So, I thought, I would make a mini bean bag, for a cat.
And do you know? She likes it!! I was quite surprised.
So, first of all I decided on a size 40cm x 40cm, I took some calico and cut a simple rectangle measuring 42cm x 64cm.
I cut it in half so each piece measured 42cm x 32cm and hemmed and stitched one long side only - I used a red thread and a fancy stitch on my sewing machine, just because.
I then took some thick curtain fabric with cartoon lions on - well cats for cats and all that - and cut it at 42cm x 42cm.
With the right side of the Lion fabric facing up, I laid one piece of calico (facing down) on top with the raw edges matching and the sewn edge facing the centre.
Then I laid the second piece on top of that - also facing down.
A quick sew all the way around, trim the corners, turn the right way in and Voila! You have a bean bag cushion cover.
Just make a basic bean bag pouch, measuring 40cm square, out of some sheeting, fill it with beans and pop it inside.
I still can't get over the fact that Milly actually uses this cushion - maybe because she thinks it isn't really hers?
Subscribe to:
Comments (Atom)


